In the closing chapters of our Object-Oriented Programming series, we will take a look at some more advanced concepts, focusing on interfaces (the programmatic kind).
This may be the final installment, but we’ll be splitting the content into two parts. In this part, we’ll get an introduction to interfaces, and begin to use them in small projects. In the next part, interfaces will play a key role in a bigger, more practical application: a simple drawing program.
(There Is No) Final Result Preview
The projects that we’ll be working on are many and small. The functionality contained therein is purposely kept to a minimum, so as to focus on the concepts and not get lost in programmatic details.
If you’re jumping into this series at this article, I recommend that you make sure you’re up to speed with the rest of the concepts introduced in not only the previous Object-Oriented Programming tutorials, but the core concepts of the rest of the AS3 101 series. This material is not exactly for the faint of heart, but if you feel confident you know that other material well, you won’t have any problems. Just stick with me, and you’ll learn a few things.
Step 1: The Interface
You won’t be begrudged for thinking that, when I mention the “interface”, I’m talking about the UI of a program, on-screen. And while that is, indeed, an interface, we’re here to discuss a more advanced Object-Oriented topic of the same name.
Imagine, if you will, a music studio, with lots of electronic gear (for our purposes, the more discrete pieces of equipment the better; note of this all-in-the-computer-box music stuff).

Photo from Flickr user The Cowshed and is distributed under a Creative Commons Attribution-NoDerivs 2.0 Generic license
In the end, all of these disparate noise makers need to get routed to the noise recorders, and then the recording gets played back and recorded as a mix. A lot of audio needs to get from point A to point B to point C, with lots of points in between.
Now, as you probably know, sound – in electronic form – travels from one point to another via a cable. Plug one end of the cable into the thing producing sound, and the other end of the cable into the thing receiving the sound, and you have a signal.
Imagine how difficult this would be if each musical equipment manufacturer created its own type of plug for the cables. You’d be stuck with only equipment from a single manufacturer, or possibly with several dozen adapters lying around to connect these incompatible inputs and outputs.
Fortunately, there are a few standards to which all manufacturers adhere. This is a bit of a gross simplification, but nearly all audio jacks you’ll find in a music studio will be one of two kinds: XLR or quarter-inch (audiophiles, let’s ignore impedance and balancing, as well as other jacks like RCA). Thankfully, with only two types of cable, and the occasional adapter, you can connect virtually any piece of audio gear to any other.
The way in which a piece of gear connects to the rest of the world is its interface. In a generic sense, you can see how this applies to user interfaces, as well – it’s how the software connects to the outside world (i.e., the user). But the audio interface for a mixer or keyboard is that piece of gear’s particular capabilities for input and output using which kind of plug.

Photo from Flickr user The Cowshed and is distributed under a Creative Commons Attribution-NoDerivs 2.0 Generic license
Step 2: Bringing It Back to Programming
In the same way as audio equipment, the interface of an object is the way in which it connects to the outside world. Now, “connect” is probably not the best word to use. Let’s use “makes itself available” instead.
All objects will have an interface, whether you think about it or not. You can think of the interface to an object as all of the public methods and properties belonging to that object. Put another way, the interface of an object is the stuff you can do to that object.
So when you write a class, and define four public methods, three private methods, and two protected methods in it, the interface to the objects is made up of the four public methods.
You have probably heard of the acronym “API”. It’s quite the rage these days in the form of web service APIs, such as the Flickr API or the Google Maps API. API stands for “Application Programming Interface.” In this sense, the interface is the set of methods you can call on the web service, defining not only the name of the methods, but the parameters you can send to it and the type of data that will be returned.
Step 3: Implementations
Let me pause briefly and bring up encapsulation again (one of the core principles of Object-Oriented Programming – see the first part of the OOP series for more information). Note that the interface is not made up of private, protected, or internal methods and properties. Those members are hidden away from the outside world, vis-a-vis, not part of the interface.
Similarly, it’s important to understand a subtle distinction between the interface, as seen from the outside world, and the implementation. That is, the interface defines the method signature (a method signature denotes the method name, its arguments and type, and the return type), like this: function publicMethod(arg1:String):Boolean. However, what actually goes on inside of the method is not the concern of the interface. That’s up to the implementation.
If you were enjoying the audio equipment analogy, you can think of this differentiation between interface and implementation as the difference between putting a 1/4-inch jack on a piece of gear, and the components and quality of material put into that jack. Not all 1/4-inch jacks are created equal; some are gold-plated while others are nickel-plated. Some will have high-quality wires soldered to it, others will be molded directly onto a circuit board. The implementation (materials and method of construction) is not under the jurisdiction of the interface (a jack that is 1/4-inch wide).
If you weren’t enjoying the audio equipment analogy, I apologize for bringing it up again.
Step 4: Interfaces in Code
As it happens, I’m not bringing up all of this just to tell you that your objects already have an interface. That’s important to realize, but what we’re after right now is another Object-Oriented Programming concept known as the interface. You can actually define an interface without defining the implementation. If you think about it, this is inherently what the interface is about. The interface merely defines what you can do with something, not how things get done.
Confused yet? If not, you’re not thinking about it hard enough! Just teasing, but I do not expect this to make complete sense at this point. Let’s move on to a simple, perhaps useless, but definitely hands-on example.
Step 5: Writing an Interface
Let’s crack open Flash and the text editor of your choice, and try our hand at creating an interface. Before we can really begin, create a folder on your computer in which to house this mini-project. It’ll just be tidier to have a dedicated project folder. All files that we create in this step will be saved in this folder.
Now, create a new .as file. I’ll assume you’re using an editor that doesn’t have much in the way of templates, but if you’re using Flash Builder, you can get most of this by choosing “ActionScript Interface” from the new file menu. And of course, many other editors have templates (even Flash CS5 has an ActionScript 3.0 Interface template). But it’s good to learn the nuts and bolts of these templates.
Save your file as “ITest.as” in the project folder. It’s not required, but it’s common practice to name your interfaces following the convention of naming classes (i.e., capital first letter, camel-case after that), with the addition of an “I” at the front. The “I” indicates that the datatype is an interface, rather than a regular class. Flash will happily work with interfaces that are named without the leading “I” but it’s a convention that you’ll find handy for your own projects, as well as useful when looking at other developers’ classes and interfaces.
Now, enter the following boiler plate code:
package {
    public interface ITest {

    }
}
You’ve just written an interface (one that doesn’t define much, but still). Note that if we wanted to utilize a package structure, we’d spell it out after the package keyword just like in classes. And except for the use of interface, the definition is identical to a class definition. However, note that we don’t put in a constructor. The constructor is a special method, and isn’t really part of an interface. Any other method, though, we can define in the interface, and we’ll do that next. Add the highlighted line to your interface file:
package {
    public interface ITest {
        function test():void;
    }
}
Now, we’ve declared that the ITest interface has one public method. It’s called test, takes no arguments, and returns nothing. What does it do? The interface isn’t terribly concerned with that. What it does will be up to the concrete implementation. Notice that the method signature ends with a semi-colon, and not curly braces.
Also notice the lack of public or private or anything in front of the function. The exceptionally quick-witted will recall that omitting the access modifier in a class will default to internal. Since interfaces define public methods only, the default is public. In fact, even trying to specify public will cause errors.
Save your file, and your interface is now usable. We’ll use it in just a moment.
Step 6: But First, a Quick Summary
To put the previous hands-on instruction into theory, the mechanics of an interface in OOP is rather similar to a class:
- An interface is defined in its own text (.as) file, just like a class.
- The boiler plate code is nearly identical to that of a class file; you use pacakges and imports as needed.
- The name of the interface must be the same as the base name of the file.
- The interface is a datatype, just like a class.
There are, as you’d expect, differences. The biggest difference is this:
Interfaces do not have any functionality.
There are other differences, some of which we haven’t touched on yet:
- In the boiler plate, you use the keyword
interfaceinstead ofclass - You can define public methods only
- This does include implicit setters and getters — e.g.,
function get someString():String - This does not include private, protected, or internal methods.
- This does not include properties of any kind.
- This does include implicit setters and getters — e.g.,
- When defining these public methods, you do not use the
publickeyword.- Not only is
publicassumed, it’s actually non-compilable code to use that keyword in the method signature.
- Not only is
- Seeing as how there is no functionality, you end the method declaration with a semi-colon, and omit the curly braces that normally
wrap around the method implementation.
Step 7: Implementing an Interface
It’s not enough to simply define an interface; the interface needs to be implemented in order to be useful. What implements an interface? A class, naturally. Any class you write can technically implement any interface you choose. We’ll take a look at how this works in this step.
This class is often called the “implementation” when referred to in relation to the interface. It may also be called a “concrete” class; as in, it’s something “solid” and “real” as opposed to the non-functional interface.
Create a new text file called “TestImplementation.as” and save it into the project folder. It will be a class, so add the following basic class skeleton:
package {
    public class TestImplementation {
        public function TestImplementation() {
        }
    }
}
So far, nothing new or even exciting. It’s just a class. It has no connection to the ITest interface we created in the last step. But obviously we want to utilize that interface, so here’s what we need to do: add implements ITest after the class name:
package {
    public class TestImplementation implements ITest {
        public function TestImplementation() {
        }
    }
}
With this addition, we have now declared that our class TestImplementation will implement the ITest interface. But all we’ve done is declare that intention. We need to actually do the implementing. Add the test method declared by ITest to our TestImplementation class:
package {
public class TestImplementation implements ITest {
public function TestImplementation() {
}
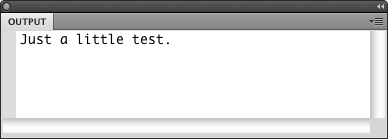
public function test():void {
trace("Just a little test.");
}
}
}
At this point, our class now fully implements the ITest interface. Our next step is to see this class in action.
Step 8: Testing the Interface and Implementation
Create an ActionScript 3.0 Flash file (File > New > ActionScript 3.0), and save it as “first-interface.fla” in your project folder.
Create one more text file, called “Main.as”, in your project folder. This will be our document class. Before writing the contents of the class, hop back to your Flash file and enter “Main” as the Document Class in the Properties panel for the document.
Now, in Main.as, enter the following:
package {
    import flash.display.Sprite;

    public class Main extends Sprite {
        public function Main() {
            var tester:TestImplementation = new TestImplementation();
            tester.test();
        }
    }
}
This is an unsurprising usage of our TestImplementation class. We create a new instance of it, then call a method on it, resulting in a trace in the Output panel.
This finished project is available in the download package in the “first-interface” folder.
Now, let’s explore the relationship between interface and implementation.
Step 9: The Contract
When you write implements in your class file, it’s like you’re signing a contract with Flash, agreeing to fully implement each method defined in the interface file. When Flash sees that implements keyword, it will do quite a bit to ensure that you do, in fact, implement the interface.
Let’s start with some modifications to the interface. Open up ITest.as and, first, let’s add a method to it:
package {
    public interface ITest {
        function test():void;
        function anotherTest():void;
    }
}
When we make this change, we’re saying that any implementations of this interface must define these two methods. But, before we do that, go ahead an test the movie right now. You should see that we get compiler errors:
[...]/TestImplementation.as, Line 2 1044: Interface method anotherTest in namespace ITest not implemented by class TestImplementation.
That error says, in rather stilted computer jargon, that we have failed to uphold the contract that we’ve entered. We said we’d implement the ITest interface, yet we never implemented the anotherTest method.
Let’s try to fix that problem. Back in TestImplementation.as, add the method in question, but we’ll deliberately make a mistake for illustrative purposes:
package {
    public class TestImplementation implements ITest {
        public function TestImplementation() {
        }

        public function test():void {
            trace("Just a little test.");
        }

        public function anotherTest(input:String):void {
            trace("Another test: " + input);
        }
    }
}
If you run the movie now, you’ll get a different compiler error. That means that we’ve solved the previous error at least, but not to the satisfaction of the Flash compiler. It is now complaining that:
[...]/TestImplementation.as, Line 2 1144: Interface method anotherTest in namespace ITest is implemented with an incompatible signature in class TestImplementation.
This is due to the use of the input argument in our implementation of the anotherTest method. It’s not declared in the interface, therefore we have an “incompatible signature.” If you clean that up:
public function anotherTest():void {
    trace("Another test");
}
You’ll see that we can now compile successfully. The lesson here is that interfaces are rather strict. Once you say you’ll implement one, you’re bound by that contract to implement each method exactly as declared by the interface. Not doing so means your SWF will not run due to compiler errors.
Step 10: The Limits of the Contract
[...]
Read more: AS3 101: OOP – Introduction to Interfaces
No comments:
Post a Comment