Showing posts with label mobile. Show all posts

Thursday, December 13, 2012

Creating a Custom Virtual Keyboard

Although AIR for iOS offers access to the iOS virtual keyboard, you have limited control over the type of keyboard that appears. If you want additional keyboard configurations within your Flash project then you’ll need to build your own custom keyboard component. Although this will require some development effort it will allow you to tailor the user experience. For certain apps such as games, you may actually find a custom keyboard is the preferred option, as it will better fit your visual design.
Let’s see how to create one using Flash.
Flash iOS Apps CookbookThis tutorial is a previously unreleased recipe from Flash iOS Apps Cookbook and supplements the content found in Chapter 7, Working with Text and the Virtual Keyboard.
Flash iOS Apps Cookbook provides the recipes required to build native iOS apps using your existing knowledge of the Flash platform. Whether you want to create something new or simply convert an existing Flash project, the relevant steps and techniques are covered, helping you achieve your goal.

Getting Ready

An FLA has been provided as a starting point.
Download this recipe’s accompanying source bundle and open chapter7/recipe8/recipe.fla into Flash Professional.
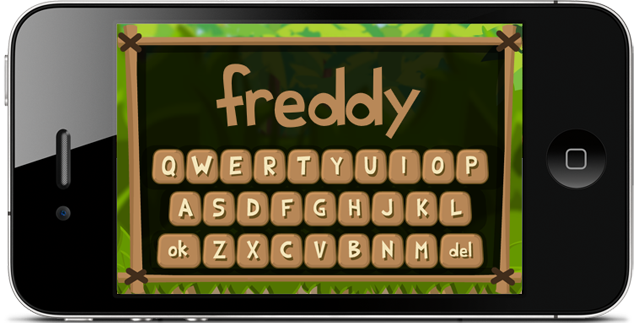
The visuals for this application have already been created. Sitting on the stage is a virtual keyboard and a dynamic text field. The text field will be used to output what the user types.
The dynamic text field has been named field while the movie clip instance that represents the virtual keyboard has been named keyboard.

Entering a player's name with a custom virtual keyboard.
With the Selection tool (V) selected, double-click on the keyboard instance to examine its timeline. The keyboard contains 28 keys – 26 for the letters of the alphabet, an ok key for when the user is finished typing, and a del key to delete a character. You’ll find that each alphabetic key is represented by its own movie clip and that the instances are named a_key to z_key. This naming convention makes it easy to determine the letter that a key represents by simply examining the first character of its instance name. The remaining two keys have instance names of ok_key and del_key. Additionally there’s a movie clip named surface that sits beneath the keys and represents the keyboard’s body.
Double-click on any one of the keys to examine its timeline. Each is represented by two frames, where the second frame will be shown when the key is being pressed. The movie clip symbol for each key is linked to a class named Button, which was introduced in the Handling user interaction recipe from Chapter 4. Open Button.as and familiarize yourself with the code.

How to do it…

Perform the following steps.
From Flash, select File | New and create a new ActionScript 3.0 class. Name it VirtualKeyboard.
  • Add the following ActionScript to the class:
    [...]
    Read more: Creating a Custom Virtual Keyboard
  • Friday, October 19, 2012

    Stage3D compressed textures – Introducing the ATF SDK

    We introduced Stage3D last year and the momentum behind has never stopped growing but there is one area we did not give all the details. The ATF file format, it is mentioned here and there, so what's up with this? Some of you may have seen it in the documentation for Stage3D referred as the compressed texture file format, but we never shared any tools to create those famous ATF textures.
    Before we package the ATF tools with the AIR SDK, I am happy to share here in advance the ATF tools so that you guys can start leveraging the ATF format now!
    So what is it?
    First, let's start by talking about what compressed textures are.
    When doing GPU programming with any technology, you have two options for how you handle your textures. You can go compressed or uncompressed, very simple. So, what is the difference?
    1. When using uncompressed textures, a good old uncompressed file format like PNG is used and uploaded to the GPU.
    2. Because GPUs don't support such a file format natively, your texture is actually stored in CPU memory, when it could actually be stored on the GPU memory!
    3. Same thing applies for JPEG images, make no mistake, graphics chipsets don't know anything about JPEG which would also be decoded on CPU memory.
    4. Of course, each platform has different support for compressed textures depending on the hardware chipset being used.
    Now get ready for the fun! Here is below a little table to illustrate it:

    PlatformFormat
    ImgTech (iOS)PVRTC
    Qualcom (Android)ETC1
    Mali (Android)ETC1
    NVidia (Android)ETC1/DXT1/DXT5
    Android (PowerVR)PVRTC/ETC1
    WindowsDXT1/DXT5
    MacOSDXT1/DXT5


    Why ATF?
    As you can imagine, if you would develop a game targeting iOS, Android and desktop, you would need to supply your textures compressed to each format for each platform. Which would look like this:
    1. leaf.png encoded to DXT for Windows and MacOS
    2. leaf.png encoded to ETC1 or DXT for Android (Nvidia)
    3. leaf.png encoded to PVRTC for iOS (ImgTech)
    Of course it is a pain to provide all the different versions of the textures, detect at runtime which platform you are running on and upload the corresponding texture. Wouldn't it be cool if you could just rely on one single container, that would wrap all the textures for each platform and Flash Player or AIR would extract automatically the texture required depending on the platform? So here comes ATF.
    The ATF internals
    Really, think about the ATF format as a container for lossy images. Here is below a little figure showing very sinply the structure of a default compressed ATF file:
    Read more: Stage3D compressed textures – Introducing the ATF SDK

    Wednesday, June 20, 2012

    Adobe Shadow Labs Release 3

    Last week the Shadow team hit another milestone: Release number 3. You can go to Adobe Labs and get the latest version and to the application stores (iTunes Store, Google Play, Android Market, and Chrome Web Store). It is important to remember that in order to get your app updated you have to update all the parts (the desktop app, the Chrome extension, and the iOS/Android apps). If you are new to Shadow, then let me tell you what it is. Shadow help you with testing your mobile websites or web pages on iOS and Android devices. How? On short it saves you time. Lot of time. You can enjoy syncronized browsing (the mobile devices display automatically the same URLs you have on your desktop browser), remote web inspector session with any one of the connected mobile devices, and work with localhost URLs to name just a few. So what’s new in the latest release? Here is the list:
    • Screenshots – you can take screenshots of the current page for the connected devices
    • Cache management – you can be sure that the cache was cleared on the devices
    • SSL support – you can use unsigned SSL certificates during development
    Here you can watch a video that walks you through these new features.
    Read more: Adobe Shadow Labs Release 3

    Tuesday, March 6, 2012

    FREE Unity3D Mobile Basic (Android and iOS)

    Unity3D

    That’s exactly what your just read: the Unity3D Mobile Basic (Android and iOS), which costs $400 each,  is completely FREE until April 8th.  It is not a trial! Head to the Unity3D web store and download your copy.

    The Unity3D Mobile Basic license allows you to develop games targeting the Android and the iOS platforms. Even though this is not a Pro license (which has lots of heavy weaponry), you still can use cutting edge technologies to create amazing games. Check this page to compare the different licenses.

    Thanks Unity Technologies for that!

    Read more: FREE Unity3D Mobile Basic (Android and iOS)

    Monday, January 30, 2012

    Andy Moore Blog: How to improve your mobile AS3/AIR performance

    Shawn Blais taught me all I needed to know about mobile optimizations of my AS3 code. His blog only has a dozen or two articles, but they are chock-full of interesting information (and even sales figures!). The most useful stuff for me, at this point, is the graphics pipeline optimizations.

    The thing that ties the following three steps together is one unifying theory: use bitmaps for everything. You can start with MovieClips and vector Sprites, and you can even stick with Flash’s DisplayList to keep things organized. But the actual image data? Bitmaps! Always bitmaps.

    Step One: Use the GPU rendering mode

    When designing a mobile application, you’ll have an “application.xml” (or similarly named) file that contains all sorts of nice settings. One of those is going to tell the mobile device whether to render using the CPU or the GPU. Most defaults (including the FlashDevelop template file) will point you to CPU, and that may be fine for flash’s standard vector art. Switching to bitmaps and the GPU setting will give us much better performance.

    Open up application.xml and make sure this exists:

    
    <initialWindow>
    
    <renderMode>gpu</renderMode>
    
    </initialWindow>
    

    (source article is same as step 3)

    Step Two: Lower the Stage Rendering Quality

    AS3′s stage-rendering quality setting determines how vector art (probably your “Sprite” and “MovieClip” classes) is rendered. The thing is, even with a low setting, the stage still respects your bitmaps “smoothing” flag and draws it without any discernible difference. No need to spare the CPU cycles on something we aren’t using!

    
    stage.quality = LOW;
    

    If you have vector art you are loading and converting during runtime (see step 3), AS3 even lets you change the stage quality on the fly! Just use this:

    
    stage.quality = HIGH;
    
    convertMySprite(); // Or whatever your function is
    
    stage.quality = LOW;
    

    (source article)

    Step Three: Use Bitmaps, and Cache them

    This is probably the best performance-enhancing-drug my mobile apps have used so far, but it only gets the big performance gains if you use it in conjunction with Step 1 (GPU render mode).

    The basic idea is to take all of your image data, and cache the bitmap data only once - dynamically – to a dictionary reference.  In GPU render mode, this stores the data as a texture in GPU memory on the mobile device. As long as all duplicate images are pulled from the original data, no new memory is used and creation of new graphics is lightning fast.

    This works particularly well for common images used frequently – say, badguys, bullets, and common tiles. But I use it for everything!

    Shawn’s original article laid out some source code and a longer explanation if you want to get into details and performance charts. His code does all of the conversions automatically for you, and the discucssion in the comments of his article improved upon it. I added a few tweaks myself, and it is now the only class I use for any type of image data. Imported .PNG file? Sprite or MovieClip in a .SWC? Class reference to an object you custom made? Doesn’t matter! All automated, all quick, all easy to use. Best of all: the code is really short, simple, and easy to read in about a minute. 

    It’s a bit too long to paste here, so here’s a link to the class I use right now. Feel free to use it, just let me know if you improve on it :) Copy and paste it to the root of any project and you should be able to start using it right away.

    (source article)

    Bonus Step: Convert MovieClips on the fly

    I haven’t tried this step out yet, but it’s an extension of the class I offered up in Step 3: automatically convert each frame from a MovieClip to cached bitmap data (and store that stuff in the GPU). If I had animations in my most recent games, I would be all over this too! [...]

    Read more: How to improve your mobile AS3/AIR performance

    Wednesday, June 1, 2011

    Videotutorial: Controlling the desktop with your mobile device via P2P

    Last year I wrote two tutorials connected with local network connections via P2P:
    MAX Racer Remote Device Controller in AIR for Android
    and
    Local Flash Peer-to-Peer Communication over LAN (without Cirrus/Stratus)

    Right now you can watch the video tutorial showing how to do this:

    Note that such application can run on iOS, BlackBerry Tablet OS and Android.

    Read more: Videotutorial: Controlling the desktop with your mobile device via P2P

    Saturday, April 23, 2011

    FlashGameLicense Blog: Dillo Hills: Optimizing Games for Playbook and Mobile

    [This is a guest post by Justin Smith, who created Dillo Hills for the PlayBook, Android, and other mobile platforms. Justin has some great insights to offer on creating games for these platforms!]


    PREFACE

    Over the past few days, I’ve been working very closely with Adam Schroeder from FGL to playtest Dillo Hills on the Playbook. He’s been very helpful in the testing process, and he’s asked me if I’d be interested in writing about my experience developing the game: from the basic experience of working in AIR, down to some of the specific tricks I’ve used to optimize rendering for mobile.

    PROJECT OVERVIEW AND STATS

    Dillo Hills was my first experience programming for mobile devices. I worked with an artist (changko) and an audio guy (strike911), both of whom were also new to mobile development.

    The game was originally developed for the Android platform, but the code for the Playbook version is almost completely identical, so all of the tips and tricks I talk about here should apply to both platforms!

    The game, for anyone who is unfamiliar, is essentially a spinoff of Tiny Wings. Your main goal is to build up speed by rolling down hills, then use that momentum to ramp up into the sky and soar. We built on to the original concept by adding in obstacles, bonuses, and by tweaking the physics a bit to give something that feels a bit more fast-paced and visceral than the original game.

    The game was released on Android near the end of March, was approved for the BlackBerry Playbook a couple days ago, and will be coming to Flash and iPhone in April (hopefully). The entire development of the game, from the moment I got the idea to the moment we released on the market, took exactly 3 weeks.

    Reception has been mixed, but mostly positive (4/5 on Android Marketplace). The biggest source of negative reviews has been from users who are simply not able to run the game at an acceptable framerate, or experience problems installing the game. Out of all the users who are able to install and run the game smoothly, feedback has been reassuringly positive.

    Sales have been pretty nice. Nothing outrageous yet, but certainly worth the time we invested, and still growing steadily. During the first 10 days after the game was released, we sold roughly 3000 premium versions of the game, and had about 25,000 downloads of the free version, which yielded just under 300,000 ad impressions using AdMob.

    As for my own impressions of the game? I’m very excited and pleased with where the game is headed, but I’m also very eager to continue working on the game, improving performance, and adding some more gameplay features to keep people entertained longer. I’ve learned a lot of important lessons that will probably have an impact on how I develop games for mobile in the future.


    OPTIMIZING TIPS AND TRICKS

    1) GPU vs. CPU

    The first hurdle you’ll face when developing a game for mobile is deciding whether to use GPU rendering or CPU rendering. Based on my experience, it seems like GPU rendering is faster when you are working primarily with bitmaps (or objects that have cacheAsBitmap=true) and placing them directly onto the stage / display list, and CPU rendering is typically faster when rendering vector shapes or using blitting as your primary means of rendering. Again, this is only based on the testing I’ve done, and your own results may vary. I recommend trying both until you find the one that works best for your game on the most devices.

    For Android applications, you can choose either CPU or GPU rendering from the Publish Settings menu (in the Flash Pro IDE). For the Playbook, I had to manually add this line inside the <content> object (which is inside the <initialWindow> object) of my DilloHills-App.xml file:

    <renderMode>gpu</renderMode>

    However, when I enabled GPU rendering before compiling to a BAR file, the BAR would no longer render anything but a black screen when testing in the Virtual Machine. This appears to be a bug with the VM, as the game runs fine on the actual device. It’s also worth mentioning that Eric Heimburg from FGL was able to get his games to run inside the Virtual Machine with GPU rendering enabled, and it actually showed a pretty significant performance increase even within the VM, so be sure to try it out for yourself!

    Dillo Hills was written and optimized for GPU rendering, so most of the techniques I mention here will be directed towards GPU rendering. A lot of these techniques are also great things that you should be doing in all of your applications (especially object pooling!), but are going to be nearly mandatory when developing for mobile.


    2) Size does matter

    [...]

    Read more: FlashGameLicense Blog: Dillo Hills: Optimizing Games for Playbook and Mobile

    Wednesday, April 13, 2011

    What Creative Suite 5.5 brings to game developers

    Building games for mobile devices with various operation systems is one of the biggest challenges for developers. Creative Suite 5.5 makes it easier and allows you to deploy games that run across Android, BlackBerry Tablet OS and iOS. You can also test your game with different resolutions and DPIs using device profiles in Flash Builder. In Flash Pro, you can rescale content to any screen-size just by ticking one check-box and so on…

    Visual

    So what CS5.5 brings to you are not only new export options, but there is tooling that is tight to mobile publishing and helps you to do things faster.

    Let’s have a look what CS5.5 brings you and how it makes your life easier.

    Deploy to web, desktop and mobile
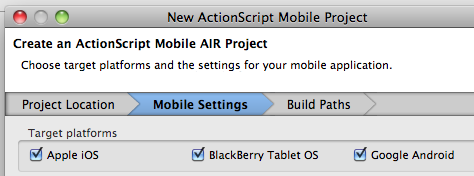
    Mobile porting has never been easier. Choose among iOS, Android and BlackBerry Tablet OS or all of them.
    Deploy to iOS, Android and BlackBerry Tablet OS

    Export as Bitmap for better performance
    Next to Cache as bitmap you can now convert your vector artwork directly to bitmap right in Flash CS5.5 IDE during export. The good thing is, that you still work with the artwork as with vector, but once you export the SWF, it’s converted to bitmap. Tweening bitmaps is less CPU demanding than vectors and your app will perform better. Unlike Cache as bitmap, you can rotate and scale the artwork during runtime without having it re-cached – so that’s why Export as Bitmap might work better you. Cache as bitmap is good choice, but only if you change positions – if you start rotating and scaling – it will re-cache every change – although this can be solved with cacheAsBitmapMatrix on mobile platforms, Export as Bitmap is another very useful option to consider[...]

    Read more: What Creative Suite 5.5 brings to game developers

    Tuesday, December 21, 2010

    MochiLand: Tips and Tricks When Developing Your Flash Game on Android

    MochiLand: Tips and Tricks When Developing Your Flash Game on Android:

    This is a collection of thoughts and tips when developing Flash games targeted to a mobile, more specifically to Android using Adobe’s AIR . I write these notes with a specific focus on full screen games. I’ll cover a few things to think about when designing your game, and a then a few tips and tricks to keep in mind that will [hopefully] save you finding out the hard way.

    Planning for Mobile

    Before you start making a game for mobile there are some important things to consider, which will save a lot of time and stress if you plan for them.

    Type of Gameplay

    The type of games typically played are very short bursts of gameplay – while traveling, sitting on the toilet, watching TV. Gameplay that can be stopped and started very quickly. Short bursts of gameplay are very typical of the mobile platform and your games should be made to work with this.

    A couple of your options are:

    • make your games levels short and sweet, saving the players progress as they complete stages
    • make the game save it’s state so that it can be stopped quickly and continued at a later time very easily
    • make a game that is only about the score from a single session of play, save that score as soon as it’s achieved

    I recommend you keep your games very simple (though still fun) at first, until you get the hang of publishing for this platform and finding out it’s pitfalls. It’s better to get content out there and learn from your mistakes than embark on a huge project and make costly mistakes.

    Controls

    With mobile phones mostly having touch screens, and a few phones having very small keyboards it’s important to make your game very easy and simple to control. Typically there is no mouse, no arrow keys (or space bar) and screen sizes can be a factor in how much you can fit on a screen at once.

    The best option is to choose an intuitive control method, that perhaps adapts to the gameplay. For example, with a vertical scrolling space shooter game you could make the players ship constantly fire bullets with the player simply steering the ship around with their finger, and for a powerful shot the player could double tap their ship. It also pays to remember that fingers get in the way of the screen, so your gameplay should allow for rather large obstructions (for example: my hands are much bigger than my wife’s). If you have a character or ship that the character controls, consider positioning them above where the players touch point will be so that it is still visible during play[...]