Assuming a ship can have multiple thrusters in various configurations, and that the ship’s shape and physical properties can change (for example, parts of the ship could be destroyed), it is necessary to determine which thrusters to fire in order to move and rotate the ship. That’s the main challenge we need to tackle here.
The demo is written in Haxe, but the solution can easily be implemented in any language. A physics engine similar to Box2D or Nape is assumed, but any engine that provides the means to apply forces and impulses and query the physical properties of bodies will do.
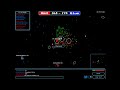
Try the Demo
Click the SWF to give it focus, then use the arrow keys and the Q and W keys to activate different thrusters. You can switch to different spaceship designs using the 1-4 number keys, and you can click any block or thruster to remove it from the ship.Representing the Ship
This diagram shows the classes that represent the ship, and how they relate to each other: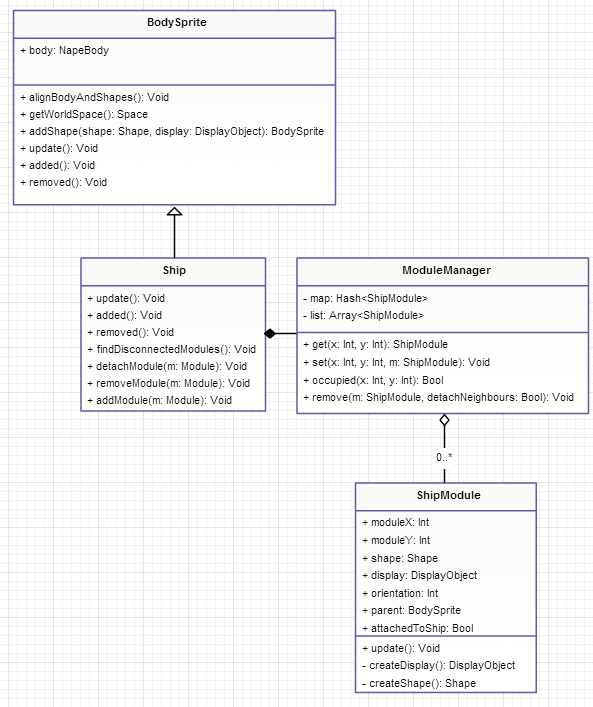
BodySprite is a class that represents a physical body with a graphical representation. It allows display objects to be attached to shapes, and makes sure that they move and rotate correctly with the body.The
Ship class is a container of modules. It manages the structure of the ship and deals with attaching and detaching modules. It contains a single ModuleManager instance.Attaching a module attaches its shape and display object to the underlying
BodySprite, but removing a module requires a bit more work. First the module’s shape and display object are removed from the BodySprite, and then the structure of the ship is checked so that any modules not connected to the core (the module with the red circle) are detached. This is done using an algorithm similar to flood fill that takes into account the way each module can connect to other modules (for example, thrusters can only connect from one side, depending on their orientation).Detaching modules is somewhat different: their shape and display object are still removed from the
BodySprite, but are then attached to an instance of ShipDebris.This way of representing the ship is not the simplest, but I found it to work very well. The alternative would be to represent each module as a separate body and “glue” them together with a weld joint. While this would make breaking the ship apart much easier, it would also cause the ship to feel rubbery and elastic if it had a large number of modules.
The
ModuleManager is a container that keeps the modules of a ship in both a list (allowing easy iteration) and a hash map (allowing easy access via local coordinates).The
ShipModule class obviously represents a ship module. It’s an abstract class that defines some convenience methods and attributes that each module has. Each module subclass is responsible for constructing its own display object and shape, and for updating itself if needed. Modules are also updated when they’re attached to ShipDebris, but in that case the attachedToShip flag is set to false.So a ship is really just a collection of functional modules: building blocks whose placement and type defines the behavior of the ship. Of course, having a pretty ship just floating around like a pile of bricks would make for a boring game, so we need to figure out how to make it move around in a way that is fun to play and yet convincingly realistic.
Simplifying the Problem
Rotating and moving a ship by selectively firing thrusters, varying their thrust either by adjusting throttle or by turning them on and off in quick succession, is a difficult problem. Fortunately, it is also an unnecessary one.If you wanted to rotate a ship precisely around a point, for example, you could do that simply by telling your physics engine to rotate the whole body. In this case, however, I was looking for a simple solution that isn’t perfect, but is fun to play. To make the problem simpler, I’ll introduce a constraint:
Thrusters can only be on or off and they can’t vary their thrust.Now that we’ve abandoned perfection and complexity, the problem is a lot simpler. We need to determine, for each thruster, whether it should be on or off, depending on its position on the ship and the player’s input. We could assign a different key for each thruster, but we’d end up with an interstellar QWOP, so we’ll use the arrow keys for turning and moving, and Q and W for strafing.
The Simple Case: Moving the Ship Forwards and Backwards
The first order of business is to move the ship forwards and backwards, as this is the simplest possible case. To move the ship, we’ll simply fire the thrusters facing in the direction opposite to the one we want to go. For example, if we wanted to go forward, we’d fire all the thrusters that face backwards.Read more: Using Torque and Thrusters to Move and Rotate a Player-Designed Spaceship
 This tutorial is a previously unreleased recipe from


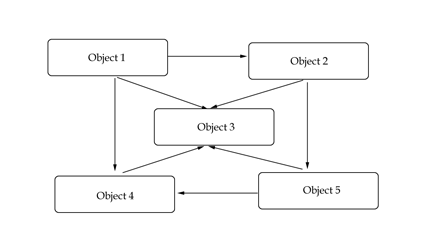 A relations diagram
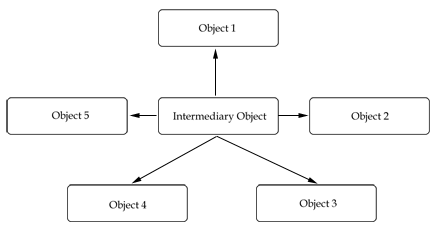 A loosely coupled system


 Back in August, I posted a