Showing posts with label oop. Show all posts

Monday, November 26, 2012

Quick Tip: The OOP Principle of Inheritance

This entry is part 6 of 6 in the series Beginner's Guide to OOP

We’ve come a long way in this beginner’s guide to object-oriented programming, discussing the principles of cohesion, coupling, encapsulation, and abstraction. In this final article, we’ll discuss the OOP principle of inheritance and its uses in game development. Note: Although this tutorial is written using Java, you should be able to use the same techniques and concepts in almost any game development environment.

What Is Inheritance?

Inheritance is the principle of class hierarchy. It is the ability for one object to take on the states, behaviors, and functionality of another object. A real-world example of inheritance is genetic inheritance. We all receive genes from both our parents that then define who we are. We share qualities of both our parents, and yet at the same time are different from them. Objects in OOP can do the same thing. Parent classes can have child classes (also known as superclasses and subclasses respectively) which can have the same properties of the parent class, and can define new states, behaviors, and functionality of their own. As an example, consider the following class that could be used as a parent class to different shapes:
public class Shape {
  protected int height;
  protected int width;

  public Shape(int h, int w) {
    height = h;
    width = w;
  }

  public int area() {
    return height * width;
  }

  public int getHeight() { return height; }
  public int getWidth() { return width; }
  public void setHeight(int h) { return height; }
  public void setWidth(int w) { return width; }
}
To extend this class to implement a triangle, it would look like this:
public class Triangle extends Shape {
  public Triangle(int h, int w) {
    super(h, w);
  }

  public int area() {
    return super.area() / 2;
  }
}
Triangle has all the same states and functions as Shape, but redefines the area() function to return the proper area of a Triangle (half base times height). The keyword super is used to reference the superclass and any of its states and functions. This is why we can use super() to call the constructor of the superclass and super.area() to call the area() function of the superclass. So, in this case, super.area() returns height * width. The protected keyword is the last access level modifier. It acts like the private access level modifier but also allows any subclasses to have access to the variable or function.

Why Is It Helpful?

As you can see, inheritance can greatly help reduce code redundancy between similar objects by taking what those objects have in common and putting them in one place. This also creates more maintainable code because it helps to comply with the principle of DRY and to prevent the ripple effect in code changes. If all of this seems familiar, it’s probably because abstraction had very similar benefits (as well as most of the other principles of OOP). Abstraction is closely related to inheritance as an abstracted class can be used as a superclass to create subclasses. The only difference between an abstract class and a normal class is that an abstract class cannot be used to create an object.

How to Apply It

Lets go back to our three games one more time to describe how to apply inheritance.

Asteroids

Recall that we defined an abstract class for moving objects across a screen. Also recall that we defined a Ship class for the ship object. To apply inheritance to Asteroids, we can have the Ship class extend the Movable class as follows:
/**
 * The Ship Class
 */
public class Ship extends Movable {
  /**
   * Function to rotate the ship
   */
  public void rotate() {
    // Code that turns the ship
  }

  /**
   * Function to fire
   */
  public void fire() {
    // Code to fire
  }
}
The code needed to move the ship is taken care of in the Movable abstract class, so we can remove it from the Ship class. All the other objects for Asteroids could also inherit from the Movable class, making it extremely easy to change how to move an object. One thing to note about inheritance is the ability to have multiple inheritance, or the ability of one class to inherit from multiple classes at the same time. Some languages allow it, others do not. Java is one of the languages that does not allow multiple inheritance. Therefore, you couldn’t have the Ship object inherit from both a Moveable class and a Drawable class. Make sure you are familiar with what your programming language allows before you try to design inheritance into your game.

Tetris

Inheritance can be applied to Tetris by having the Tetrimino and all of the game visuals inherit from the Drawable class, which we defined in the last article.

Pac-Man

Recall that for Pac-Man we identified thee objects: Pac-Man, a Ghost, and a pac-dot. Throughout this series we’ve only discussed these three objects and have put off mentioning anything about the last critical piece of Pac-Man: the power pellet. With inheritance, we are now ready to talk about it. A power pellet is a special pac-dot that allows Pac-Man to eat ghosts. Its states and behaviors are exactly the same as a pac-dot, with really the only difference being its size and the ability to blink (remember that to keep the game loosely coupled, we want another class to monitor when a power pellet is eaten and active the changeState() method of the ghosts). This is when inheritance comes in handy. Since a pac-dot and power pellet are practically the same object, we can create a PowerPellet class which extends the PacDot class. The PowerPellet class would just need to modify a few states to make it bigger and add the behavior of growing and shrinking to create a blinking effect. And that’s it – we now have a power pellet with little extra work. Not too shabby. The code for how this would look could be as follows:
Read more: Quick Tip: The OOP Principle of Inheritance

Monday, November 19, 2012

Quick Tip: The OOP Principle of Abstraction

This entry is part 5 of 5 in the series Beginner's Guide to OOP
We’re almost done with this series on object-oriented programming, and in this article we’ll discuss the OOP principle of abstraction – that is, generalising an object – and its use in game development.
Note: Although this tutorial is written using Java, you should be able to use the same techniques and concepts in almost any game development environment.

What is Abstraction?

Abstraction is the principle of generalization. This requires that we move from a specific instance to a more generalized concept by thinking about the most basic information and function of an object.
This may sound a bit strange, but we are already familiar with the concept of abstraction. For example, if I say the word “car”, what do you think of? Odds are we weren’t thinking about the same car. I was thinking about a black Mustang Boss 302, which is a specific instance of a car. Neither of us were wrong because the word car is a very general concept of a vehicle that we use for transportation (or recreation in my case).
The same goes for video games. Video games are categorized into groups such as RTS, RPG, Racing, etc.. These groups are all generalized concepts that describe the gameplay of a game. StarCraft II, Elder Scrolls V: Skyrim, and Need for Speed are all specific instances of these generalized concepts.
Thus, abstraction takes many specific instances of objects and extracts their common information and functions to create a single generalized concept that can be used to describe all the specific instances as one.

Why is it Helpful?

Abstraction is helpful because it strips everything down to its most basic principles. This can help when encapsulating functionality of an object because it can help identify the important information that should be made visible and the unimportant information which can be made hidden.
Abstraction also helps with the Don’t Repeat Yourself principle. By taking what a group of objects have in common and abstracting it, we can help prevent redundant code in each object which in turn creates more maintainable code.

How to Apply This Principle

As before, let’s use our three games to see some concrete examples of this principle in action.

Asteroids

[...]
Read more: Quick Tip: The OOP Principle of Abstraction

Thursday, November 15, 2012

Quick Tip: The OOP Principle of Encapsulation

This entry is part 4 of 4 in the series Beginner's Guide to OOP
We’ve discussed object-oriented programming for game developers in general and the specific OOP principles of cohesion and coupling. Now let’s take a look at encapsulation and how it helps to keep code loosely coupled and more maintainable. Note: Although this Quick Tip is explained using Java, you should be able to use the same techniques and concepts in almost any game development environment.

What Is Encapsulation?

Encapsulation is the principle of information hiding. That is, the implementation (the internal workings) of an object is hidden from the rest of the program. A popular example you’ll hear for encapsulation is driving a car. Do you need to know exactly how every aspect of a car works (engine, carburettor, alternator, and so on)? No – you need to know how to use the steering wheel, brakes, accelerator, and so on. Another example is searching for a value in an array. In Java, you can do the following:
int myArray[] = {1, 2, 3, 5, 7, 9, 11, 13};
Arrays.asList(myArray).contains(11);
The above code will return true if the value 11 is in myArray, otherwise it will return false. How does the contains() method work? Which searching technique does it use? Does it pre-sort the array before searching? The answer is it doesn’t matter because the exact implementation of the method is hidden.

Why Is Encapsulation Helpful?

Encapsulation helps to create code that is loosely coupled. Because the details are hidden, it reduces the ability of other objects to directly modify an object’s state and behavior. It also greatly helps when you must change the data type of a variable. Lets say you decided to use a String to keep track of time in “hh:mm:ss” format. After awhile, you come to realize that an int representing seconds might be a better data type for time. Not only must you change the data type in the object, but also every time you referenced the object’s time in the entire program! Instead, you can use what are known as getter and setter functions. Getters and setters are usually small functions that return and set a variable respectively. A getter function to get the time would look as follows:
public String getTime() {
  return time;
}
The getter will return a String value: the variable time. Now when we want to change time to an int, instead of changing all calls to the getter we can just change the getter function to change the int data type into a String data type.
Read more: Quick Tip: The OOP Principle of Encapsulation

Thursday, November 8, 2012

Quick Tip: The OOP Principle of Coupling

This entry is part 3 of 3 in the series Beginner's Guide to OOP So far in this series, we’ve discussed object-oriented programming in general, and the OOP principle of cohesion. In this article, we’ll look at the principle of coupling and how it helps in game development. Note: Although this tutorial is written using Java, you should be able to use the same techniques and concepts in almost any game development environment.

What Is Coupling?

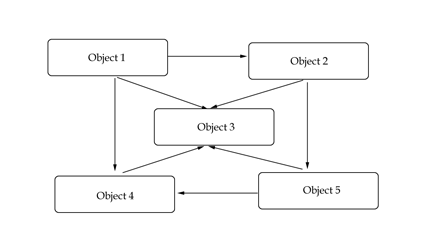
Coupling is the principle of “separation of concerns”. This means that one object doesn’t directly change or modify the state or behavior of another object. Coupling looks at the relationship between objects and how closely connected they are. A Relations Diagram is a great way to visualise the connections between objects. In such a diagram, boxes represent objects and arrows represent a connection between two objects where one object can directly affect another object.
A relations diagram A relations diagram
A good example of coupling is HTML and CSS. Before CSS, HTML was used for both markup and presentation. This created bloated code that was hard to change and difficult to maintain. With the advent of CSS, HTML became used just for markup, and CSS took over for presentation. This made the code fairly clean and easily changeable. The concerns of presentation and markup were separated.

Why Is Coupling Helpful?

Objects that are independent from one another and do not directly modify the state of other objects are said to be loosely coupled. Loose coupling lets the code be more flexible, more changeable, and easier to work with.
A loosely coupled system A loosely coupled system
Objects that rely on other objects and can modify the states of other objects are said to be tightly coupled. Tight coupling creates situations where modifying the code of one object also requires changing the code of other objects (also known as a ripple effect). Tightly coupled code is also harder to reuse because it can’t be separated.
A tightly coupled system A tightly coupled system
A common phrase you’ll hear is “strive for low coupling and high cohesion“. This phrase is a helpful reminder that we should strive for code that separates tasks and doesn’t rely heavily on each other. Thus, low (or loose) coupling is generally good, while high (or tight) coupling is generally bad.

How to Apply It

Asteroids

First, lets look at the objects of Asteroids and how they are connected. Recall that the objects are a ship, an asteroid, a flying saucer, and a bullet. How are these objects related or connected to each other? In Asteroids, a ship can fire a bullet, a bullet can hit an asteroid and a flying saucer, and an asteroid and a flying saucer can hit the ship. Our relations diagram then looks as follows:
The Asteroids relations diagram
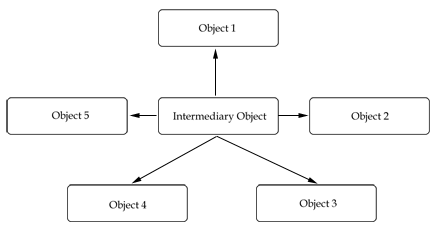
As you can see the objects are all pretty well interrelated. Because of this, we have to be careful of how we write the code, otherwise we will end up with a tightly coupled system. Lets take for example the ship firing a bullet. If the ship were to create a bullet object, keep track of its position, and then modify the asteroid when the bullet hits, our system would be very tightly coupled. Instead, the ship should create a bullet object, but not worry about it after that point. Another class would be responsible for keeping track of the bullet’s position as well as what happens when a bullet hits an asteroid. With an intermediary class in between our relationships, the diagram would look as follows:
Read more: Quick Tip: The OOP Principle of Coupling

Friday, November 2, 2012

Quick Tip: The OOP Principle of Cohesion

This entry is part 2 of 2 in the series Beginner's Guide to OOP
In the first post of this series, we discussed why object-oriented programming (OOP) was helpful for game development, and learned how to identify objects, their states, and their behaviors. In this article, we’ll look at the specific OOP principle of cohesion and how it applies to games.
Note: Although this tutorial is written using Java, you should be able to use the same techniques and concepts in almost any game development environment.

What Is Cohesion?

Cohesion is the principle of being or doing one thing well. In other words, cohesion means grouping together code that contributes to a single task.
A great non-programming example of this principle was covered in one of the first Gamedevtuts+ articles which talked about the Covert Action Rule:
Don’t try to do too many games in one package … Individually, those each could have been good games. Together, they fought with each other.
The same rule applies to object-oriented programming. Each object should only have one responsibility. Every behavior of that object should only do one task. Any more than that and you’ll have a much harder time making changes to the code.

Why Is It Helpful?

Code that is organized by functionality and does only one task is said to have high cohesion. Highly cohesive code is reusable, simple, and easy to understand. It also creates objects that are small and focused [...]
Read more: Quick Tip: The OOP Principle of Cohesion

Thursday, November 1, 2012

Quick Tip: Intro to Object-Oriented Programming for Game Development

This entry is part 1 of 1 in the series Beginner's Guide to OOP
Welcome to a new series of Quick Tips on Object-Oriented Programming! We’ll be going over the principles of OOP and how they can be used to create organized code. In this first part, we’ll talk about what OOP is and why it’s helpful, with a few examples of how it could be used in game development.

What Is Object-Oriented Programming?

Object-oriented programming (OOP), in its most basic sense, is a programming style used to organize code. Video games can run anywhere from a few thousand lines of code (Cut the Rope has 15,000) to millions of lines of code long (Crysis has over a million). You can see why it’s so important to write code that can be easily modified and maintained.
Programming styles, such as OOP, help to organize code in such a way that it becomes easier to maintain and modify. OOP helps organize code by organizing it into what are known as objects.
Objects hold information about state and behavior:
States are the characteristics of the object, or the words you would use to describe it, and usually take the form of is or has descriptors. A computer is either on or off, a chair has four legs, and you have a name.
Behaviors are the things the object can do, or the actions the object can perform, and are usually verbs that end in ing. You are sitting, using a computer, and reading this article.

Why Is It Helpful?

As stated earlier, OOP is helpful because it helps create maintainable code – code that is understandable, adaptable, and extendable.
It also helps create reusable code by following the DRY (Don’t Repeat Yourself) method: write the code once and then reuse it, rather than copying and pasting.
The OOP way of thinking also lends itself well to directly translating real-world objects and interactions into code.

How to Apply It

I’ll list three different examples of how to apply OOP to video games. In later articles, we’ll look at how to code these examples, but for now we’ll just stick to learning to identify objects and their states and behaviors.

Asteroids

First, let’s imagine that we wanted to make the classic game Asteroids. To identify what the objects are in Asteroids, try describing it.
Wikipedia describes Asteroids as follows:
The objective of Asteroids is to score as many points as possible by destroying asteroids and flying saucers. The player controls a triangular-shaped ship that can rotate left and right, fire shots straight forward, and thrust forward. As the ship moves, momentum is not conserved – the ship eventually comes to a stop again when not thrusting.
Think about what in this description could stand alone, or the things that are described that could have state and behavior. These become our objects.
The objects for Asteroids are: a ship, an asteroid, a flying saucer, and a bullet (can’t forget those!). The cool thing about objects is that we normally describe things in terms of objects in everyday talk, so they usually reveal themselves through a description.
The classic game of Asteroids
Now that we have identified our objects, let’s define the state and behavior for one of them: the player’s ship. Think about what attributes describe the ship; these are its states. Then think about what the ship can do; these are its behaviors.
A ship has states of:[...]
Read more: Quick Tip: Intro to Object-Oriented Programming for Game Development

Monday, April 25, 2011

Beginner’s ActionScript 3.0 Object Communication: OOP’s Essence

Beginner’s ActionScript 3.0 Object Communication: OOP’s Essence

My favorite OOP quote for beginners is about communication–sending messages, and just about everything I read on Parallel Programming (//P) is about communication. So I thought it’d be a good idea to have a post for beginners first and follow it up with a parallel programming post about object communication. First, I want to look at communication in OOP programming, and in a second post, communication in //P. They have a good deal in common and a good deal of differences [...]

Read more: Beginner’s ActionScript 3.0 Object Communication: OOP’s Essence

Monday, March 14, 2011

Beginning Flash and ActionScript Game Programming Part 10: Input and Event Handling

Beginning Flash and ActionScript Game Programming Part 10: Input and Event Handling:

Beginning Flash and ActionScript Game Programming Part 10: Input and Event Handling

In the previous sections, we looked at how to create graphics on screen using vector drawing.

In this section, we’ll look at Flash and Actionscript specific concepts, event handling, and keyboard and mouse input.

Events and Event Handling

In Actionscript, there is a concept called “event handling”. Basically that certain events can be dispatched for actions, such as if a key is pressed, and you create listeners that are able to “catch” the events after being fired, and handle them.

This lets us capture and handle keyboard and mouse input, as well as several other event types.

Handling Mouse Input

So lets start by moving the smiley face around on screen, using the mouse.

Modify your “Main.as” class to look like below.

Main.as

1
2
3
4
5
6
7
8
9
10
11
12
13
14
15
16
17
18
19
20
21
22
23
24
25
26
27
28
29
30
31
32
33
34
35
36
37
38
39
40
41
42
43
44
45
46
47
48
49
50
51
52
53
54
55
56
57
58
59
60
61
62
63
64
65
66
67
68
69
70
71
72
73
74
75
76
77
78
79
80
81
82
83
84
85
86
package 
{
 import flash.display.Sprite;
 import flash.events.Event;
 import flash.events.MouseEvent;
 
 /**
  * ...
  * @author Chris Moeller
  */
 public class Main extends Sprite 
 {
  public var smiley_face:Sprite;
  public var smiley_is_cursor:Boolean;
  public function Main():void 
  {
   if (stage) init();
   else addEventListener(Event.ADDED_TO_STAGE, init);
  }
 
  private function init(e:Event = null):void 
  {
   removeEventListener(Event.ADDED_TO_STAGE, init);
   // entry point
   smiley_is_cursor = true;
 
   smiley_face = new Sprite();
   addChild(smiley_face);
 
   //draw the main circle
   smiley_face.graphics.beginFill(0xffff00);
   smiley_face.graphics.lineStyle(10, 0x000000);
   smiley_face.graphics.drawCircle(800 / 2, 600 / 2, 300);
   smiley_face.graphics.endFill();
 
   //draw the eyes
   smiley_face.graphics.lineStyle(0);
   smiley_face.graphics.beginFill(0x000000);
   //left eye (from our perspective)
   smiley_face.graphics.drawEllipse(290, 150, 75, 110);
 
   //right eye (from our perspective)
   smiley_face.graphics.drawEllipse(450, 150, 75, 110);
   smiley_face.graphics.endFill();
 
   //draw the mouth
 
   //draw left curve
   smiley_face.graphics.lineStyle(7);
   smiley_face.graphics.moveTo(250, 340);
   //first two are anchor point, second two are destination
   smiley_face.graphics.curveTo(240, 380, 190, 380);
 
   //now lets draw the right curve
   smiley_face.graphics.moveTo(550, 340);
   smiley_face.graphics.curveTo(560, 380, 613, 380);
 
   //and draw the final mouth curve
   smiley_face.graphics.lineStyle(10);
   smiley_face.graphics.moveTo(233, 373);
   smiley_face.graphics.curveTo(400, 600, 567, 373);
 
   //now to add input
   //start with the mouse
   stage.addEventListener(MouseEvent.MOUSE_MOVE, MouseMoveSmiley);
   smiley_face.addEventListener(MouseEvent.CLICK, SelectSmiley);
  }
  public function MouseMoveSmiley(e:MouseEvent):void
  {
   if (smiley_is_cursor)
   {
    smiley_face.x = mouseX-smiley_face.width/2;
    smiley_face.y = mouseY - smiley_face.height / 2;
   }
  }
  public function SelectSmiley(e:MouseEvent):void 
  {
   if(smiley_is_cursor)
    smiley_is_cursor = false;    
   else
    smiley_is_cursor = true; 
  }
 
 }
 
}

I set it up now so that by default, the smiley face will follow the cursor, and be at the center. When you click on the smiley once, it will follow your cursor, but if already following, it will leave it in it’s place.

The new lines added are:

Line 14: ‘smiley_is_cursor’ is a variable created to keep track of whether the smiley face is following the mouse. If set to true, we’ll have it follow the mouse, or false, stay where it is.

Line 25: We set ‘smiley_is_cursor’ to true, so that initially the smiley face moves with the cursor, so people can see something working.

Line 65: We add a listener to our “stage” object. This object is setup by default by flash, and is basically the “top level” object in flash. So we add a listener to it to catch any movement on the flash window, and to call the function “MouseMoveSmiley” whenever the mouse moves (when the MOUSE_MOVE function fires).

Line 66: We add another listener for whenever a click is detected, but we add this one onto the smiley face sprite. This way, whenever the smiley face is clicked, it calls the “SelectSmiley” function.

Line 68: This function is called whenever the mouse is moved, and is required to have a ‘MouseEvent’ passed to it in the parameters.
Inside of here, we check to see if the smiley is set to the cursor, and if so, we set the x and y position of the smiley sprite to that of the mouse, and take away half the width and height so that the smiley face is centered around the mouse.

Line 76: This function is called whenever the smiley face has been clicked. It will check whether the ‘smiley_is_cursor’ variable is set to true, if so set it to false, otherwise set it to true. So everytime this function is called, it will basically flip between setting the smiley face to follow the cursor or stay in place.

Tutorial Demo

This is what this will look like when you compile:
(use mouse to move smiley face, click to place it, click on it again to move it around)

Handling Keyboard Input

[...]

Beginning Flash and ActionScript Game Programming Part 8: Basic Programming Concepts-Classes-Inheritance

Beginning Flash and ActionScript Game Programming Part 8: Basic Programming Concepts-Classes-Inheritance:

Crysis2 game screen shot

In the previous section, we learned the basics of creating classes, and how to create objects from the classes we made.

In this section, we’ll go into more detail about creating classes, specifically inheritance, which allows you to save time when creating simmilar objects.

What is Inheritance?

The programming concept of ‘inheritance’ is important, and used a lot in object oriented programming (OOP).

The concept is that you create a base class that other classes will inherit from, usually when the other class is a derivative of the base class.

For instance, if you have a orc enemy, a golbin enemy, and a dragon enemy, they can all be based off a basic ‘enemy’ type.

Each enemy will need health, a function to damage the player, have an attack speed, a move speed, and whatever else as enemy might have.

They can all have basic stuff in common, and ‘inherit’ those functions and variables from a base class, but have their own specific variables and functions as well, that the other enemy types might not need.

An example of a base enemy class:

Enemy.as

1
2
3
4
5
6
7
8
9
10
11
12
13
14
15
16
17
18
19
20
21
22
23
24
25
26
27
28
29
30
31
32
33
34
35
36
37
38
39
40
41
42
43
44
45
46
package  
{
 /**
  * ...
  * @author Chris Moeller
  */
 public class Enemy 
 {
  public var name:String;
  public var health:int;
  public var attack_speed:int;
  public var attack_strength:int;
  public var move_speed:int;
 
  public function Enemy(name:String, health:int=100, attack_speed:int=20, attack_strength:int=5, move_speed:int=48) 
  {
   this.name=name;
   this.health=health;
   this.attack_speed=attack_speed;
   this.attack_strength=attack_strength;
   this.move_speed=move_speed;
 
   trace(name+": basic enemy created");
  }
  public function TakeDamage(amount:int):void
  {
   if(health <= 0)
   {
    trace(name+": Stop beating my corpse!");
    return;
   }
 
   health-=amount;
   if(health > 0)
    trace(name+": ouch, you damaged me!(health:"+health+")");
   else
    trace(name+": Eck, you killed me!");
  }
  public function Speak():void
  {
   trace(name+": I am a basic enemy!");
  }
 
 }
 
}

Nothing really new here, we have a constructor that is called on creation where we are required to pass in the enemy name, but all the other variables in the parameters have default values, so we don’t have to pass them in if not needed.
“Speak” if a function that just traces out our basic enemy telling what it is.

Next, lets create some clases that inherit from our base enemy class.

To do this, first right click on the ‘src’ folder in FlashDevelop, and select “Add->New Class”.
Name it “Dragon” in the name field, and this time click on the “Browse” button below, next to “Base Class”.
In the top field type in “Enemy”, and double click on the enemy class, whcih shows up in the window area below.
Next click the check box next to “Generate constructor matching base class” to check it, and click ‘OK’ to create your dragon class.

It should create a new class file that looks like:

Dragon.as

1
2
3
4
5
6
7
8
9
10
11
12
13
14
15
16
17
18
package
{
 /**
  * ...
  * @author Chris Moeller
  */
 public class Dragon extends Enemy
 {
 
  public function Dragon(name:String, health:int = 100, attack_speed:int = 20, attack_strength:int = 5, move_speed:int = 48)
  {
   super(name, health, attack_speed, attack_strength, move_speed);
 
  }
 
 }
 
}

As you can see, there are a couple additions here that are not in a class that doesn’t have a base class. The first is

line 7: public class Dragon extends Enemy The key here being the keywords ‘extends Enemy’.
This just means that this class will be a sub class of the ‘Enemy’ class, and will inherit all of it’s ‘public’ variables and functions as if we declared them in this class.
So we will have access to all of the ‘Enemy’ class’s functions and variables that we declared in the ‘Enemy.as’ file, as if we also declared it in this file.

line 12: super(name, health, attack_speed, attack_strength, move_speed); The “super” keyword is used to explicitly call a base class’s functions. Here, just using ‘super’ with paranthesis will call the parent/base class’s constructor.
So when a dragon object is created, right now it needs to be created with the same parameters as the ‘Enemy’ class, and it needs to call the ‘Enemy’ class’s constructor in it’s constructor to run the ‘Enemy’ constructor.

Right now, if you created a ‘Dragon’ object, it would be identical to an ‘Enemy’ object, so lets change that to make the Dragon class slightly different.

Dragon.as

1
2
3
4
5
6
7
8
9
10
11
12
13
14
15
16
17
18
19
20
21
22
23
24
25
26
27
28
29
30
31
32
33
34
35
36
37
38
package
{
 /**
  * ...
  * @author Chris Moeller
  */
 public class Dragon extends Enemy
 {
  public var flight_speed:int;
  public var fire_damage:int;
  public var number_of_heads:int;
 
  public function Dragon(name:String, health:int = 100, flight_speed:int=100, fire_damage:int=50, number_of_heads:int=1)
  {
   //super(name, health, attack_speed, attack_strength, move_speed);
   super(name, health, 20, 10, 50);
   this.flight_speed = flight_speed;
   this.fire_damage = fire_damage;
   this.number_of_heads = number_of_heads;
 
   trace(name + ": dragon created");
  }
  override public function Speak():void
  {
   trace("I used to say:");
   super.Speak();
 
   trace("But now I say: ");
   trace("I am a dragon!");
  }
  public function BlowFire():void
  {
   trace(name+": I'm blowing fire, with fire damage=" + fire_damage + ", from my " + number_of_heads + " heads");
  }
 
 }
 
}

I added some things that a dragon would have, that a generic enemy might not.

Line 9–11: I added a few variables that a dragon would have, that the basic enemy wouldn’t have needed.

Line 13: I created the Dragon constructor with different parameters that are used to create it, but it can be the same as the original Enemy constructor if needed.

Line 16: I call the ‘Enemy’ constructor, and say that all dragons will have an attack speed of 20, attack strength of 10, an a move speed of 50.

Line 23: Here, we use the keyword ‘override’ to override a function that was created in the base class (Enemy), but make it so that when the function for a dragon is called, we run this function instead.

Line 26: Here, we use the ‘super’ keyword and the name of the ‘Speak’ function to call the Dragons parent class (Enemy) Speak function. So even if we override a function, we have access to the base function as well.

Line 31: This is a new function, specific to dragons, which we can call for dragons, but not for basic Enemies.

Now we need to just need to create the objects from the class definitions we just made in our ‘Main.as’ program [...]

Sunday, March 13, 2011

Beginning Flash and ActionScript Game Programming Part 7: Basic Programming Concepts-Classes and Objects

Beginning Flash and ActionScript Game Programming Part 7: Basic Programming Concepts-Classes and Objects:

In the previous section, we learned about functions, which allows us to create blocks of re-usable code that creates cleaner code, as well as saves time typing.

In this section, we'll get into the "meat and potatoes" of programming– creating classes and objects.

Setting Up FlashDevelop

Open FlashDevelop, Click Project->New Project, select "AS3 Project", name it "part7"(or whatever you want, really), select a location to create the project, and click "OK".

On the right side, in the window "Project", double click on the "src" folder, and double click on the file "Main.as" below it. Now you have a base Actionscript 3.0 progam setup in FlashDevelop.

Creating a Class

Creating a class is simmilar to creating a function in structure, but each class is required to be in its own individual file.

To do this in FlashDevelop, on the right hand side of the screen, right click on the folder "src", select "Add" then "New Class".

All you need to do here right now is name your new class, so beside "Name" change it to "Enemy" and click "OK".

You should now have a file that looks like this:

Enemy.as

1
2
3
4
5
6
7
8
9
10
11
12
13
14
15
16
17
package  
{
 /**
  * ...
  * @author Chris Moeller
  */
 public class Enemy 
 {
 
  public function Enemy() 
  {
 
  }
 
 }
 
}

What is nice here is that FlashDevelop sets up the "skeleton" of the file for you.

Line 1: This is the "package name", which you can also think of as the folder name. Here, this file is just in the main "src" file so it has no package name, but if you had created it in a folder called "BadGuys", the this line would look like: "package BadGuys".

Line 3–6: This is an automatically generated comment, which you can erase if you want to, or provide information about what this class will do.

Line 7: This is where you define the name of your class. This needs to to be the same name as the file.

Line 10: This is your class's "Constructor" function. A constructor is named the same as your class, and is called automatically whenever a new object of this class type is created.

Now that we have made our first class, lets make it do something!

Enemy.as

1
2
3
4
5
6
7
8
9
10
11
12
13
14
15
16
17
18
19
20
21
22
23
24
25
26
27
28
29
30
31
32
33
34
35
36
37
38
39
40
41
42
43
44
package  
{
 /**
  * ...
  * @author Chris Moeller
  */
 public class Enemy 
 {
  public var name:String;  
  public var type:String;
 
  private var total_health:int;
 
  public static var total_enemies:int;
 
  public function Enemy(name:String, total_health:int, type:String) 
  {
   this.name = name;
   this.total_health = total_health;
   this.type = type;
   total_enemies++;
 
   trace("New enemy created, total is now: " + total_enemies +
   ", name = "+name+", total_health = "+total_health+", of type = "+type);
  }
 
  public function TakeDamage(amount:int):void
  {
   if(total_health<=0)
   {
    trace(name+": Stop beating my corpse!");
    return;
   }
 
   total_health-=amount;
   if(total_health>0)
    trace(name+": ouch, you damaged me!(health:"+total_health+")");
   else
    trace(name+": Eck, you killed me!");
  }
 
 }
 
}

Line 9–14: We create a few variables that we want for each of our "Enemy" objects.
We'll create a "name" and a "type" public variables (variables that can be seen outside of this class), a private "health" variable, that can only be seen from inside this class, and a static variable, which is a variable that is stored for the entire class, instead of for each object created.

Line 16: Our constructor, which is automatically called when we create an object of this type. Here, all 3 variables are required to be passed in when creatng an object of this type– it must be given a "name", an amount for "total_health", and a "type".

Line 18–20: These 3 lines are used to assign the passed in variables to our class's variables. We use the keyword "this" to refer to "this" class's variables. Since the variables being passed in have the same name as the ones for our class, we must use the keyword "this" to refer to the variables for our class vs. the passed in ones.

Line 21: Just to show how a static variable works, everytime any object of this class type is created, we'll add one to the count of total objects of this type. Remember, this is a variable that is assigned to the class itself, not each object that we will create with this class type.

Line 22: We'll just trace out the total number of enemies when each object is created.

Line 27: This function we will call for each enemy whenever we want to damage them, for instance if the player hit them. We will pass in the amount of damage, and have the function decide how to handle it.

Line 29: We'll first check if the total_health is less than or equal to zero, have the enemy tell them it's aleady dead, and exit out of the function (using return; –which means we're returning nothing, which causes us just to exit the function at that point instead of completing it like normal) instead of continuing with the function.

Line 35: Here the total health of the enemy will be taken away by the amount of damage being done.

Line 36–39: We'll check if the health (after the damage has been done), is greater than zero (not dead), and print out the relative message.

Now you have created a class — but what does it do? Nothing yet! We need to create an object of this type of class to be able to do anything with it.

Objects

[...]