Showing posts with label frameworks. Show all posts

Tuesday, February 28, 2012

Create a Top-Down RPG in Flixel: Your First Room

In this tutorial we will go from asking “What is Flixel?” to having an indoor room and a keyboard-controlled character in the top-down role playing game style (think Zelda).


Final Result Preview

Let’s take a look at the final result we will be working towards:


Step 1: Understanding the Project Structure

For the visual people among us, let’s see how everything will be organized so the rest will make sense.
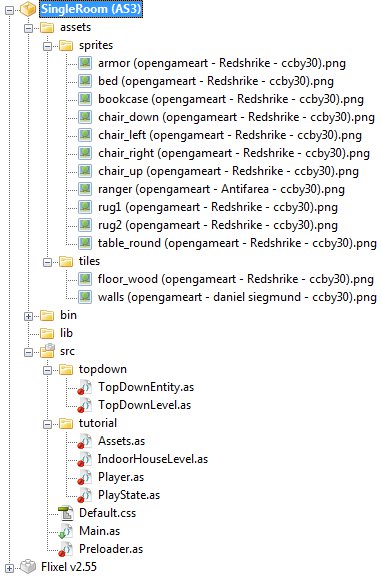
list of all the source files and folders used in the project

Basically, we have all of our artwork stored in the assets folder and all of our ActionScript files stored in the src folder. If you want to use this tutorial as the basis for your own game engine, the topdown folder contains the generic stuff (a.k.a. the engine) and the tutorial folder shows how to use it.

You’ll probably notice rather quickly that the art files have really long names. Rather than showing you a tutorial filled with compelling red boxes (the apex of my artistic ability), we will use some open source artwork from OpenGameArt. Each file is named to show the source, the artist, and the license. So, for example, armor (opengameart - Redshrike - ccby30).png means it’s an image of armor, downloaded from OpenGameArt, created by the artist known as Redshrike, and it uses the CC-BY-30 license (Creative Commons Attribution).

Long story short – these art files can be used for any purpose as long as we link back to the site and give credit to the artist.

Here’s a description of each source file in the project:

  • topdown/TopDownEntity.as – base class for any moveable sprites in our top-down RPG
  • topdown/TopDownLevel.as – base class for a top-down RPG level
  • tutorial/Assets.as – imports any images that we need to use in this tutorial
  • tutorial/IndoorHouseLevel.as – defines an indoor room with some objects lying around
  • tutorial/Player.as – a keyboard-controlled, animated Ranger
  • tutorial/PlayState.as – Flixel state that controls our game
  • Default.css – an empty file needed to prevent the Flex compiler from giving us a warning
  • Main.as – entry point for the application
  • Preloader.as – Flixel preloader

Now let’s get down to business!


Step 2: Firing Up Flixel

Flixel is a 2D game engine for ActionScript 3. To quote the home page:

Flixel is an open source game-making library that is completely free for personal or commercial use.

The most important thing to know about Flixel is that it is designed to use bitmap images (raster graphics) instead of Flash-style vector graphics. You can use Flash movie clips, but it takes a little massaging. Since I don’t feel like giving a massage today, we will be using images for all our art.

Flixel comes with a tool that creates a dummy project for you. This tool creates the three files that are in the root of our project: Default.css, Main.as, and Preloader.as. These three files form the basis for almost any project in Flixel. Since Default.css is just there to avoid a compiler warning, let’s take a look at Main.as.

package
{
 import org.flixel.*;
 import tutorial.*;

 [SWF(width="480", height="480", backgroundColor="#ffffff")]
 [Frame(factoryClass="Preloader")]
 public class Main extends FlxGame
 {
  /**
   * Constructor
   */
  public function Main() {
   super(240, 240, PlayState, 2);
  }
 }
}

There are only three lines of importance here. First off, we tell Flash to use a 480×480 window with a white background. Then we tell Flash to use our Preloader class while loading. Finally, we tell Flixel to use a 240×240 window (zooming in by a factor of 2 to make things look bigger) and to use PlayState once everything is ready to go.

Let me share a quick word about Flixel’s states. In Flixel, states are kind of like a window, but you can only have one at a time. So, for example, you could have a state for your game’s main menu (MainMenu), and when a user clicks the Start Game button you switch to PlayState. Since we want our game to just get going immediately, we just need one state (PlayState).

Next up is Preloader.as.

package
{
 import org.flixel.system.FlxPreloader;

 public class Preloader extends FlxPreloader
 {
  /**
   * Constructor
   */
  public function Preloader():void {
   className = "Main";
   super();
  }
 }
}

Not much to see here. Since we extend from FlxPreloader, Flixel really just takes care of it. The only thing to note is that if you changed Main to some other name, you would have to change className here on the highlighted line.

We’re almost up to seeing something on the screen now. All we need is a Flixel state to get the ball rolling, so here’s PlayState.as.

package tutorial
{
 import org.flixel.*;

 /**
  * State for actually playing the game
  * @author Cody Sandahl
  */
 public class PlayState extends FlxState
 {
  /**
   * Create state
   */
  override public function create():void {
   FlxG.mouse.show();
  }
 }
}

If you compiled this code, you’d get a marvelous black screen with a mouse cursor. Never fear, it gets better from here.


Step 3: Creating a Basic Level

[...]

Read more: Create a Top-Down RPG in Flixel: Your First Room

Thursday, January 19, 2012

Fast Game Prototyping with Flashpunk and Minimal Comps

The proper way to build a game in Actionscript (or any other language) is to create a quick prototype and test the gameplay. Then, if the gameplay is good, you refine it. If it isn’t working, you go back to the drawing board and create another prototype. Large game companies often scrap ideas that aren’t working when the prototype is tested.

In reality, it oftens takes so much time to get the basic mechanics working that you would never consider scrapping it, even if it isn’t really a good game. But, it doesn’t have to be that way. Two issues that slow down game development are:

#1: Dealing with basic input/output, collision detection and all of the “simple” things that you need to make a game function. Coding these elements takes hours and has very little to do with making your game awesome.

#2: Fine tuning your game. There are usually several inter-related variables that need to be adjusted. The (slow) way to do this is to make an educated guess, set the values, publish and test. Then, adjust the variable values and try again.

The good news is that there are solutions to both of these problems. The solution to problem #1 is Flashpunk. It’s an open-source AS3 framework for building pixel-based 2D games. It handles a lot of the basic animation, collision detection, keyboard input and other issues so that you don’t have to do it. It’s a pure Actionscript-based library that compiles in FlashDevelop, which is free and open source, so you don’t even need the Flash IDE. I whipped up a sample “game” in Flashpunk below. This only took me a few hours, including the learning curve.

“But, I’m making an “immersive 3D RPG for iPhone” you say? So what? You can still use Flashpunk to do some quick gameplay demos and make sure that your basic gameplay is actually fun. Once you get the hang of Flashpunk, you can whip up a simple game demo in less than a day. It may save you a lot of time down the road. Go here to get the source code and then work through the tutorials. You can be making games by the end of the day.

Now, if you tried my game demo above, you are probably saying “this sucks! I can’t even jump up to the platforms!” That’s where my second time saver comes in. Minimal Comps is a set of basic Actionscript3 components that can help you with your prototyping. In the game above, I’ve added a game tuning panel made with Minimal Comps. To see it, right-click on the stage and choose “Show Testing Console.” This will open the panel with several options. The first button toggles the collision hitbox visibility. If you make the hitboxes visible, you will notice a bug that I left in the game when you move the character to the left. By changing the values in the textfields, you can adjust the game gravity and jump velocity until the gameplay works and feels right.  Minimal comps makes it easy to set up this testing panel for tuning your game in real time [...]

Read more: Fast Game Prototyping with Flashpunk and Minimal Comps

Sunday, January 15, 2012

Nape and Starling together? It’s possible!

Hey, friends!

Somebody of you already tried fastest 2D flash physics engine Nape with a GPU 2D rendering framework Starling together and noticed that Body.graphic property is class of flash.display.DisplayObject and it can’t be assigned to the starling.display.DisplayObject instance.

So, some of you just used Box2D, some of you controlled Starling DisplayObjects manually, maybe some did what I did, but keep it away from public, but I like Body.graphic property – it’s really useful and I wish all as3 developers can easily use fastest 2d physics engine with 2D GPU rendering engine.

Today I’m glad to present you modified Nape FP 10+ swcs (release and debug) of the Milestone 7.2 “r3″ (maybe not fully) compatible with the Starling.

I just replaced Body.graphic flash.display.DisplayObject class by the Dynamic class (* in as3) and removed Body.graphic.rotation radians to degrees conversion to make it compatible with Starling in my case.
Now I can use Nape as usual, with usual DisplayObjects, it’s really cool!
Yes, there are possible some more compatibility issues, but this changes was enough in my case and Nape worked with the Starling DisplayObjects fine.

Feel free to download and use this swcs with Starling Framework!
debug swc
release swc

I like a challenge with caxe and flib compiling on Windows in the MinGW I faced while recompiling swc, it was fun!
To get the working swcs on Windows, you should

Read more: Nape and Starling together? It’s possible!

Saturday, January 14, 2012

Introducing Starling – a free book from O’Reilly

Introducing Starling Building GPU Accelerated Applications By Thibault ImbertO’Reilly has just released a free book on the Starling Framework written by Thibault Imbert. This is essentially an updated and enhanced version of the getting started PDF that he wrote around the time of the release. Here is the abstract:

Starling is an ActionScript 3 2D framework developed on top of the Stage3D APIs (available on desktop in Flash Player 11 and Adobe AIR 3). Starling is mainly designed for game development, but could be used for many other use cases. Starling makes it possible to write fast GPU accelerated applications without having to touch the low-level Stage3D APIs.

Most Flash developers want to be able to leverage GPU acceleration (through Stage3D) without the need to write such higher-level frameworks and dig into the low-level Stage3D APIs. Starling is completely designed after the Flash Player APIs and abstracts the complexity of Stage3D (Molehill) and allows easy and intuitive programming for everyone.

Thanks to Thibault for creating a great beginner resource for Starling! You can also check out my video tutorial on Starling over on gotoAndLearn.

Read more: Introducing Starling – a free book from O’Reilly

Wednesday, November 2, 2011

Flash Game Dev Tip #14 – How to create a Flixel plugin

Tip #14 - How to create a Flixel plugin When Adam created Flixel 2.5 he added support for plugins. Probably due to my constant harassing him on GTalk about it, but he did it all the same! And lots of my Flixel Power Tools take advantage of them. But it's not always easy to know when you [...]

Flash Game Dev Tip #14 – How to create a Flixel plugin

Wednesday, May 25, 2011

Creation of a platform game using FlashPunk

During these days I am playing a bit with FlashPunk and I want to share with you a couple of examples.

We are going to build a simple platform game.

Getting the required software

While most developers use Flash Builder or FlashDevelop, I will use Flash Professional CS5.5, so the first thing you should do is getting a copy of it. You can get a fully functional 30 days trial at this page.

Then, download the latest release of FlashPunk from this page, and you are ready to go.

Preparing the worspace

All in all, FlashPunk is just an AS3 library, and although it has been developed for being used outside the Flash IDE, you just have to copy the net foder into your project folder and you are ready to go.

Hello FlashPunk

At this time in your main class (I called mine punk), enter this code:

1
2
3
4
5
6
7
8
9
package {
 import net.flashpunk.Engine;
 import net.flashpunk.FP;
 public class punk extends Engine {
  public function punk() {
   super(640,480,60,false);
  }
 }
}

I said FlashPunk has been developed for being used outside the Flash IDE, and that’s it… we haven’t Sprites or Movieclips, but the class extends Engine FlashPunk’s class.

This line

6
super(640,480,60,false);

Calls the constructor of the extended class, that is Engine constructor, with these arguments:

width: the width of your game in pixels

height: the height of your game in pixels

frameRate: the game framerate, in frames per second (default: 60)

fixed: true if a fixed-framerate should be used, false (default) otherwise.

Test the movie and you will see a dark background color, no matter the Stage color.

Your FlashPunk project works!

Adding some walls

When it’s time to add graphics to our FlashPunk games, we have to draw them with our preferred paint software. Using Photoshop, I made a 32×32 pixels square and called saved it as wall.png in a newly created assets folder in the same level of net (the one which contains FlashPunk library).

Then change punk.as this way:

Read more: Creation of a platform game using FlashPunk

Tuesday, April 5, 2011

Flash Game Dev Tip #8 – Building a Shoot-em-up Part 3 – Return Fire

Flash Game Dev Tip #8 – Building a Shoot-em-up Part 3 – Return Fire:

Flash Game Dev Tips logo

Tip #8 – Flixel – Building a Shoot-em-up, Part 3 – Return Fire

This tip follows-on from Tip #4, where we added enemies and explosions into our game. But it was a little one-sided. This time the enemy are going to shoot back. And you’ll feel it, by way of a health bar and set of lives in our new HUD. Finally we’ll drop in the scrolling tile-map background and simple menu / game-over states. By the end it will look like this:

Scrolling tile-map background and simple menu and game-over states

Note: I’ve embedded the game at the bottom of the tip.

Return Fire

Last time we added the Enemy Manager, which spawned a regular supply of enemies at us. Each enemy had a launch function which set it moving. Let’s add the ability to fire to that:

// Will they shoot at the player? 70% chance of doing so
if (FlxMath.chanceRoll(70))
{
 willFire = true;
 fireTime = new FlxDelay(1000 + int(Math.random() * 500));
 fireTime.start();
}

This uses a new FlxMath function chanceRoll. The enemy has a 70% chance of firing at you. If this happens we create a new FlxDelay Timer of 1 second + up to an extra 0.5 second, and start it running.

Then in the Enemy update function we check that timer:

if (willFire && fireTime.hasExpired)
{
 Registry.enemyBullets.fire(x, y);
 willFire = false;
}

As you can see, this is calling the fire function in our Enemy Bullet Manager, passing in the x/y coordinates of the Enemy, which launches a bullet from the bullet pool:

public function fire(bx:int, by:int):void
{
 x = bx;
 y = by;
 FlxVelocity.moveTowardsObject(this, Registry.player, speed);
 exists = true;
}

FlxVelocity tells the bullet (this) to move towards the player at the value of speed (which in our case is 240 pixels per second).

Pixel Perfect Collision

If you are unlucky enough to be hit by our new enemy bullets then we need to damage your health.

Previously the game used native flixel collision, which is based on bounding-boxes (i.e. the rectangle that encloses your sprite). This isn’t desirable in a shoot-em-up. It meant the player could get shot without the enemy bullet even visually touching him. To address this we simply add one check into our bulletHitPlayer function [...]

Saturday, March 12, 2011

An Introduction to Robotlegs AS3 Part 3: Services

An Introduction to Robotlegs AS3 Part 3: Services:

This is the third part in the introductory series covering Robotlegs AS3 here on InsideRIA. In the first part in the series we learned what Robotlegs AS3 is and had a brief 'HelloWorld' introduction to the Robotlegs Context and Mediator classes. In the second part we explored Models. This article is going to expand on those concepts and introduce Services.

Robotlegs

If you missed the first two parts I recommend looking at them first:

What is a Service?

The name of this website is InsideRIA. A Service is your application's link to the I in RIA. Services provide your application an API to access web services, data sources, and other applications. This could be accessing the Twitter API, your company/client's web server, the file system, or a host of other sources of data outside of your application.

A Service makes remote calls and parses the results. After the results are parsed, the service will notify the rest of the application that data is ready and/or update a Model with the results. We want external data to live as short of a life as possible within our applications. As soon as we get the results, they are converted to a format that is specific to the application domain. This might be XML, JSON, or typed Objects from an AMF source. When we are working in a 'controlled' environment, meaning the server-side mid-tier is within our control, sometimes we can avoid parsing altogether because the returned objects are already part of the application domain. In many situations we are accessing third-party servers and receiving 'foreign' data. This is what we want to parse.

Let's make something!

So with the definition behind us, lets look at how a Service functions within a Robotlegs AS3 application. This example is going to make use of the basic Twitter Search API.

Serve talks to twitter

The diagram above is the general overview of how our service will function. It receives a request, asks the server for some data, parses the results, and notifies the rest of the application. The requests are generally made from Mediators and Commands. In this example, we are going to keep it simple and make requests to the service from a Mediator. In the next article we will talk about how Commands are a great place to access services. Let's take a look at the finished widget and then build it from the ground up.

So it's not the next TweetDeck, but it is about as simple as it gets when accessing the Twitter API. The widget access the Twitter Search API and returns the current results for 'robotlegs.' We'll start simple, and add complexity later if we need to. Let's take a look at the pieces that go into to putting this together [...]

An Introduction to Robotlegs AS3 Part 2: Models

An Introduction to Robotlegs AS3 Part 2: Models:

This is the second part in the introductory series covering Robotlegs AS3 here on InsideRIA. In the first part in the series we learned what Robotlegs AS3 is and had a brief 'HelloWorld' introduction to the Robotlegs Context and Mediator classes. This article is going to expand on those concepts and introduce Models.

Robotlegs

If you missed it, here is Part One: Context and Mediators

What is a Model?

Model classes encapsulate your application's data and provide an API to access and manipulate that data. The other classes in your application will make requests of models via this API. When data on the model is updated, the model dispatches events that the other classes within your application can react to. Models are appropriate for capturing the domain logic, such as performing calculations or other manipulations. An example of this might be a shopping cart. When an item is added to the shopping cart model, the new total for all of the items in the cart will be calculated. The new total will then be stored on the model for access by other classes within the application. By placing this logic within your models, you ensure that it isn't scattered across the entire application and know exactly where to look to see how and when your data is being manipulated.

In addition to controlling access to data, models maintain the state of your application. State, in the sense of the data model, is not the same concept as a Flex State, which relates to controlling the appearance of your application. They are certainly related, but with a model, consider a list of objects. You want to keep track of which of these objects is selected, so the data model has a selected property which is updated with the currently selected item. Other areas of your application can now access this property to discover which item is selected and react accordingly.

Models can be written to be portable. Along with Services this is something to keep in mind when you develop your models. There are many common sets of data that can easily transport between one application and the next. Think of, as an example, a UserLoginModel or a ShoppingCartModel. Portability takes a bit more thought and energy, but no more than writing the same code over again for each project does.

The model deserves a lot of attention. It is the core of your application. The visual components get all the ooos and aaahs, but as a developer you know that data is the man behind the curtain. It is our jobs, as developers, to curate the data and deliver it to those beautiful interface items accurately. This is why isolating domain logic in the model is so important. By isolating it you have made it easier to locate, update, and maintain. With the basic definition of the model in hand, let's look at a small example application.

On to the code!

This pure AS3 application is making use of Keith Peters's awesome Minimal Comps library. Don't worry, if you love Flex (and how could you not?) the next example will be a Flex app, but Minimal Comps makes it so easy to make quick examples with AS3, and Robotlegs is just as easy to use with a straight Actionscript application as it is with Flex. So let's take a look at the application and take it apart to examine its pieces.

Above is the application we will be examining. It is a simple list of authors with a quote displayed for the author that is selected in the list. Here is the archived Flash Builder project (zip 168k), which includes the Robotlegs 1.1 and MinimalComps SWC files as well[...]

An Introduction to Robotlegs AS3 Part 1: Context and Mediators

An Introduction to Robotlegs AS3 Part 1: Context and Mediators:

We are presented with lots of choices these days when it comes to frameworks for Actionscript 3 development. This is a good sign. The open source community is alive and vibrant, and tools that make development easier are a good thing. Over the course of the last year Robotlegs AS3 has seen rapid growth in adoption. It is being leveraged by major media corporations, independent game developers, startups, and enterprises of all sizes.

Robotlegs

This is the first in a series of Robotlegs articles that will appear here on InsideRIA. In the coming weeks, more articles in the series will detail core Robotlegs concepts and work through some more advanced concepts involving third party utilities and libraries built to interact with them.

This article uses Flex. Don't worry straight AS3 developers, the second part uses an example that is pure AS3.

What is Robotlegs?

Simply put, Robotlegs is a mechanism for wiring your objects together. ObjectA needs to talk to ObjectB. ObjectA doesn't want, or need, to know that ObjectB even exists. How can they communicate? The simple answer is through Events. With Flash, we have a native event system that is used to facilitate this sort of communication. Likely you use Events on a daily basis. Objects on the display list communicate via events, and event bubbling allows distant objects to receive messages from other display objects. What about objects that aren't on the display list? This is where a framework such as Robotlegs can really make life easier for you.

At its core, Robotlegs is a set of modular utilities and interfaces that provide tools to ease these communication tasks, reduce repetitive coding tasks, and manage dependency injection within your application. In addition to this core set of tools, Robotlegs provides a lightly prescriptive MVC+S (Model, View, Controller, and Service) implementation to get you started. If you have any experience with PureMVC you will quickly recognize the use of Mediators and Commands within the Robotlegs MVC+S implementation. If not, don't worry, we will be looking at these classes in more depth soon.

This article is going to give an overview of Robotlegs through a simple 'Hello World' example. You will probably look at the example and say, 'Eh? I could have done this in a single MXML file without all the hassle!' While probably true with a trivial example, keep in mind that on a large project this structure quickly becomes invaluable. That is the benefit of development with a framework in general. It allows us to effectively communicate concepts and understand a code base much quicker than a slapped together application with no patterns and practices.

This is not going an exhaustive dissection of Robotlegs, but hopefully it is enough to spark your interest. I've posted resources at the end of the article for further investigation. That said, let's look at some code!

Basic Structure of a Robotlegs MVC+S Application

A typical Robotlegs MVC+S application is composed of several parts:

  • Context - the Context is the bootstrapping mechanism that initializes dependency injection and the various core utilities that Robotlegs uses.
  • Mediators - Mediators manage communication between your application's view components and other objects within your application.
  • Commands - Commands represent individual actions that your application can perform. These are typically in response to user activity, but are not limited to that use case.
  • Models - Models store data and represent the current state of your application.
  • Services - Services are your application's gateway to the outside world.

Let's take a look at the Context and Mediators in more depth, starting with the Context.

The Context is at the heart of your application. It provides the central event bus that your other application objects will utilize to communicate with one another. Beyond the initial loading and bootstrapping of your application, you won't deal with the Context during regular development. It comes to life, does its job, and then quietly gets out of your way while you develop your heart out. The Context is not a Singleton. Your application can have any number of Contexts, which makes Robotlegs well suited for modular applications. We aren't going to explore modular applications here, but it will be the subject of a future article as it is an extremely powerful tool. To start off, let's look at the most basic Context [...]