Showing posts with label optimization. Show all posts

Monday, February 11, 2013

Creating Sprite Sheets in Five Minutes With Texture Packer

So you’ve started working on your project, you got the basics down and now you are at the part where you actually want to implement some graphics… but you’re not quite sure how to do that. Let me introduce you to Texture Packer.

What Is Texture Packer?

Created by the guys over at Code n’ Web, Texture Packer is a great little piece of software that allows you to pack textures, assets, and pretty much anything you want in a nifty little sheet that is compatible with tons of frameworks!
A free version is available, but some features are disabled.
I love Texture Packer because it’s easy to use, it’s super flexible and it works with the engines you already use. It does an amazing job of letting you optimize your sheets with various options such as color depth, auto scaling, dithering and trimming invisible pixels. It also exports to many formats compatible with Cocos 2D, Unity, Corona, any engine that supports JSON, and more.

The Main Interface

Before we start to make our own sheet, let’s look at the interface for a second.
Texture Packer: Sprite Sheets tool
The main Texture Packer interface.
All the settings on the left might look a bit menacing but don’t worry, they are actually really easy to set up. And even better, you only have to set them once; you can then save them and re-use them later for any other sheet you want to create!
As you can see, the sheet’s settings are on the left, the list with our assets is on the right (which is empty right now), and the sheet preview itself in the center.

Let’s Get Started!

The first thing to do is open your folder with your magical art, and drag and drop it into Texture Packer’s assets list.
Texture Packer: Sprite Sheets tool
As you can see, they instantly appear in your sheet. You can click on a specific asset in that list and it will highlight in the sheet. (This works the other way around as well.)
Tip: Right under the preview sheet there are some zoom options; feel free to play with those until the sheet fits nicely on screen for a better preview.
Let’s take a look at the mess of options on the left. There are only three categories you have to worry about:
  • Output settings: These take care of where your sheet will be exported and the compression that’s applied to it.
  • Geometry settings: These take care of the sheet’s size and asset scaling.
  • Layout settings: These are all about assets’ placement in your sheet and overall optimization.
We’ll go through each of these in turn.

Output Settings

Data Format

This is the format for the sheet’s data file containing all the information you need, such as coordinates, dimensions, and rotation.
Currently, the following options are available: Cocos2D, Corona, Sparrow/Starling, LibGDC, JSON, Unity3D, LibGDX, Css, Gideros, CEGUI/OGRE, AndEngine, AppGameKit, Slick2D, Moai, BHive, Xml, BatteryTech SDK , EaseIJS, Kwik2 and plain text.

Data File

This is the path where the data file will be saved, it’s a good practice to keep it in the same folder as the sheet itself.
Tip: It’s a good idea to set the output folder so the sheet and its data file are exported directly into your engine’s directory.

Texture Format

From here you select the format of the sheet’s image. PNG is recommended, unless you need something else specific for your project.

Png Opt. Level, DPI, and Premultiply Alpha

Unless you know what you are doing, leave these settings untouched: Png Opt Level at “none”, DPI at 72 and Premultiply Alpha unchecked.

Image Format

In other words, color depth. It’s indicated to leave this untouched as well; the default RGBA8888 is the highest quality option. In case you are going for a specific look or you highly value the size of your sheets you can choose a lower option such as RGBA4444.
The “A” in those abbreviations stands for “Alpha” (transparency), and you will notice that if you pick an option that says only “RGB” it will have a black background, meaning there is no alpha info there. If you need it, you can create an alpha map by selecting “ALPHA” from that list; this may come in handy in some cases so keep it in mind.
Texture Packer: Sprite Sheets tool
The difference between RGBA8888 and RGBA4444 is evident in the colors of the main body, above.

Dithering

If you haven’t touched the option from the previous step, dithering will be unavailable, but don’t worry about it. Now, in case you selected a lower option in the previous step, such as RGB444, you may notice that you can see where the color tones match… that’s ugly, so dithering is here to help you by mixing colors using some complex algorithms.
Try out the “FloydSteinberg” or “Atkinson” options and see how they look.
Texture Packer: Sprite Sheets tool
The effect of the dither is easiest to see in the shirt’s fabric.

Texture File

Just like the “Data File” option, from here you choose the path where the sheet image will be exported.
There is one more setting in the Output category called “Auto SD”. This allows you to automatically export a smaller version of the same sheet you are working on at the same time. This is useful when you work on an iOS app that requires two separate sheets in order to work on both normal and retina displays – Texture Packer has you covered.

Geometry Settings

Size

This is the place where you can change the size of the sheet. You can pick a maximum size or a fixed size. There are predefined, recommended values in the drop-down menu (all powers of two), but you can also manually input any values you want.
Unless you are working on a project that requires a specific size for the sheet, I suggest you enable the “Allow free sizes” option. This ensures that the sheet size is big enough to accommodate all the assets without leaving any wasted blank pixels. (Also, keep the “Pack” option on “Best”.)

Scale

From here you can easily re-size your entire sheet from the drop-down menu (also allowing you to add your own values). Right below the scaling number there is another option for the scaling method. The “smooth” and “fast” options are the most common; “fast” does the scaling without blending any pixel color (this could be used to scale up your pixelated graphics for a retro game), and “smooth” scales everything smoothly (obviously).
[...]
Read more: Creating Sprite Sheets in Five Minutes With Texture Packer

Wednesday, December 12, 2012

Enable Advanced Telemetry on Flex or old SWFs with SWF Scount Enabler

Adobe Scout allows developers to profile SWFs like never before. The telemetry data sent by the release Flash Player to Adobe Scout is by default only set to send basic telemetry data. To be able to see data for the AS3 sampler, Stage3D rendering, and DisplayList rendering you have to enable the SWF (password is optional).
This is done by using the newer asc2 compiler that comes in Flash Builder 4.7 or in the AIR sdk found in the Gaming SDK from Creative Cloud. Currently asc2 only works with ActionScript projects and implements a new flag called -advanced-telemetry or a check box in Flash Builder 4.7 ActionScript project properties.
To enable SWFs that don’t use asc2, mainly Flex apps or legacy SWFs, you need to use a script to write a specific SWF tag into the SWF file. This doesn’t change the SWF abc code but just adds a SWF tag that Flash Player will use to start sending telemetry data. There is a python script written to help with writing this tag. But the python script requires python and I wanted something a bit easier to use so I created SWF Scout Enabler.

To use the application all you need to do is drag your SWF into the application and it will create a new SWF (or override if you give it a “” suffix) that is enabled for advanced telemetry.
The application will also save the last suffix and password used. It also has the ability to re-process the last processed file by clicking on the top right box image.
Last but not least, the full source of the application can be found on github.
Download the SWF Scout Enabler AIR application.
I need to thank Joseph Labrecque for testing out the app.
Note: This app has been tested on a bunch of SWFs but if it is not working let me know. There seems to be a bug with Adobe Scout on AS2 SWFs older than version 8. Adobe Scout will never do ActionScript sampling on AS2 SWFs but it will do basic telemetry.

Read more: Enable Advanced Telemetry on Flex or old SWFs with SWF Scount Enabler

Tuesday, December 11, 2012

Animating With Asset Sheets: An Alternative to Blitting

So you’ve got your awesome game in the works, it’s got all sorts of complex physics, epic enemy AI or what-have-you. But it feels lifeless. You want some OOMPH, you want some animation!
So if you go and look up how to animate, the first answer you come across will most likely be a method using spritesheets and blitting. In fact, almost all tutorials on the web talk about nothing but blitting, as if there’s no other way to animate. But in my experience, there’s a better way to animate your orcs and goblins!
This method could be called animating with asset-sheets – or more technically, tweening with asset-sheets – as opposed to using sprite-sheets. Before we get into exactly what this means, let’s consider an important question:

What’s Wrong With Blitting?

Below are some reasons as to why you would not want to use blitting in certain cases.

1. It Takes a Lot of Space

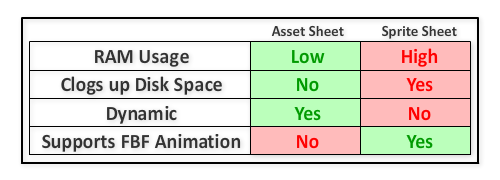
Whether we’re talking about RAM or disk space, sprite sheets can easily clog things up. Especially if you’re trying to make HD graphics. Huge sprite sheets may have to be split into multiple PNGs, taking up precious RAM and skyrocketing your game’s size if you’re not careful.

2. It’s Not Dynamic

What happens when you want to speed up an animation? You could skip some frames, but what about slowing down? The animation would look choppy and ugly. Even if you want to only support 60 fps, what if a computer can run the game faster? You could have jaw-droppingly smooth animations at higher frame rates with no extra work, and it would also look good if you chose to change the game’s frame rate at any time.
And what if you wanted something to happen when the player’s arms reached some place? Or to have him pick up something? You’d need to manually mark his arm throughout the animation, which may be time-consuming as you can’t get any data about where any of his limbs are from a sprite sheet.

3. It Doesn’t Allow You to Make Transitions

What happens when the player is running and suddenly jumps? It cuts to the jump animation right away. This looks choppy, and this would happen every time the animation transitions to a new state. You’d have to make a transition for every pair of animations you have, which is not only insanely time consuming, but also has the adverse effect of increasing your RAM usage as discussed earlier.

The Alternative

Using asset-sheets not only allows the animations to be dynamic and scale up with any FPS, as well as transitioning smoothly between any two states, but also takes a tiny tiny amount of disk space and RAM compared to blitting!
This isn’t even very new. Some popular games use it, like the recently popular Closure.  Its only limitation is that it can’t do frame-by-frame (FBF) animation, since it relies on tweening – so if you have complex explosions, you’ll have to use sprite sheets.
But for a lot of cases, you’ll find you won’t need to, and it’s more than worth the effort to have a system like this for your game, as some games could rely completely on this, shaving off a ton of overhead. It’s also really cool because it’s similar to how you might animate a 3D game!
So to summarize:
Gamedev Animation With Asset-Sheets: An Alternative to Blitting

Let’s Dive Right In

This is a character and his asset sheet.
Gamedev Animation With Asset-Sheets: An Alternative to Blitting
As the name implies, an asset sheet is a PNG with all the limbs/assets of the character or object separated.
And here is the animation data in JSON (of course, you can use whichever format you prefer to work with):
//this snippet shows the first three frames of the "Body" animation
"-name":"Body",
"Frame": [
{
 "-x":"0.65",
 "-y":"-64.45",
 "-rotation":"0.000"
},
{
 "-x":"2.45",
 "-y":"-64.45",
 "-rotation":"0.279"
},
 "-x":"3.30",
 "-y":"-64.05",
 "-rotation":"0.707"
}
Now combining these two together in an awesome engine, you get:
Gamedev Animation With Asset-Sheets: An Alternative to Blitting
And unlike a blitted animation, this could speed down or up, or transition very smoothly. So this is what we'll be doing.

Step 1: Exporting Your Asset Sheet

The first step is to get your asset-sheet ready. You can do this in any number of ways. The point is to end up with a sheet containing the assets and a data file containing the positions of the assets in the sheet. This is the exact same method as for making a spritesheet, except in lieu of sprites you add separate assets.
Export your player's limbs and pieces as individual PNGs, then use a program like Texture Packer to group them into a sheet. There are other programs, but I personally prefer Texture Packer because of how versatile and feature-rich it is.
Tip: Whatever software you use to make your sheets , make sure there is at least 2px of padding between each asset and 1px extrusion. This will prevent some nasty problems in the future.

Step 2: Exporting Your Animation Data

[...]
Read more: Animating With Asset Sheets: An Alternative to Blitting

Tuesday, December 4, 2012

Introducing Game Developer Tools

I am really excited about what happened tonight. We just announced the introduction of the Adobe Game Developer Tools on Creative Cloud. You can read the official announcement here. As part of this, we are introducing three new products: Adobe Gaming SDK, FlasCC and Adobe Scout, which I have been working on for a year now. Here is a video about Adobe Scout and why it is going to change everything for your as a developer: I wrote a full article on how to get started with Scout. Make sure you check it out! If you have any questions, check the Scout forums! If you want to take a deep dive in Scout you can also check the video tutorials here. We also wanted to provide a great out of the box experience for developers to get started with the stack. Provide a nice package that allowa developers to get up and running quickly without having to hunt for the frameworks needed, the compilers and right documentation. That's why we are also introducing the Gaming SDK: The Gaming SDK contains the key frameworks you guys need to use to create fast performing 2D and 3D GPU games, but also much more, from the ATF tools to iOS ANEs. Starling, Feathers and Away3D are officially supported by Adobe and part of the Gaming SDK. It provides to you a one stop shop package to get started with the technology, we hope you guys will enjoy it! For those of you guys doing native development and interested in porting native games to the desktop, you can now use FlasCC (formerly named Alchemy), which is now release quality and supported.

Read more: Introducing Game Developer Tools

Wednesday, October 17, 2012

Project “Monocle”, profiling taken to the next level

Adobe project "Monocle"Back in August, I posted a sneak peek video of project "Monocle" the next-generation profiling tool for ActionScript based content. Last week at GDC online, I gave a talk entitled "Changing the game" and demoed Monocle. Again, the feedback we had was unbelievable.
I have been using Flash for 13 years now and I have seen lots of cool things happening in Flash. The introduction of AMF in Flash Player 6 (Flash Remoting) allowing fast and efficient RPC communications taking care of serialization for you (AMFPHP, anyone? Props to Patrick Mineault). Damn, that was nice. The introduction of BitmapData in Flash Player 8, which enabled so much expressiveness and Flash Player 9 with ActionScript 3 and a world of new possibilities. I think Monocle is the next big thing happening to Flash, it will just revolutionize the way we work with Flash Player and AIR.
I got lots of emails and tweets from people asking to get on the prerelease. I am really excited to announce that all of you guys can now get access to "Monocle"!
Please register, test Monocle, look for bugs, give us feedback! So what do you need to get started?
1. Register here.
2. Download Flash Builder 4.7 Game Development Beta 2 with Project Monocle Support.
3. Compile your project and make sure the compiler option "Enable Detailed Telemetry" is enabled. Joseph Labrecque has posted great details here.
4. If you are using Flash Pro or have existing SWFs you don't want to recompile. We provide a little python script to post process you SWF and make them profilable.
I hope you guys will love it. Enjoy!
Read more: Project “Monocle”, profiling taken to the next level

Thursday, July 12, 2012

New tutorial: Profiling memory with TheMiner

Tutorial: Using the Memory profiler

Most of the time, Flash performance issues come from bad memory management.
Object instantiation take a lot of time, and since FlashPlayer work with a Garbage Collector, having tons of objects can make it go nuts.
Good practice is to remove all instantiation from loops, keep a minimum of object in memory and use serialization and bytearrays to keep some data.
This profiler show you what the VM is reporting as object being allocated and removed (garbage collected).
Here is what the profiler look like:

1. Search filter
Since there is a lot of different object type being managed by the VM,
just listing them would make it hard to find specific data.
This input box let you enter any text to filter the visible object using their QName
When the filter search is ON (there is text inside the box), the box appear green,
and only class name with the text in it appear in the list [...]
Read more: New tutorial: Profiling memory with TheMiner

Monday, April 16, 2012

ActionScript 3.0 Optimization: A Practical Example

Code optimization aims to maximize the performance of your Flash assets, while using as little of the system’s resources – RAM and CPU – as possible. In this tutorial, starting off with a working but resource-hogging Flash app, we will gradually apply many optimization tweaks to its source code, finally ending up with a faster, leaner SWF.


Final Result Preview

Let’s take a look at the final result we will be working towards:
Note that the “Memory Used” and “CPU Load” stats are based on all the SWFs you have open across all browser windows, including Flash banner ads and the like. This may make the SWF appear more resource intensive than it actually is.

Step 1: Understanding the Flash Movie

The Flash movie has two main elements: a particle simulation of fire, and a graph showing the animation’s resource consumption over time. The graph’s pink line tracks the total memory consumed by the movie in megabytes, and the green line plots CPU load as a percentage.
ActionScript objects take up most of the memory allocated to the Flash Player, and the more ActionScript objects a movie contains, the higher its memory consumption. In order to keep a program’s memory consumption low, the Flash Player regularly does some garbage collection by sweeping through all ActionScript objects and releasing from memory those no longer in use.
A memory consumption graph normally reveals a hilly up-down pattern, dipping each time garbage collection is performed, then slowly rising as new objects are created. A graph line that’s only going up points to a problem with garbage collection, as it means new objects are being added to memory, while none are being removed. If such a trend continues, the Flash player may eventually crash as it runs out of memory.
The CPU load is calculated by tracking the movie’s frame rate. A Flash movie’s frame rate is much like its heartbeat. With each beat, the Flash Player updates and renders all on-screen elements and also runs any required ActionScript tasks.
It is the frame rate that determines how much time Flash Player should spend on each beat, so a frame rate of 10 frames per second (fps) means at least 100 milliseconds per beat. If all the required tasks are performed within that time, then Flash Player will wait for the remaining time to pass before moving on to the next beat. On the other hand, if the required tasks in a particular beat are too CPU intensive to be completed within the given time frame, then the frame rate automatically slows down to allow for some extra time. Once the load lightens, the frame rate speeds up again, back to the set rate.
(The frame rate may also be automatically throttled down to 4fps by the Flash Player when the program’s parent window looses focus or goes offscreen. This is done to conserve system resources whenever the user’s attention is focused elsewhere.)
What this all means is that there are actually two kinds of frame rates: the one you originally set and hope your movie always runs at, and the one it actually runs at. We’ll call the one set by you the target frame rate, and the one it actually runs at the actual frame rate.
The graph’s CPU load is calculated as a ratio of actual to target frame rate. The formula used to calculate this is:
CPU load = ( target frame rate - actual frame rate ) / actual frame rate * 100
For example, if the target frame rate is set to 50fps but the movie actually runs at 25fps, the CPU load will be 50% – that is, ( 50 - 25 )/ 50 * 100.
Please note that this is not the actual percentage of system CPU resources used by the running movie, but rather a rough estimate of the actual value. For the optimization process outlined here, this estimate is a good enough metric for the task at hand. To get the actual CPU usage, use the tools provided by your operating system, e.g. the Task Manager in Windows. Looking at mine it right now, it shows the unoptimized movie is using 53% of CPU resources, while the movie’s graph shows a CPU load of 41.7%.
ActionScript 3.0 Optimization: A Practical Example

Tuesday, March 13, 2012

fastSort, faster is better!

Today, Jackson Dunstan posted about how to use a profiler to get better performance in flash.
For this post he decided to show how to use TheMiner… awesome!
In this post he’s profiling two sorting method: native vector. sort, and Skyboy’s fastSort code.
At first I was impressed by the result of Skyboy. Then I realized two things.
First, The flash native sort REALY don’t like Number.infinity, negative infinity.
So when sorting and vector. with these values inside, it’s getting a LOT slower.
Where a standard vector could take 100ms to sort, one with infinity values in it can take up to 2000ms!!
The other thing is fastSort is using void (*) pointer everywhere.
So if we go back a few day to my previous (epic) article , we know that this is a really bad thing when casting from void to Number.
It’s allocating a LOT of memory. (5Mo/Sort on 50K elements)
So I decided to add a few hundreds lines to this class with already a lot of it (fastSort)
I added a specific sorting method for int, uint and Number to manage only typed values.
The result is quite amazing!
Native Vector Sort : 100 ms + 400Ko allocation
UnOptimized fastSort : 400 ms + 5Mo allocation
New Optimized fastSort : 20ms + zero allocation
Finaly, just before giving you the code, I want to invite you on a new little forum that focus on Performances, optimization, debugging and multiple other flash hardcore subjects.
Many of the most hardcore dev and blogger I know are already in or are going to join soon, so please be part of this and enjoy posting refreshing and brain teasing content!
The Hardcore flash forum
And now.. the way too many lines of code part: [...]

Read more: fastSort, faster is better!

Sunday, February 26, 2012

Epic Flash memory leak track down

Have you ever had a memory instantiation problem that was impossible to track down? Here is a post that might help you with that kind of thing!

Beware! This post is very long… but VERY instructive! If you want to learn some internal mechanism of Flash, I strongly suggest you read it from top to bottom without skipping parts!:)

The Context

Yesterday I was helping Luca (creator of Nape physic engine, made with haXe) to find what seemed to be a big memory leak. There was a couple framework used so it could be directly from Nape… or from Starling… or from debug tool running… or from a port error from haXe…

Memory profiling

So I though it was going to be simple


I got TheMiner running and started profiling. It was pretty easy to find a LOT of memory allocation coming from Starling. The SWC version available is over 4 months old and back then there was a lot of useless instantiation coming from TouchProcessor.as
If you use Starling, I suggest you build from sources as these instantiation are gone now.
There are a couple left but no big deal.

We also saw that Nape was using a LOT of anonymous function call and some try catch. This create what’s called activation-object. And there was a lot of these. So by removing anon-calls and try catch we were able to remove a lot of instanciation.

And After removing the debugging tools, It was clear it was coming from haXe or Nape.

But even when recording all samples allocated by the VM I could not find the damn allocation. (we are talking of more than 1Mo per sec)

Then I wrote a Scala script to try to identify samples that could have been missed, but that didn’t help me much since that was only an override of constructor and constructorProp avm opcodes.

Simplifying the context

So I decided to look a bit further into the bytecode and found something very interesting.

After simplifying the problem multiple time, I got this very simple code to demonstrate the bug.
Because Nape has that very nice abstraction layer, it can support both standard DisplayObject as well as Starling 3D DisplayObject.

The leak happens when Nape try to set the DisplayObject properties like .x, .y, .rotation, etc.
Let’s create a fake DisplayObject class and name it DO [...]

Read more: Epic Flash memory leak track down

Tuesday, February 21, 2012

Keep Your Flash Project’s Memory Usage Stable With Object Pooling

Memory usage is an aspect of development that you really have to be careful about, or it might end up slowing down your app, taking up a lot of memory or even crashing everything. This tutorial will help you to avoid those bad potential outcomes!


Final Result Preview

Let’s take a look at the final result we will be working towards:

Click anywhere on the stage to create a firework effect, and keep an eye on the memory profiler in the top-left corner.


Step 1: Introduction

If you have ever profiled your application using any profiling tool or used any code or library that tells you the current memory usage of your application, you may have noticed that many times the memory usage goes up, and then goes down again (if you haven’t, your code is superb!). Well, although these spikes caused by big memory usage look kinda cool, it’s not good news for either your application or (consequently) your users. Keep reading to understand why this happens and how to avoid it.


Step 2: Good and Bad Usage

The image below is a really great example of poor memory management. It’s from a prototype of a game. You must notice two important things: the big spikes on memory usage and the memory usage peak. The peak is almost at 540Mb! That means this prototype alone reached the point of using 540Mb of the user’s computer RAM – and that is something you definitely want to avoid.

Bad memory usage

This problem begins when you start creating a lot of object instances in your application. Unused instances will keep using your application’s memory until the garbage collector runs, when they get deallocated – causing the big spikes. An even worse situation happens when the instances simply won’t get deallocated, causing your application’s memory usage to keep growing until something crashes or breaks. If you want to know more about the latter problem and how to avoid it, read this Quick Tip about garbage collection.

In this tutorial we will not address any garbage collector issues. We’ll instead work on building structures that efficiently keep objects in the memory, making its usage completely stable and thus keeping the garbage collector from cleaning up memory, making the application faster. Take a look at the memory usage of the same prototype above, but this time optimized with the techniques shown here:

Good memory usage

All this improvement can be achieved using object pooling. Read on to understand what it is and how it works.


Step 3: Types of Pools

Object pooling is a technique wherein a pre-defined number of objects are created when the application is initialized, and kept in the memory during the entire application lifetime. The object pool gives objects when the application requests them, and resets the objects back to the initial state when the application is finished using them. There are many types of object pools, but we will only take a look at two of them: the static and the dynamic object pools [...]

Read more: Keep Your Flash Project’s Memory Usage Stable With Object Pooling

Monday, January 30, 2012

Andy Moore Blog: How to improve your mobile AS3/AIR performance

Shawn Blais taught me all I needed to know about mobile optimizations of my AS3 code. His blog only has a dozen or two articles, but they are chock-full of interesting information (and even sales figures!). The most useful stuff for me, at this point, is the graphics pipeline optimizations.

The thing that ties the following three steps together is one unifying theory: use bitmaps for everything. You can start with MovieClips and vector Sprites, and you can even stick with Flash’s DisplayList to keep things organized. But the actual image data? Bitmaps! Always bitmaps.

Step One: Use the GPU rendering mode

When designing a mobile application, you’ll have an “application.xml” (or similarly named) file that contains all sorts of nice settings. One of those is going to tell the mobile device whether to render using the CPU or the GPU. Most defaults (including the FlashDevelop template file) will point you to CPU, and that may be fine for flash’s standard vector art. Switching to bitmaps and the GPU setting will give us much better performance.

Open up application.xml and make sure this exists:


<initialWindow>

<renderMode>gpu</renderMode>

</initialWindow>

(source article is same as step 3)

Step Two: Lower the Stage Rendering Quality

AS3′s stage-rendering quality setting determines how vector art (probably your “Sprite” and “MovieClip” classes) is rendered. The thing is, even with a low setting, the stage still respects your bitmaps “smoothing” flag and draws it without any discernible difference. No need to spare the CPU cycles on something we aren’t using!


stage.quality = LOW;

If you have vector art you are loading and converting during runtime (see step 3), AS3 even lets you change the stage quality on the fly! Just use this:


stage.quality = HIGH;

convertMySprite(); // Or whatever your function is

stage.quality = LOW;

(source article)

Step Three: Use Bitmaps, and Cache them

This is probably the best performance-enhancing-drug my mobile apps have used so far, but it only gets the big performance gains if you use it in conjunction with Step 1 (GPU render mode).

The basic idea is to take all of your image data, and cache the bitmap data only once - dynamically – to a dictionary reference.  In GPU render mode, this stores the data as a texture in GPU memory on the mobile device. As long as all duplicate images are pulled from the original data, no new memory is used and creation of new graphics is lightning fast.

This works particularly well for common images used frequently – say, badguys, bullets, and common tiles. But I use it for everything!

Shawn’s original article laid out some source code and a longer explanation if you want to get into details and performance charts. His code does all of the conversions automatically for you, and the discucssion in the comments of his article improved upon it. I added a few tweaks myself, and it is now the only class I use for any type of image data. Imported .PNG file? Sprite or MovieClip in a .SWC? Class reference to an object you custom made? Doesn’t matter! All automated, all quick, all easy to use. Best of all: the code is really short, simple, and easy to read in about a minute. 

It’s a bit too long to paste here, so here’s a link to the class I use right now. Feel free to use it, just let me know if you improve on it :) Copy and paste it to the root of any project and you should be able to start using it right away.

(source article)

Bonus Step: Convert MovieClips on the fly

I haven’t tried this step out yet, but it’s an extension of the class I offered up in Step 3: automatically convert each frame from a MovieClip to cached bitmap data (and store that stuff in the GPU). If I had animations in my most recent games, I would be all over this too! [...]

Read more: How to improve your mobile AS3/AIR performance

Monday, September 19, 2011

Composing BitmapData Scenes

Since Flash 8, BitmapData has offered a wide range of possibilities to improve performance. Many Flash apps, particularly games, choose to simply display a single, huge BitmapData, render the entire game scene into it and, for the most part, eschew Stage‘s whole system of DisplayObject and DisplayObjectContainer. When you’re doing this or just generally using [...]

Read more: Composing BitmapData Scenes

Monday, July 25, 2011

Fast AS3 MultiMap

Sometimes you need to map a key to many values, but AS3 has no built-in data structure for this purpose. Dictionary and Object are suitable one-to-one maps, but there’s been no one-to-many support until now. Read on for my own one-to-many class—MultiMap—as well as performance testing and analysis. Before writing your own general-purpose class, it’s [...]

Read more: Fast AS3 MultiMap

Friday, July 22, 2011

Flash Game Dev Tip #10 – Flixels Internal Structure and Performance Tips

Flixels Internal Structure and Performance Tips

Tip #10 – Flixels Internal Structure and Performance Tips

If you’ve ever wondered just what Flixel does when it starts-up or runs its main loop, then wonder no more :) Here’s the full gory details, with some take-away performance tips at the end.


The Instantiation Process

All games in Flixel extend the FlxGame class, which in turn extends Sprite. When the game is created the following process happens, in the following order:

  1. It hides the system mouse cursor
  2. Calls FlxG.init which clears the bitmap cache, creates a new Sprite (flashGfxSprite) and creates an empty cameras Array
  3. Sets the internal game frame rate
  4. Sets the Flash Player frame rate
  5. Adds an ENTER_FRAME Event Listener which triggers FlxGame.create

Frame rates

Flixel 2.5 uses a Deterministic Delta Timer to handle steps within the framework. A step (as you’ll see later) is processed in the main loop, and is when Flixel performs all of the collision, separation and movement calculations. This is not the same thing as when it renders the game. When you create your game you have to tell FlxGame what game frame rate and Flash Player frame rates you want. From these two values it does the following:
  • Sets the step to be 1000 / Game Frame Rate. So a rate of 30 updates per second would equal a step of 33.
  • Sets the Maximum Accumulation (maxAcc) value to 2000 / Flash Player Frame Rate (fps) – 1.
  • So an fps rate of 30 would equal a maxAcc of 66. The maxAcc can never be less than step.
Read more: Flash Game Dev Tip #10 – Flixels Internal Structure and Performance Tips

Monday, July 18, 2011

Amazing Lookups Optimization

Today’s article is about an unintuitive-yet-simple optimization you can use to hugely increase the speed of reading from Array, Vector, Dictionary, Object, and dynamic classes. Need I say more? Read on for this amazing speedup! I was recently reading an article on Mark Knol’s site about some of the loop optimizations I’ve discussed before [...]

Read more: Amazing Lookups Optimization

Friday, July 15, 2011

Efficient Adobe Flash Professional using

Working with Adobe Flash Professional you should consider about performance and culture of the content you’re creating.
After some docs reading and co-workers listening, I came to this: I should collect and keep most common and useful “authoring-in-Flash Pro” rules in one place to help with efficient content creating. To make your knowledge of this topic even deeper – consider reading completely all links at the end of this post.
These rules will be useful for the Flash Animators and Flash Designers first of all, developers should know some rules too though.

Completely compatible with Flash Pro CS5.5 and not completely with earlier versions.

- Consider using as low frame rate as possible.
Most animations could be played smoothly enough at 24-30 fps. Graphics, like some application GUI without smooth animations could be played at 12 fps. If you wish to play smooth animation – you could change the fps with code. Using higher fps you’re giving Flash Player Runtime less time to draw, run code, GC. So, if given time will be too short to do all this for one frame, your animation will lose its smoothness.
Use 25 fps instead of 120 fps

- Avoid nesting when possible.
Use layers instead of containers (MovieClips) when possible. Decreasing amount of nested containers you’re increasing performance. [...]

Read more: Efficient Adobe Flash Professional using

Monday, July 11, 2011

Even Faster Linked Lists

Linked lists can be much faster than AS3′s Array and Vector classes if you use them under the right circumstances. It’s been over a year and a half since I last visited the topic, but today it’s time to update my LinkedList class. Read on for the freshly-optimized code and all-new performance testing and analysis! [...]

Even Faster Linked Lists

Tuesday, June 21, 2011

Loops With int and uint

AS3 has two integer types: int and uint. In my experience, most AS3 programmers just use int everywhere and ignore uint. This is usually acceptable as the need for unsigned integers is rare compared to their signed counterparts. However, there are significant performance differences between the two. Read on for the impact of uint on [...]

Loops With int and uint

Wednesday, June 8, 2011

Quick Tip: How to Randomly Shuffle an Array in AS3

Sometimes you have a set of items — could be Strings, could be Numbers, could be Objects, whatever — whose order you want to randomise. This is particularly useful for quizzes and games of chance, but comes in handy in all sorts of other applications. The easiest method I’ve found for doing this is to stick all the items in an Array and then shuffle it like a deck of cards. But how can we do that…?

As a simple example, we’ll use the letters of the alphabet:

var letters:Array = ["A", "B", "C", "D", "E", "F", "G", "H", "I", "J", "K", "L", "M", "N", "O", "P", "Q", "R", "S", "T", "U", "V", "W", "X", "Y", "Z"];

There are different approaches we can take to actually sorting this array.


The Naive Approach

We could create a second array, and copy each element of the first into a random position in the second:

Naive Approach of array sort
Approach of array sort

The code for that might look like this (see this Quick Tip on getting a random integer within a specific range for more details):

var letters:Array = ["A", "B", "C", "D", "E", "F", "G", "H", "I", "J", "K", "L", "M", "N", "O", "P", "Q", "R", "S", "T", "U", "V", "W", "X", "Y", "Z"];
var shuffledLetters:Array = new Array(letters.length);

var randomPos:int = 0;
for (var i:int = 0; i < letters.length; i++)
{
 randomPos = int(Math.random() * letters.length);
 shuffledLetters[randomPos] = letters[i];
}

But there’s one huge problem. What if the random position picked for C is 6 as well?

Here, A gets overwritten, and will therefore not be in the shuffled array. That’s not what we want, so we need to check that the slot is empty before copying the letter over, and pick a different slot if it isn’t: [...]

Read more: Quick Tip: How to Randomly Shuffle an Array in AS3

Wednesday, June 1, 2011

SWFRETools

SWFRETools are a collection of tools built for vulnerability analysis of the Adobe Flash player and for malware analysis of malicious SWF files. The tools are partly written in Java and partly in Python.

The following tools are part of the SWFRETools:

  • Flash Dissector: Binary viewer for SWF files
  • SWF Parser: Build your own tools using this parser
  • Minimizer: Automatically minimize crashing SWF files
  • FP Debugger: Trace the Flash Player dynamically
  • StatsGenerator: Generate stats over SWF files
Read more: SWFRETools