Showing posts with label 2D. Show all posts

Sunday, January 15, 2012

Nape and Starling together? It’s possible!

Hey, friends!

Somebody of you already tried fastest 2D flash physics engine Nape with a GPU 2D rendering framework Starling together and noticed that Body.graphic property is class of flash.display.DisplayObject and it can’t be assigned to the starling.display.DisplayObject instance.

So, some of you just used Box2D, some of you controlled Starling DisplayObjects manually, maybe some did what I did, but keep it away from public, but I like Body.graphic property – it’s really useful and I wish all as3 developers can easily use fastest 2d physics engine with 2D GPU rendering engine.

Today I’m glad to present you modified Nape FP 10+ swcs (release and debug) of the Milestone 7.2 “r3″ (maybe not fully) compatible with the Starling.

I just replaced Body.graphic flash.display.DisplayObject class by the Dynamic class (* in as3) and removed Body.graphic.rotation radians to degrees conversion to make it compatible with Starling in my case.
Now I can use Nape as usual, with usual DisplayObjects, it’s really cool!
Yes, there are possible some more compatibility issues, but this changes was enough in my case and Nape worked with the Starling DisplayObjects fine.

Feel free to download and use this swcs with Starling Framework!
debug swc
release swc

I like a challenge with caxe and flib compiling on Windows in the MinGW I faced while recompiling swc, it was fun!
To get the working swcs on Windows, you should

Read more: Nape and Starling together? It’s possible!

Saturday, January 14, 2012

Introducing Starling – a free book from O’Reilly

Introducing Starling Building GPU Accelerated Applications By Thibault ImbertO’Reilly has just released a free book on the Starling Framework written by Thibault Imbert. This is essentially an updated and enhanced version of the getting started PDF that he wrote around the time of the release. Here is the abstract:

Starling is an ActionScript 3 2D framework developed on top of the Stage3D APIs (available on desktop in Flash Player 11 and Adobe AIR 3). Starling is mainly designed for game development, but could be used for many other use cases. Starling makes it possible to write fast GPU accelerated applications without having to touch the low-level Stage3D APIs.

Most Flash developers want to be able to leverage GPU acceleration (through Stage3D) without the need to write such higher-level frameworks and dig into the low-level Stage3D APIs. Starling is completely designed after the Flash Player APIs and abstracts the complexity of Stage3D (Molehill) and allows easy and intuitive programming for everyone.

Thanks to Thibault for creating a great beginner resource for Starling! You can also check out my video tutorial on Starling over on gotoAndLearn.

Read more: Introducing Starling – a free book from O’Reilly

Friday, December 9, 2011

Create REAL explosions with Box2D

Look at the title… Create REAL explosions with Box2D… keyword: REAL.

This means we will make a Box2D explode into pieces using the basics of Slicing, splitting and cutting objects with Box2D. At the moment it’s just a prototype but it does not need that much optimization.

That’s what we’ll get:

Click the mouse to make the box explode.

Too fast? Get this slow motion example:

As you can see, this is a real explosion.

This is the source code, can you discover how was it possible?

Read more: Create REAL explosions with Box2D

Friday, October 21, 2011

Develop a Flash game like Angry Birds using Box2D – Killing the pigs

Do you know why Angry Birds had such as a worldwide success? Because people love to kill pigs in videogames.

I got sick when I saw Babe movie and I want to kill pigs since then.

Today, you will learn how to do it thanks to the second part of the Angry Birds tutorial.

Before we start, let me explain how we are going to kill them. A pig dies when something, including the bird, the objects in the game, and even the ground, hits it too hard.

Various objects in the game also break when they hit something too hard.

You are already able to see when two objects collide thanks to tutorials like Create a Flash prototype of The Moops – Combos of Joy, but we’ve never seen how to determine the force of the collision.

You still have to create a custom contact listener class, but rather than using BeginContact function which just has an argument we can use to determine which objects collided, we will use PostSolve, which has another argument, a b2ContactImpulse variable.

With b2ContactImpulse we can know the amount of impulse Box2D has to give to bodies to avoid them from penetrating each other due to the collision. In other words, the collision force.

Once we know the strength of the collision, we can compare it with the maximum strength allowed before an object breaks (which can also be different according to the material, such as glass, wood, stone) and if the collision will break the object, we simply remove it from the Box2D world, and then we’ll show a cute animation.

This is what I made with this concept:

Throw the pigeon to the castle on the right to see how all blocks (and the pig) which are hit hard get destroyed.

In this prototype, world boundaries and the bird itself can’t be destroyed.

This is the Main class [...]

Read more: Develop a Flash game like Angry Birds using Box2D – Killing the pigs

Sunday, September 11, 2011

quickb2 – Box2D for Flash games

quickb2 – Box2D for Flash games

QuickB2 is a complete abstraction of Box2D, providing grouped hierarchies, extensible classes, and event-driven callbacks. The high-level interface enables developers to create physics simulations that are impractical to write using Box2D’s API alone. It takes care of things that you don’t want to, so that you can concentrate on your game.

Here are some examples of what it can do: http://quickb2.dougkoellmer.com/bin/qb2DemoReel.swf

Here is a place where you can ask questions: http://quickb2.dougkoellmer.com/forum

I’ve just gone and looked through the demo reel, and I have to say this is quite impressive. Obviously having a nicer to use, ActionScript 3 style syntax rather than the C++ syntax is a bonus, but what really makes this cool is the features that this library has, over and above the basics of Box2D.  Things like shape cutting, soft bodies; breakable joints etcetera.

You can find out more information, and download the source code from Google Code, at: http://code.google.com/p/quickb2/

quickb2 – Box2D for Flash games.

Wednesday, August 10, 2011

Build a 2D Portal Puzzle Game With Unity: Getting Started

In this tutorial (part free, part Premium), you’ll learn how to create a 2D puzzle game in Unity which uses a Portal-style game mechanic to teleport objects across the level. In this first part, we’ll lay out the main concepts of the game, put some graphics together, and get the basic (portal-less) physics working.


Final Result Preview

Let’s take a look at the final result we will be working towards, across the whole of this multi-part tutorial:

Please view the full post to see the Unity content.

Hit the number keys 1-8 to try different levels. The aim is to get the little yellow Roly character to the designated end point, using portal mechanics. The demo shows off a few of the different mechanics we’ll introduce.

It’s going to take us a while to get to that point, though! In this first part of the tutorial, we’ll make a good start.

Important Note: This project does make use of a few commercial Unity plugins: Sprite Manager 2, EZ GUI, and Vectrosity. Also, while the first two parts of the tutorial are free to read, the third and fourth will be available exclusively to our Premium members.


Step 1: Project Overview

When creating your game you never want to jump right away into the code, first, you need an idea.

Some people like to simply start doodling whatever they have on mind, some take a couple of random words and make a concept of the game based on thoughts that gravitate around those. Sometimes you don’t really want to make something new but rather do something that’s already done, but then again, you want to do it your way.

Once you’ve got a pretty clear image of what you want to do, you need to be able to present your idea in a way that other people can see what the heck is this all about. Usually it takes a form of a concept art, a mock up picture, or a quick prototype. Even if you think the idea is great at the beginning, you should look objectively at those concepts and with an eye of a critic review your idea.

If it doesn’t seem very appealing after the review, it surely won’t be later on, it’s better to simply try again with something else. If you still think it is the best game ever, you should show it to your friends, they surely won’t mind a few minutes lost, and their opinions are invaluable because they are given from other perspective than your own.

The game we’re going to make in this tutorial is a 2D puzzle game that uses portals as its core mechanic. I’m sure you checked out the demo above so I don’t really have to explain much. I should probably show here some of my concepts for the game, but unfortunately many of them either weren’t saved or simply weren’t in digital form to begin with, I can present only a couple of them that I found lying here and there [...]

Read more: Build a 2D Portal Puzzle Game With Unity: Getting Started

Monday, July 4, 2011

Slicing, splitting and cutting objects with Box2D – part 3: cutting your own Sprites

In the second part of this series I showed you how to cut Box2D objects.

Unfortunately I was working in the debug draw environment, so the whole process can’t be applied in a real-world example, unless you want to publish a game with the debug draw graphics.

So it’s time to see how to cut your own sprites. This is what you’ll get at the end of this step:

Cut the debug draw polygons to see randomly colored debris fall down. These debris are Sprites generated in real time.

So let’s take a look at the source code, and see what changed since the previous step[...]

Slicing, splitting and cutting objects with Box2D – part 3: cutting your own Sprites

Thursday, June 16, 2011

How to create a Flash platformer using Citrus Engine

More than a year ago I shows you how to create a little game prototype using Citrus Engine.

A year has passed, and now Citrus Engine is back with version 2.0 which promises to let us create complex games in a quick.

For all you specs maniacs, here it is a brief list of features:

* Blazing 50 FPS in the browser on current machines, and 250+ FPS on the desktop (or Adobe AIR).
* Integrated with Box2D physics, which allows for tumbling crates, pulleys, vehicles, and just about anything else you can imagine, without the limitations of a grid.
* Supports multiple rendering methods with very little code. Like blitting and sprite sheets? Citrus Engine’s got it. Prefer animating using the timeline? No problem.
* Hijack the Flash IDE and use it as a level editor, for easily laying out and iterating on level designs.
* Robust documentation includes and ASDoc API, tutorial videos, and a forum.
* Standards-based code API means developers and designers spend more time tweaking the fun stuff, and less time debugging.
* Level-based progressive downloading allows gamers to start playing the game quicker by only downloading what the next level needs.
* Pre-made commonly used objects, like a hero, coins, enemy, platforms, clouds, and more!
* Easily use embedded or dynamic graphics.
* Decoupled architecture allows for custom rendering methods, like blitting or 3D.
* Sound management
* Keyboard and input management
* Built-in particle system
* Intuitive Signals event framework

Ok, the boring part is over. Now take this little prototype I made in 20 minutes (yes, 20 minutes):

Look at what we have:

* The hero (on the bottom right)
* A pushable crate (on the bottom left)
* Some platforms around the stage
* A moving platform
* An enemy (on the upper right corner)
* A coin (on the upper right corner)

Move the hero with LEFT and RIGHT and jump with SPACE. Try to grab the coin. See what happens if you touch the enemy. The game mechanics are complex enough to represent a level of a good platformer. But it took me only a few lines to do it.

This is the main class [...]

Read more: How to create a Flash platformer using Citrus Engine

Tuesday, June 7, 2011

How to make Angry Birds – part 2

Hello and welcome back to my blog!

This is the 2nd part of my series on how to make a game like Angry Birds by Rovio - and its been a while coming… You can read the first part here.

The Game

Ok, so here is the game so far; there are three demo levels to show the level progress system and some simple looking characters and block types. Apologies for the programmer art :)

Catch up

Ok, so last time I had covered how to draw the background graphics and made a start on how the world is going to be composed in terms of collision.

What I’m going to cover in this article is the physics part; stability and optimisations. The physics engine that I’ve created for this game is based on the technology I’ve discussed in my previous articles:

Physics engines for dummies
Collision detection for dummies
Speculative contacts – a continuous collision engine approach

Level

A level is defined as a bunch of instances of static rigid bodies and dynamic rigid bodies plus a visual layer which covers up the statics – I use this other layer because otherwise there would be a slight visible gap between adjacent static blocks, which we don’t want since the texture is supposed to be continuous.

A level must inherit the base class Code.Level. I’ve done this so I can predefine certain things about each level – such as the instance names for the hero characters, and the sling-shot which I need to reference in code.

Characters and blocks

Each of the two characters and every block used in the game are designed in the Flash IDE, and each of them references a base class that I’ve defined in the code. This is so that I can parse the children of a level at runtime and create the appropriate rigid bodies at the correct mapped locations for the physics engine.

Characters and blocks

Rigid-bodies

There are the following base classes (stone and wood use the same base class):

  • HeroCharacter
  • EnemyCharacter
  • ProxyRectangleIce
  • ProxyRectangle
  • ProxyRectangleStatic
  • ProxyTriangleStaticDown
  • ProxyTriangleStaticUp

These are interpreted at level creation time, using a loop similar to this: [...]

Read more: How to make Angry Birds – part 2

Thursday, June 2, 2011

Introduction to Box2D for Flash and AS3

Box2D is a popular physics engine with a solid Flash port, which was used to create the excellent game Fantastic Contraption. In this tutorial, the first of a series, you’ll get to grips with the basics of Box2D 2.1a for Flash and AS3.


Step 1: The Boring Setup

I’m going to assume you already know how to set up a basic Flash project using your editor and workflow of choice, whether that means creating a FLA with a document class, a pure AS3 project in a different editor, or whatever. I’m using FlashDevelop, but you should use whatever you feel comfortable with.

Create your project, and name the main class Main.as. Give it some boilerplate code; mine looks like this:

package
{
 import flash.display.Sprite;
 import flash.events.Event;

 [Frame(factoryClass="Preloader")]
 public class Main extends Sprite
 {

  public function Main():void
  {
   if (stage) init();
   else addEventListener(Event.ADDED_TO_STAGE, init);
  }

  private function init(e:Event = null):void
  {
   removeEventListener(Event.ADDED_TO_STAGE, init);
   getStarted();
  }

  private function getStarted():void
  {

  }

 }

}

Don’t worry about the [Frame] metatag — that’s just how FlashDevelop creates a preloader. All you need to know is that getStarted() is run when the SWF has fully loaded. Create a function of the same name that runs when your Main class has loaded.

I’m also going to assume you’re comfortable with using a separate library or API in your project. Download Box2DFlash 2.1a from this page (I’m using the Flash 9 version), and extract the zip to wherever you normally put your APIs. Next, add a classpath to point to the \Source\ folder from the zip. Alternatively, you could just extract the contents of the \Source\ folder to the same directory as your Main class.

Great! That was easy. Let’s start using Box2D.


Step 2: A Whole New b2World

“If you want to make an apple pie from scratch, you must first create the universe,” wrote Carl Sagan; if we want to make a few physics objects, we only need to create a world.

In Box2D, a world is not a planet or an ecosystem; it’s just the name given for the object that manages the overall physics simulation. It also sets the strength of gravity — not just how quickly objects accelerate but also in which direction they fall.

We’ll create a vector to set the gravity before creating the world itself:

import Box2D.Common.Math.b2Vec2;

//...

private function getStarted():void
{
 var gravity:b2Vec2 = new b2Vec2(0, 10);
}

A b2Vec2 is a Box2D Euclidean vector (the second 2 stands for 2D again, because it’s possible to have a 3D Euclidean vector). Daniel Sidhion wrote an excellent tutorial explaining what Euclidean vectors are (they are nothing to do with the Vector class in AS3), so check that out if you’re not sure. But briefly, think of a Euclidean vector as an arrow:

This arrow shows b2Vec2(4, 9); it points down and to the right. Our gravity vector, then, will point straight down. The longer the arrow, the stronger the gravity, so later on in the tutorial you could try changing the gravity vector to b2Vec(0, 2) to simulate a much weaker gravity, much like that on the Moon.

Now we’ll create the world itself:

import Box2D.Dynamics.b2World;

//...

public var world:b2World;

//...

private function getStarted():void
{
 var gravity:b2Vec2 = new b2Vec2(0, 10);
 world = new b2World(gravity, true);
}

The second parameter we pass to b2World() tells it that it can stop simulating objects that it doesn’t need to simulate any more, which helps speed up the simulation but is completely irrelevant to us at the moment.

Run the SWF to check there are no errors. You won’t be able to see anything yet, though. The world is currently completely empty!


Step 3: Reinvent the Wheel

Let’s create a simple circular object; this could represent a rock, a basketball, or a potato, but I’m going to see it as a wheel [...]

Read more: Introduction to Box2D for Flash and AS3

Monday, May 30, 2011

QuickB2

QuickB2 is a complete abstraction of Box2D, providing grouped hierarchies, extensible classes, and event-driven callbacks. The high-level interface enables developers to create physics simulations that are impractical to write using Box2D’s API alone.

Some features:

  • Soft-bodies.
  • Top-down car physics.
  • Friction in z-direction (top-down friction).
  • Event-driven through revent.
  • Retain mode that doesn’t require destroying/remaking objects.
  • Extensible architecture.
  • Nested hierarchy system similar to Flash’s display hierarchies.
  • Cloneable objects.
  • Highly customizable immediate-mode rendering for both debug and production purposes.
  • Hooks for integration with any typical retain-mode-type rendering engine (e.g. the Flash display list).
  • Various debugging tools including visualizations, mouse dragging, warnings, notifications, asserts, exceptions, and runtime GUIs.
  • Pixel-based units.
  • AABB and circular bounding representations.
  • Easy low-level access to Box2D API in case of emergency.
  • Large suite of “stock” functions and classes to address common needs.
  • Individual polygons may be concave and have any number of vertices.
  • All kinds of joints, including built-in spring joints.
  • Physics world is completely changeable within contact callbacks.
  • WYSIWYG editing environment for Flash CS5.
  • Built-in system for handling your game loop and time steps.
  • Easy API for beginners – lower-level optimizations and tricks available for advanced users.
Read more: QuickB2

Thursday, May 5, 2011

Flash physics draw game with a car using QuickB2

QuickB2 is a complete abstraction of Box2D, providing grouped hierarchies, extensible classes, and event-driven callbacks.

The high-level interface enables developers to create physics simulations that are impractical to write using Box2D’s API alone.

It takes care of things that you don’t want to, so that you can concentrate on your game.

Among its top features we can find:

* Soft-bodies.
* Top-down car physics.
* Friction in z-direction (top-down friction).
* Pixel-based units.
* Individual polygons may be concave and have any number of vertices.
* All kinds of joints, including built-in spring joints.
* WYSIWYG editing environment for Flash CS5.

Combining one of the official examples with the drawing concept introduced during the creation of Way of an Idea Box2D prototype I ended up with this script [...]

Read more: Flash physics draw game with a car using QuickB2

Friday, March 18, 2011

Create a Flash prototype of The Moops – Combos of Joy

Create a Flash prototype of The Moops – Combos of Joy:

Did you play The Moops – Combos of Joy?

It’s a cute physics game we can build a prototype in a few minutes (don’t worry, Plants Vs Zombies fans, as next step is about to come).

Moops – Combos of Joy screenshot

Let’s see game’s features:

* It’s a physics game so we are using Box2D to create it.

* The player fires a ball with the mouse. The direction can be decided according to mouse position, but power can’t. Player fires balls with the same, predefined speed.

* A series of shapes “fall” down from the top of the stage. Actually they don’t fall because there is no gravity in the game. Let’s say they move from top to bottom at a constant speed.

* When the ball hits a square, the square reacts according to physics, changing its direction and speed, but the ball does not exactly follow physics rules as its speed never changes.

Obviously there are more features in the original game but at the moment we’ll see these ones. Since it’s a long time we don’t deal with Box2D, I am using a line by line approach to explain the code.

This is the script:

1
2
3
4
5
6
7
8
9
10
11
12
13
14
15
16
17
18
19
20
21
22
23
24
25
26
27
28
29
30
31
32
33
34
35
36
37
38
39
40
41
42
43
44
45
46
47
48
49
50
51
52
53
54
55
56
57
58
59
60
61
62
63
64
65
66
67
68
69
70
71
72
73
74
75
76
77
78
79
80
81
82
83
84
85
86
package {
 import flash.display.Sprite;
 import flash.events.Event;
 import flash.events.MouseEvent;
 import flash.utils.Timer;
 import flash.events.TimerEvent;
 import Box2D.Dynamics.*;
 import Box2D.Collision.Shapes.*;
 import Box2D.Common.Math.*;
 public class moops extends Sprite {
  private var world:b2World=new b2World(new b2Vec2(0,0),true);
  private var worldScale:int=30;
  private var timeCount:Timer=new Timer(500);
  public function moops():void {
   timeCount.start();
   debugDraw();
   addEventListener(Event.ENTER_FRAME, update);
   stage.addEventListener(MouseEvent.CLICK,onClick);
   timeCount.addEventListener(TimerEvent.TIMER, onTime);
  }
  private function onClick(e:MouseEvent):void {
   var angle:Number=Math.atan2(mouseX,mouseY-480)-Math.PI/2;
   addball(20*Math.cos(angle),-20*Math.sin(angle));
  }
  private function onTime(event:TimerEvent):void {
   addBox(300+Math.random()*200,-100,40);
  }
  private function addball(xVel:Number,yVel:Number):void {
   var ball:b2BodyDef= new b2BodyDef();
   ball.userData="ball";
   ball.type=b2Body.b2_dynamicBody;
   ball.position.Set(20/worldScale, 460/worldScale);
   var circle:b2CircleShape=new b2CircleShape(15/worldScale);
   var ballFixture:b2FixtureDef = new b2FixtureDef();
   ballFixture.shape=circle;
   ballFixture.friction=0;
   ballFixture.density=1;
   ballFixture.restitution=1;
   var ballBody:b2Body=world.CreateBody(ball);
   ballBody.CreateFixture(ballFixture);
   ballBody.SetLinearVelocity(new b2Vec2(xVel,yVel));
  }
  private function debugDraw():void {
   var debugDraw:b2DebugDraw = new b2DebugDraw();
   var debugSprite:Sprite = new Sprite();
   addChild(debugSprite);
   debugDraw.SetSprite(debugSprite);
   debugDraw.SetDrawScale(worldScale);
   debugDraw.SetFlags(b2DebugDraw.e_shapeBit|b2DebugDraw.e_jointBit);
   debugDraw.SetFillAlpha(0.5);
   world.SetDebugDraw(debugDraw);
  }
  private function addBox(xOrigin:Number,yOrigin:Number,size:Number):void {
   var box:b2BodyDef= new b2BodyDef();
   box.position.Set(xOrigin/worldScale,yOrigin/worldScale);
   box.type=b2Body.b2_dynamicBody;
   var square:b2PolygonShape = new b2PolygonShape();
   square.SetAsBox(size/2/worldScale, size/2/worldScale);
   var boxFixture:b2FixtureDef = new b2FixtureDef();
   boxFixture.shape=square;
   boxFixture.friction=0;
   boxFixture.density=4;
   boxFixture.restitution=1;
   var boxBody:b2Body=world.CreateBody(box);
   boxBody.CreateFixture(boxFixture);
   boxBody.SetLinearVelocity(new b2Vec2(0,5));
  }
  private function update(e:Event):void {
   world.Step(1/30,10,10);
   world.ClearForces();
   world.DrawDebugData();
   for (var currentBody:b2Body = world.GetBodyList(); currentBody; currentBody=currentBody.GetNext()) {
    if (currentBody.GetPosition().y*worldScale>600 || currentBody.GetPosition().y*worldScale<(100*-1)) {
     world.DestroyBody(currentBody);
    }
    if (currentBody.GetUserData()=="ball") {
     var velocity:b2Vec2=currentBody.GetLinearVelocity();
     if (velocity.Length()!=20) {
      var speedOffset:Number=20/velocity.Length();
      currentBody.SetLinearVelocity(new b2Vec2(velocity.x*speedOffset,velocity.y*speedOffset));
     }
    }
   }
  }
 }
}

Let’s see how does it work [...]

Saturday, March 12, 2011

Create complex Box2D shapes in a click with PhysicsEditor

Create complex Box2D shapes in a click with PhysicsEditor:

With Box2D is very easy to create primitives like boxes or spheres, but when you have to handle more complex shapes, things get nasty.

You have to use compound objects and it’s not as intuitive as it should be.

In our help comes PhysicsEditor by Andreas Low

Physics Editor for creating Box 2D shapes

The software allows you to create complex bodies simply dragging your shapes inside the editor and press the auto trace button! No more clicking. Then adjust the shape’s physics parameters and directly export to your game development framework.

I am currently using this software for a game prototype I am designing but I am not ready to make a review, but I can assure you this software really rocks.

Watch the official video:

I am also using the .as exporter so at this time I am able to show the Flash results of what you are seeing in the video:

I removed the textures so you can see how objects are made.

"

Wednesday, March 9, 2011

Introducing M2D – GPU accelerated 2D framework for Flash ‘Molehill’ API

Introducing M2D – GPU accelerated 2D framework for Flash ‘Molehill’ API:

M2D – GPU accelerated 2D framework for Flash MolehillI am pretty sure, that most of you are familiar with ‘Molehill’ – the new 3D API for Flash Player that enables GPU acceleration. Some people were wondering if this is just for 3D. The good news is that you can actually accelerate 2D graphics as well by rendering them on a stage3D instead on a stage (DisplayList). It’s little bit tricky, but definitely possible.

For instance if you have a look at this demo – http://www.bytearray.org/wp-content/projects/molehill2d/molehill/ – the 2D graphics are rendered on GPU via Molehill.
But if you look at the code of this example and are not really coming from an OpenGL or DirectX world, it might take too long for you to pick it up.

To make it easier for you, Ely Greenfield wrote a framework called M2D, which is available here at github.

Features:
- render embeds
- animate spritesheets
- position, rotate objects
- particles

Kudos to Ely! I mean, this is really big thing for 2D Flash games. Now you can render thousands of sprites with 60 FPS easily and smoothly and I am looking forward to see games using it.

I have forked the original Ely’s M2D and added RenderScene class and Physics class that uses Box2D C++ Alchemy port. RenderScene is simplified API for using M2D, which will fit most of your use cases and is easy to use for everyone.

How does it work?
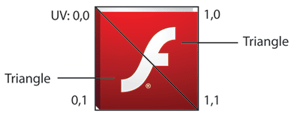
In 3D there are couple things available to you – geometry (in our case triangles), textures and shaders.
To actually display an image – you render two triangles per a rectangle and then you upload a bitmap to it with correct UVs.
How does M2D work

Can I accelerate DisplayObjects from Flash DisplayList?

Yes, you certainly can. The only thing is that currently it supports only static DisplayObjects, but MovieClip support is planned for the future. Animated sprites are currently supported via SpriteSheets – there is a tool, which can help you to easily convert SWF to a PNG SpriteSheet – check Zoë by Grant Skinner.

Future plans
- Mouse Events – there is currently no framework support for mouse events
- Animated MovieClips – animations can be done via SpriteSheets
- Optimizations – we are pretty sure that there will come numerous optimizations in the future by the community
- ATF support (Adobe Texture Format)

Open Source Project
The framework is provided for public domain “as is” with no guarantees, you may use it in your own commercial projects for free, fork it, change it, upgrade it. We are looking forward to hearing from community about new updates, projects using M2D and proposals for the future versions [...]

Monday, February 21, 2011

Using Tweens with Box2D 2.0.1

Using Tweens with Box2D 2.0.1:

Juten tach,

i am currently involved in a fun project, where i am told to build a classical jump ‘n run game. Very nice. I am using the flash port of Box2d in its version 2.0.1. I know, that there is version 2.1, but it’s still alpha and i generally do not feel so comfortable using alpha software.

Like in most jump ‘n run games, we have moving obstacles, like little bricks, that move from left to right and back again and you have to jump on them to get over a giant abyss.

Now these moving bricks should move autonomously and indefinitely. Being a flash developer, first thing, that comes to mind is tweening them. But as we learn from many sources in the box2d community, this is actually a no-go, because we should rather use velocities and the real physics of Box2d to make things move. Makes sense to me.

So my first attempt was to reuse some of the smart scripts from Todd. And that worked quite well. Here is an excerpt of the script (actually with slight changes from my side) [...]

Friday, January 28, 2011

New Video Tutorial On Building Games With Flixel

New Video Tutorial On Building Games With Flixel:

Flixel logoI just uploaded the first tutorial in a 3-part series showing you how to build a simple game using the Flixel framework. This framework is incredibly easy to use and takes care of most of the heavy lifting for you. In the future I will also be doing a similar series on other frameworks such as Push Button Engine.

Thursday, January 27, 2011

Build a Physics-Based Platformer in Under an Hour

Build a Physics-Based Platformer in Under an Hour:

In this tutorial, you will learn to make a physics-based platform game in the quickest way possible with the World Construction Kit.


Final Result Preview

Let’s take a look at the final result we will be working towards:

It’s a little wonky, but that can be fixed — and wait until you see how quick and easy it was to make!


Step 1: Download

Download the Box2D Alchemy Port and WCK libraries. Get the source from github and for more information, see www.sideroller.com.


Step 2: New FlashDevelop Project

Click on ‘Project’ and select ‘New Project’ from the list. Select AS3 Project as your project template, name your project, point it to an empty directory and click OK.

Locate the Box2D/WCK libraries that you downloaded in Step 1 and place the following folders in your new project’s ‘lib’ folder: Box2D, Box2DAS, extras, gravity, misc, shapes, and wck.

Click on ‘Project’ again and select Properties. Click on the ‘Classpaths’ tab and add your lib folder.

Open Main.as in the source file and add the highlighted code. FlashDevelop should have auto-generated the rest.

public class Main extends WCK
{
 public function Main():void
 {
  if (stage) init();
  else addEventListener(Event.ADDED_TO_STAGE, init);
 }

 private function init(e:Event = null):void
 {
  removeEventListener(Event.ADDED_TO_STAGE, init);
  // entry point
 }
}

Step 3: Set Up the Flash IDE

Open Flash Professional. Press Ctrl+Shift+F12 to open Publish Settings. Click the Flash tab. Select the option ‘Export SWC’

Flash physics platformer WCK Box2D

….and then click the Settings button next to the ActionScript 3.0 combobox.

Flash physics platformer WCK Box2D

In the Source Path tab, click on the ‘browse to path’ icon and select your lib folder. Then click on the Library Path tab and select the ‘browse to SWC’ icon. Select the file lib/Box2DAS/Box2D.swc.

Click OK in Advanced Actionscript 3 Settings and again on the Publish Settings window. Save your FLA in the \src\ folder of your FlashDevelop project (the same folder with Main.as).

Finally, press Ctrl+F3 to open the document properties and set the Document Class to Main.


Step 4: Your First World Object

[...]

Saturday, January 8, 2011

Pixel Smash Source Code Released

Pixel Smash Source Code Released:

Photonstorm faceJust a quick one, but some people asked me if I’d send them the source to the Pixel Smash demo I posted the other day. I figure it can’t hurt, so I’ve packaged it up, removed some useless bits, added comments and thrown it together in a zip.

Pixel Smash source code (includes Flash Develop project, set-up with Nape linked in ready to compile)

Should work “out of the box” on PCs running Flash Develop. Will need rebuilding in anything else. It isn’t optimised by a long shot, so make of it what you will [...]

Monday, December 20, 2010

New Tutorial on Physics Using Box2D and WCK

New Tutorial on Physics Using Box2D and WCK:

I just uploaded a new tutorial that shows you how you can add physics to your Flash projects using the Box2D physics library. In particular I show you how to do this from Flash CS5 without writing any code by taking advantage of an amazing new library called the World Construction Kit.