Showing posts with label unity. Show all posts

Sunday, June 24, 2012

Getting Started With Unity – Finishing Our Game With a Menu

There are several methods used to produce menus within Unity, the main two being the built in GUI system and using GameObjects with Colliders that respond to interactions with the mouse. Unity’s GUI system can be tricky to work with so we’re going to use the GameObject approach which I think is also a bit more fun for what we’re trying to achieve here.

Final Result Preview

Please view the full post to see the Unity content.

Step 1: Determine Your Game Resolution

Before designing a menu you should always determine what resolution you are going to serve it to. Open the Player settings via the top menu, Edit > Project Settings > Player and enter your default screen width and height values into the inspector. I chose to leave mine as the default 600x450px as shown below.
unity tutorial menus UI
You then need to adjust the size of your Game view from the default "Free Aspect" to "Web (600 x 450)", else you could be positioning your menu items off the screen.
unity tutorial menus UI

Step 2: Choosing a Menu Background

As you will have seen in the preview, our menu scene is going to have our game environment in the background so that when you click Play you enter seamlessly into the game. To do this you need to position your player somewhere in the scene where you like the background and round up the Y rotation value. This is so it’s easier to remember and to replicate later, so that the transition can be seamless from the menu into the game.
unity tutorial menus UI
Let’s now get on with the creation of the menu scene!

Step 3: Creating the Menu Scene

Make sure your scene is saved and is called "game" – you’ll see why later. Select the game scene within the Project view and duplicate it using Ctrl/Command + D, then rename the copy to "menu" and double-click it to open it. Note: You can confirm which scene is open by checking the top of the screen, it should say something like "Unity – menu.unity – ProjectName – Web Player / Stand Alone". You don’t want to start deleting parts accidently from your game scene! Now select and delete the GUI and PickupSpawnPoints GameObjects from the Hierarchy. Expand the "Player" and drag the "Main Camera" so that it’s no longer a child of the Player, then delete the Player.
unity tutorial menus UI
Next, select the terrain and remove the Terrain Collider Component by right-clicking and selecting Remove Component. Finally, select the "Main Camera" and remove the MouseLook Component by right-clicking and selecting Remove Component. If you run the game now nothing should happen and you shouldn’t be able to move at all. If you can move or rotate then redo the above steps.

Step 4: Adjusting the Build Settings

Currently when you build or play your game the only level included within that build is the "game" scene. This means that the menu scene will never appear. So that we can test our menu, we’ll adjust the build settings now. From the top menu select File > Build Settings and drag the menu scene from your Project View into the Build Settings’ "Scenes In Build" list as shown below
unity tutorial menus UI
(Make sure you rearrange the scenes to put "menu.unity" at the top, so that it’s the scene that’s loaded first when the game is played.) Perfect![...]
Read more: Getting Started With Unity – Finishing Our Game With a Menu

Tuesday, March 6, 2012

FREE Unity3D Mobile Basic (Android and iOS)

Unity3D

That’s exactly what your just read: the Unity3D Mobile Basic (Android and iOS), which costs $400 each,  is completely FREE until April 8th.  It is not a trial! Head to the Unity3D web store and download your copy.

The Unity3D Mobile Basic license allows you to develop games targeting the Android and the iOS platforms. Even though this is not a Pro license (which has lots of heavy weaponry), you still can use cutting edge technologies to create amazing games. Check this page to compare the different licenses.

Thanks Unity Technologies for that!

Read more: FREE Unity3D Mobile Basic (Android and iOS)

Wednesday, August 17, 2011

Build a 2D Portal Puzzle Game With Unity: Adding the Portals

At the end of the first part of this series, we had just created a new shader, which will allow us to hide part of the main character’s sprite when it is part-way concealed by a portal. In this part, we’ll put that to use as we create a portal prototype.


Final Result Preview

Let’s take a look at the final result we will be working towards, across the whole of this multi-part tutorial:

Please view the full post to see the Unity content.

Hit the number keys 1-8 to try different levels. The aim is to get the little yellow Roly character to the designated end point, using portal mechanics. The demo shows off a few of the different mechanics we’ll introduce.

It’s going to take us a while to get to that point, though! In this second part of the tutorial, we’ll start work on adding the actual portal objects. Click here to see what we’ll have built by the end of this part.


Step 1: Create a Portal

It’s time to create an early portal prototype. Here’s a texture we’ll use to build it.

Texture for the portal

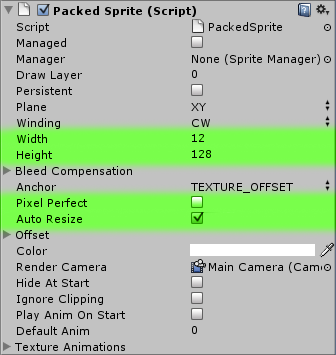
It’s very small, but we will stretch so the portal will look OK. Create a sprite the way you did before, but this time instead of selecting Pixel Perfect, select only Auto Resize. Then change the height of the sprite to 128 and width to 12. Also, you may assign Tiles Material to it.

Portal sprite settings
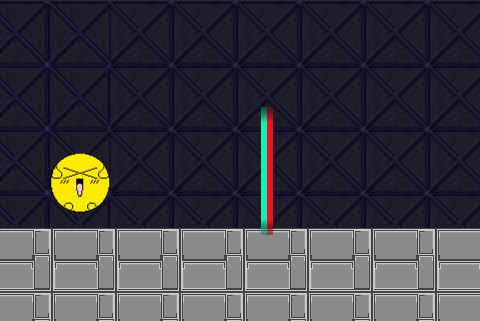
Portal sprite

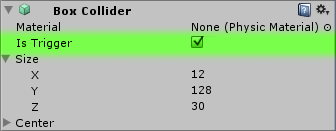
Now add Box Collider to our portal. Do it the same way we did before, but this time let’s check Is Trigger, because we don’t want our collider to be solid, we want the ball to be able to go through it. Also remember to set it’s z size to 30, so all objects on the ground can detect the collision with it.

Collider is a trigger.

The next thing to do is to create a script and name it Portal. This will be the script we attach to the portal, it will store portal related data, such as a linear equation of an axis, its height and what kind of portal does it lead to. Of course you should place this script in the Game Scripts folder.

Read more: Build a 2D Portal Puzzle Game With Unity: Adding the Portals: "

Wednesday, August 10, 2011

Build a 2D Portal Puzzle Game With Unity: Getting Started

In this tutorial (part free, part Premium), you’ll learn how to create a 2D puzzle game in Unity which uses a Portal-style game mechanic to teleport objects across the level. In this first part, we’ll lay out the main concepts of the game, put some graphics together, and get the basic (portal-less) physics working.


Final Result Preview

Let’s take a look at the final result we will be working towards, across the whole of this multi-part tutorial:

Please view the full post to see the Unity content.

Hit the number keys 1-8 to try different levels. The aim is to get the little yellow Roly character to the designated end point, using portal mechanics. The demo shows off a few of the different mechanics we’ll introduce.

It’s going to take us a while to get to that point, though! In this first part of the tutorial, we’ll make a good start.

Important Note: This project does make use of a few commercial Unity plugins: Sprite Manager 2, EZ GUI, and Vectrosity. Also, while the first two parts of the tutorial are free to read, the third and fourth will be available exclusively to our Premium members.


Step 1: Project Overview

When creating your game you never want to jump right away into the code, first, you need an idea.

Some people like to simply start doodling whatever they have on mind, some take a couple of random words and make a concept of the game based on thoughts that gravitate around those. Sometimes you don’t really want to make something new but rather do something that’s already done, but then again, you want to do it your way.

Once you’ve got a pretty clear image of what you want to do, you need to be able to present your idea in a way that other people can see what the heck is this all about. Usually it takes a form of a concept art, a mock up picture, or a quick prototype. Even if you think the idea is great at the beginning, you should look objectively at those concepts and with an eye of a critic review your idea.

If it doesn’t seem very appealing after the review, it surely won’t be later on, it’s better to simply try again with something else. If you still think it is the best game ever, you should show it to your friends, they surely won’t mind a few minutes lost, and their opinions are invaluable because they are given from other perspective than your own.

The game we’re going to make in this tutorial is a 2D puzzle game that uses portals as its core mechanic. I’m sure you checked out the demo above so I don’t really have to explain much. I should probably show here some of my concepts for the game, but unfortunately many of them either weren’t saved or simply weren’t in digital form to begin with, I can present only a couple of them that I found lying here and there [...]

Read more: Build a 2D Portal Puzzle Game With Unity: Getting Started