At the end of the first part of this series, we had just created a new shader, which will allow us to hide part of the main character’s sprite when it is part-way concealed by a portal. In this part, we’ll put that to use as we create a portal prototype.
Final Result Preview
Let’s take a look at the final result we will be working towards, across the whole of this multi-part tutorial:
Please view the full post to see the Unity content.
Hit the number keys 1-8 to try different levels. The aim is to get the little yellow Roly character to the designated end point, using portal mechanics. The demo shows off a few of the different mechanics we’ll introduce.
It’s going to take us a while to get to that point, though! In this second part of the tutorial, we’ll start work on adding the actual portal objects. Click here to see what we’ll have built by the end of this part.
Step 1: Create a Portal
It’s time to create an early portal prototype. Here’s a texture we’ll use to build it.

It’s very small, but we will stretch so the portal will look OK. Create a sprite the way you did before, but this time instead of selecting Pixel Perfect, select only Auto Resize. Then change the height of the sprite to 128 and width to 12. Also, you may assign Tiles Material to it.
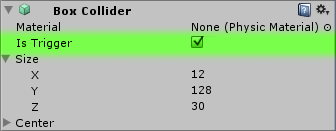
Now add Box Collider to our portal. Do it the same way we did before, but this time let’s check Is Trigger, because we don’t want our collider to be solid, we want the ball to be able to go through it. Also remember to set it’s z size to 30, so all objects on the ground can detect the collision with it.

The next thing to do is to create a script and name it Portal. This will be the script we attach to the portal, it will store portal related data, such as a linear equation of an axis, its height and what kind of portal does it lead to. Of course you should place this script in the Game Scripts folder.
Read more: Build a 2D Portal Puzzle Game With Unity: Adding the Portals: "
No comments:
Post a Comment