Thursday, March 31, 2011

Understanding AS3 getDefinitionByName (for all eval maniacs)

Understanding AS3 getDefinitionByName (for all eval maniacs):

Sometimes you may want to create a new class or DisplayObject only starting from its name. This is where something like an eval function would come into play, but we have to manage it in a different way with AS3.

Look at this movie:

Circles are four different objects called symbol1, symbol2, symbol3 and symbol4 and this is the script:

1
2
3
4
5
6
7
8
9
10
11
12
13
14
15
16
17
18
19
20
21
22
23
package {
 import flash.display.Sprite;
 public class Main extends Sprite {
  public function Main() {
   var s1:symbol1=new symbol1();
   addChild(s1);
   s1.x=95;
   s1.y=100;
   var s2:symbol2=new symbol2();
   addChild(s2);
   s2.x=245;
   s2.y=100;
   var s3:symbol3=new symbol3();
   addChild(s3);
   s3.x=395;
   s3.y=100;
   var s4:symbol4=new symbol4();
   addChild(s4);
   s4.x=545;
   s4.y=100;
  }
 }
}

Obviously it’s a bit unoptimized, just think about if we had a thousand objects. That’s when getDefinitionByName comes into play. It returns a reference to the class object of the class specified by the name parameter.

This means the same script can be written this way:

1
2
3
4
5
6
7
8
9
10
11
12
13
14
15
16
17
18
19
package {
 import flash.display.Sprite;
 import flash.utils.*
 public class Main extends Sprite {
  public function Main() {
   var symbolName:String;
   var symbolClass:Class;
   var s:Sprite;
   for (var i:int=1; i<=4; i++) {
    symbolName="symbol"+i;
    symbolClass=getDefinitionByName(symbolName) as Class;
    s=new symbolClass();
    addChild(s);
    s.x=95+150*(i-1);
    s.y=100;
   }
  }
 }
}

DisplayObjects names are passed as strings in getDefinitionByName method and created as generic classes that can be used anywhere in the movie [...]

Wednesday, March 30, 2011

Pausing a Flash game or movie detecting its focus

Pausing a Flash game or movie detecting its focus:

Sometimes we want our Flash game or movie to stop when the user is not playing/watching it.

It’s a feature blog readers ask me frequently, because once they read the post, often they need to reload the page to enjoy the demostrative Flash movie as it was already running before readers could see it.

Also, this is what happens to our Flash movies when they are switched from visible to invisible, according to Tinic Uro, Adobe engineer:

When SWF is visible:

  • SWF frame rates are limited and aligned to jiffies, i.e. 60 frames a second. (Note that Flash Playe 10.1 Beta 3 still has an upper limit of 120 which will be changed before the final release)
  • timers (AS2 Interval and AS3 Timers) are limited and aligned to jiffies.
  • local connections are limited and aligned to jiffies. That means a full round trip from one SWF to another will take at least 33 milliseconds. Some reports we get say it can be up to 40ms.
  • video is NOT aligned to jiffies and can play at any frame rate. This increases video playback fidelity.

When SWF is invisible:

  • SWF frame rate is clocked down to 2 frames/sec. No rendering occurs unless the SWF becomes visible again.
  • timers (AS2 Interval and AS3 Timers) are clocked down to 2 a second.
  • local connections are clocked down to 2 a second.
  • video is decoded (not rendered or displayed) using idle CPU time only.
  • For backwards compatibility reasons we override the 2 frames/sec frame rate to 8 frames/sec when audio is playing.

For all these reasons, it’s necessary to pause the Flash game or movie when the SWF itself is not focused.

AS3 provides us flash.events.Event.ACTIVATE which is dispatched when Flash Player or an AIR application gains operating system focus and becomes active,and flash.events.Event.DEACTIVATE dispatched when Flash Player or an AIR application loses operating system focus and is becoming inactive.

Using these two listeners, we can quickly create a simple movie with a circle moving from left to right and a pause screen to be added once the game needs to be paused.

1
2
3
4
5
6
7
8
9
10
11
12
13
14
15
16
17
18
19
20
21
22
23
24
25
26
27
28
29
30
31
32
package {
 import flash.display.Sprite;
 import flash.events.Event;
 public class Main extends Sprite {
  private var circle:circleMc;// a simple circle we will move around
  private var pausedMovie:pausedMc;// the pause DisplayObject
  public function Main() {
   pausedMovie=new pausedMc();
   addChild(pausedMovie);
   circle=new circleMc();
   circle.y=100;
   circle.x=-50;
   addChild(circle);
   addEventListener(Event.ACTIVATE,onActivate);
   addEventListener(Event.DEACTIVATE,onDeactivate);
  }
  private function onActivate(e:Event):void {
   addEventListener(Event.ENTER_FRAME,onEnterFrm);
   removeChild(pausedMovie);
  }
  private function onDeactivate(e:Event):void {
   removeEventListener(Event.ENTER_FRAME,onEnterFrm);
   addChild(pausedMovie);
  }
  private function onEnterFrm(e:Event):void {
   circle.x++;
   if (circle.x>690) {
    circle.x=-50;
   }
  }
 }
}

It’s a very basic script, but it works as we expect:

Click on the movie to gain focus, and outside the movie to lose the focus, and see what happens.

Download the source code.

Updated FLV Encoder, 3.5x faster with Alchemy

Updated FLV Encoder, 3.5x faster with Alchemy: "
Thumbnail - Click me
Demo: Record and encode FLV’s from webcam in realtime, using Alchemy

Or, download AIR desktop version

This is an update to FLV Encoder which adds an optional Alchemy routine that’s about 3.5x faster, as well as FileStream support for writing directly to a local file using AIR. The library has been architected in such a way that you can use the package while targeting either the browser (no FileStream support) or AIR, and either Flash 9 (no Alchemy support) or Flash 10 – without getting class dependency errors.

I’ve put the package on Github, along with a couple examples (including the one from the last post). The API has changed a little so be sure to also see the example code below. A method updateDurationMetadata() has been added so the video duration does not have to be declared before the video has been created. Also, a bug where the top-most line of pixels was not being written has been fixed.

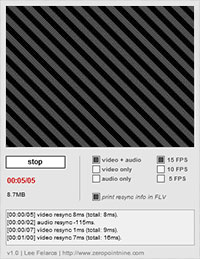
Realtime encoding demo:

Because of the increased speed of the Alchemy version, it is now viable to encode FLV’s in realtime as the audio and video is being captured, at least within certain limits. Click on the thumbnail above for an online demo that encodes webcam video and audio to a file at 320×240 in real time. If your system is fast enough, you can keep the framerate set to 15FPS with minimal hiccups. The browser-based version must store the entire FLV in memory before saving to disk, but the equivalent AIR version can save its contents directly to a file so that the only limiting factor is disk space. I’m using a dynamic timing and queuing system to keep video and audio in sync which could be the topic of another post.

Updated usage examples:

[A] To encode an FLV to a ByteArray, start by instantiating ByteArrayFlvEncoder. The rest is similar to the last version, but you can now call updateDurationMetadata() when you’re done to update the duration property in the metadata. Finally, call kill() to prepare the object for garbage collection [...]

[as3]
var baFlvEncoder:ByteArrayFlvEncoder = new ByteArrayFlvEncoder(myFrameRate);

baFlvEncoder.setVideoProperties(myWidth, myHeight, VideoPayloadMakerAlchemy);
// (Omit the 3rd argument to NOT use Alchemy if you’re targeting Flash 9)
baFlvEncoder.setAudioProperties(BaseFlvEncoder.SAMPLERATE_44KHZ, true, false, true);

baFlvEncoder.start();

baFlvEncoder.addFrame(myBitmapData, myAudioByteArray);
baFlvEncoder.addFrame(myBitmapData, myAudioByteArray); // etc.

baFlvEncoder.updateDurationMetadata();

saveOutMyFileUsingFileReference( baFlvEncoder.byteArray );

baFlvEncoder.kill(); // for garbage collection
[/as3]

[B] To encode an FLV directly to a local file (in AIR), instantiate FileStreamFlvEncoder with a File reference, and open up the exposed FileStream, and then close it when you’re all done:

[as3]
var myFile:File = File.documentsDirectory.resolvePath(“video.flv”);
var fsFlvEncoder:FileStreamFlvEncoder = new FileStreamFlvEncoder(myFile, myFrameRate);
fsFlvEncoder.fileStream.openAsync(myFile, FileMode.UPDATE);

fsFlvEncoder.setVideoProperties(myWidth, myHeight, VideoPayloadMakerAlchemy);
fsFlvEncoder.setAudioProperties(BaseFlvEncoder.SAMPLERATE_44KHZ, true, false, true);

fsFlvEncoder.start();

fsFlvEncoder.addFrame(myBitmapData, myAudioByteArray);
fsFlvEncoder.addFrame(myBitmapData, myAudioByteArray); // etc.

fsFlvEncoder.updateDurationMetadata();

fsFlvEncoder.fileStream.close();

fsFlvEncoder.kill();
[/as3]

A new instance of FlvEncoder should be created for every new FLV to be generated.

If you’re using the Alchemy version, the SWC lives in leelib/util/flvEncoder/alchemy, so be sure add that folder to your project library path. The C++ code is there as well.

Note that the current Alchemy video encoding routine is being done synchronously, which means that although it’s much faster than the regular AS3 version, the main Flash thread must still wait for the Alchemy encoding to be done before continuing. An asynchronous version would allow for a real-time encoding scenario that is more flexible and probably with less ‘dropouts’, and would probably prompt the need an internal queuing system. Anyway, this warrants further development.

- Source code (Github)

Licensed under a Creative Commons Attribution 3.0 License.

"

Monday, March 28, 2011

Beginners OOP & Design Patterns in ActionScript 3.0 Post 1 : Rolls-Royces in the Junk Yard

Beginners OOP & Design Patterns in ActionScript 3.0 Post 1 : Rolls-Royces in the Junk Yard:

C’est magnifique, mais ce n’est pas la guerre. C’est de la folie: French Marshal Pierre Bosquet’s comment after observing the British charge of the Light Brigade. (Bugs Bunny commented, What a bunch of maroons! regarding the same action.) Beginning Where You are Now This is the first in a series of posts that look at working with [...]

Rolling Cubes 3D Puzzle in AS3 Flash - Browser Version

Rolling Cubes 3D Puzzle in AS3 Flash - Browser Version:

Recently, we published at the Android Market an app which is a 3D rendition in AIR of the Rolling Cubes puzzle. Here, we present a web-based version of the puzzle so you can play this very challenging and interesting game on your computer. We provide and discuss complete AS3 source code [...]

Link: Face-tracking and 3D Scene

Link: Face-tracking and 3D Scene:

3D Scene and Face tracking demo

I may be slow on the uptake here, but Mr.doob has some awesome HTML5 and Flash Player showcase pieces over at mrdoob.com. It’s hard to pick a favorite, because they’re all darn impressive, but I’m a fan of the Face-tracking and 3D Scene demo (which I’ve screenshotted above).  It’s based in Flash, because it has to access the computers’ webcam, and is a pretty neat concept.

If it didn’t require the whole webcam-access notification message that makes the whole effect so obvious, I’d definitely want to slide this into loads of projects, just for the hell of it!

"

AS3 vs. JavaScript Performance Followup (March 2011)

AS3 vs. JavaScript Performance Followup (March 2011):

It’s been about 9 months since my last test of AS3 versus JavaScript and there have been several major releases. I’ve held off on an update to this series since the two most widely used browsers—Internet Explorer and Firefox—have been approaching significant new versions. In the meantime, Adobe has released Flash Player 10.2 as we’ve [...]

Sunday, March 27, 2011

Improved Collision Detection

Improved Collision Detection:

Tutorial written by Leo “130x” Cederwall – leo.cederwall [at] gmail.com and edited by Niklas Mårdby (marten@work).

[ edit: My students are working hard on writing tutorials for the add-ons they have coded to the Spawn Engine. Over the next few weeks these tutorials will appear here. //Niklas ]

As you will have noticed, the Spawn Engine uses the hitTestObject which isn’t completely satisfactory when checking collisions between objects in the game. We need an improved collision detection. Let’s start with importing a necessary library. Write at the top of the package where the other imports are.

import flash.geom.Rectangle;

Lets also define a new variable which is the Collision object we will use when checking collisions.

private var collisiondetection:Collision=new Collision();

As you see we are going to use a Collision class. More about this at the end of the tutorial.

Now we need to change a few things in checkBulletEnemyCollissions and checkPickups. We need to replace hitTestObject and use a new function checkCollision instead.

Change ”if ( player.hitTestObject ( enemies[i ] ) )” to ”if ( checkCollision (player, enemies[i] ) )” and ”if ( player.hitTestObject ( pickups[i ] ) )” to ”if ( checkCollision (player, pickups[i] ) )”.

Last thing is to define the checkCollision function by writing:

function checkCollision(target1_mc:MovieClip, target2_mc:MovieClip):Boolean
{
var collisionRect:Rectangle = collisiondetection.getCollision (target1_mc,target2_mc);
if (collisionRect != null && collisionRect.width > 0 && collisionRect.height > 0)
{
return true;
}
else
{
return false;
}
}

[edit: As you see this function has two parameters and returns a Boolean. The two parameters are two MovieClip objects that we call target1_mc and target2_mc. These two could be a bullet and the player or any two movieclips you want to check if they collide. The first thing we do in the function is to create a Rectangle and to set the size of it we use the Collision class function getCollision. Now if the two movieclips are overlapping then the rectangle will have a width and height. If so, return the value true to checkBulletEnemyCollissions or where you called checkCollision from. //Niklas ]

And then also put the Collision.as file in your flash projects directory. The code for that file is below. Credits to Frederik Humblet och Grant Skinner for their work! [...]

The Case of the Disappearing Number

The Case of the Disappearing Number:

On a current project we were experiencing an issue with a specific numeric ID not working correctly. After some exhaustive debugging, it was isolated it to a seemingly bizarre phenomenon that manifests in both AS3 and Javascript: a missing number.

Specifically, we found that the number 10100401822940525 appears to simply not exist in these programming environment. You can test this for yourself, simply trace or log the following statements:
10100401822940524
10100401822940525
10100401822940524+1
Number(“10100401822940525″)
(10100401822940525).toString()

All of the above statements will output “10100401822940524″, when obviously all but the first one should return “10100401822940525″.

Theres no obvious significance to that value. The binary/hex value isn’t flipping any high level bit, and there are no results for it on google or Wolfram Alpha. Additional testing showed the same result with other numbers in this range.

I thought it might be related to the value being larger than the max 32bit uint value, but adding a decimal (forcing it to use a floating point Number) does not help, it simply rounds it up to “10100401822940526″ instead. Number should support much higher values (up to ~1.8e308). I confirmed this with:
Number.MAX_VALUE > 10100401822940526 // outputs true

As it turns out, the issue is a side effect of how Numbers are stored. Only 53bits out of the 64bits in a Number are used to store an accurate value. The remainder are used to represent the magnitude of the value. You can read about this here. So, the maximum accurate value we can store is:
Math.pow(2,53) =
9007199254740992 <
10100401822940525

This means that the precise value is not stored. Knowing this, we can rework our logic to store the value in two uints / Numbers.

Thanks to everyone on Twitter that provided input to this article. I’d name contributors individually, but I had a lot of duplicate responses, and don’t want to leave anyone out.

Thursday, March 24, 2011

AS3 Geom Exporter

AS3 Geom Exporter:

AS3 Geom Class Exporter is a 3DS Max designed script that allows you to directly export 3D models to AS3 classes. Its main benefit is that you don’t need to load and parse a text files (collada, ase, obj, 3ds) anymore. You just have to import the class and create an instance, like you do with usual objects such as plan, sphere and box classes.

The script is compatible with the following AS3-3D engines :

Alchemy Series Part 5: Revenge of the Thiz

Alchemy Series Part 5: Revenge of the Thiz:

This episode is a bit of a catch all for some other random things that we wanted to cover in this series. The hope is, by the time you are done reading this post (along with the last 4) you will be able to start build swcs of other libraries, or even creating your own directly in C. If this ends up being the case, please let us know, we would love to see what you guys make! Anywho, on with the show…

For any of this to make sense, you will probably want to follow along with the code in the example which you can download here:
Example Source

Multiple File Compilation and Linking
While doing my own research on Alchemy, I came across many a forum post asking about compiling and linking C libraries that were comprised of multiple files, as most are. So this week’s example has been split up into multiple files to try and demonstrate the process. In the alchemy folder bundled with the example code, this is a folder called “lib”. In there is a couple of C files and a few Bash scripts. For the purpose of this example, we are going to consider this our Library. In order get our library compiled and ready to link with our Alchemy wrapper we have to complete a few intermediate steps.

The first step is to compile each of the .c files individually and create .o (object) files from them. These object files are what is linked together in the end to create the swc. Since most C libraries out there have lots of files, its probabaly most convenient to create a bash script to handle the compile. In our case its the “compilelib.sh” file.

#!/bin/bash
optLevel=3
 
gcc -I../include -I./ -Wall -O$optLevel -c loopstart.c
gcc -I../include -I./ -Wall -O$optLevel -c cancelstate.c

The first line should look familiar to you from previous posts, but just in case you missed it, it simply tells cygwin to interpret this script with the “bash” shell located at “/bin/bash”. Next we create a variable to make it easy to alter some compile settings without having to edit each line individually. Then we have the now familiar “gcc” calls. The “-I” switches tell gcc to add these folders to its search path when looking for files and definitions, such as (.h) header files. In this case we are telling it to look in the “include” folder one level up, and to also look in its own folder. The “include” folder has our “alcexample.h” file which contains the declarations for our library functions and data structures. The -Wall tells gcc to report all types of warnings while compiling. -O is the compiler optimization setting. At one point I thought the optimization was messing with Alchemy, I was wrong. But I figured it would be good to suggest leaving the variable in there as an example. You could probably do the whole include bit with a var too. Lastly “-c” tells gcc to not run the linker, and just save out the object file. Once those files have been compiled into object files, we need to archive the library together into one file. Thus the “arclib.sh” script:

#!/bin/bash
ar csr exampleLib.a loopstart.o cancelstate.o

To build the archive we use the “ar” program. The command line settings break down like this:
c – create the archive
s – this creates an object file index in the archive which “allows routines in the library to call each other without regard to their placement in the archive” (from ranlib docs)
r – inserts the object file into the archive and replaces duplicates instead of appending

Lastly we feed it the name we want the archive to be called and a list of object files we want included.

At this point we have the library built and archived ready for use in our Alchemy wrapper. So if you pop up one folder level you will see our main Alchemy file, alcexample.c, as well as another Bash script that will finish our build called “compileandlink.sh”:

#!/bin/bash
gcc -I./include -L./lib -lexampleLib -Wall alcexample.c -swc -O3 -o alcexample.swc

This looks very similar to our “compilelib.sh” script, with a couple of notable exceptions. This time we are using the “-L” switch to add a library path to the gcc search path. We then follow that with a “-l” switch and the name of our library. The “-c” has also been replaced by a “-o” and a “-swc”. Which means that gcc will now link the project and create your brand new .swc file :)

So, basically the moral of the story is to build a multi-file library, it takes three steps:
1) Basic library compile to object files
2) Archiving of the .o files to a single archive file (with indicies)
3) Final compile and link

Great, now that we can compile the example, lets jump back into looking at code.

Bound States
So a few posts ago, I had mentioned that the first parameter for the AS3_Function() call was usually NULL, and I at the time didn’t know why. Well, its been figured out :) You can replace this NULL with a pointer to some data of whatever kind you like. This can be a handy shortcut so you don’t have to continuously pass in the pointer address from flash to your function calls when you want to access data within the C code. If you take a look at the alcexample.c file and head down to main(), you will see it looks much like the rest of the examples. However instead of passing NULL into our AS3_Functions we are now passing a pointer to a struct[...]

[Literature] Game Balance ch4 - Cards, Dice, and Other Randomness

[Literature] Game Balance ch4 - Cards, Dice, and Other Randomness:

My notes from course 4 of the Game Balance class of Summer 2010, by Ian Schreiber.

Revealing information (ie which door has a goat rather than a nice car) doubled the winning chance of the door the player did not pick at first. (image from Wikipedia)

Monte Carlo simulation = good way to approximate stats when the maths are too hard.

Dices are used for independent game events: each dice roll is independent of the previous roll. XdY = throw X items that have Y sides at the same time (ex: 1d6 = one 6-sided dice). For custom dices, eg a 6-sided dice with 1-1-1-2-2-3 on the sides: p(1)>p(2)>p(3).
More dice = less random (= smaller std deviation)> Example: p(7) for 1d10 is 1/10, but it is 10/32 for 5d2.

Cards are used for dependent game events: some events may not happen again if they have happened a certain number of times Revealing information as the game goes does not change the odds in previous player choices, but it changes the odds of non-player variables. Famous related problems: Monty Hall's 3 doors or families with at least one boy

Flash Game Development by Example – My book is on the shelves!!

Flash Game Development by Example – My book is on the shelves!!: "

This is a very important day for me and the blog. After about seven months of writing, coding, rewriting and recoding, finally my (first) book is on the shelves!!

The title is Flash Game Development by Example and it’s a complete AS3 guide to the creation of 10 (9 on the book + 1 extra chapter available online) classic games.

Flash Game Development by Example

Following the style of the blog, with games dissected and explained line by line, in the book every feature of the game is explained in deep detail. I just want you to know the chapters initially have been decided to be 11, but due to the high number of pages, we had to drop a chapter. Just imagine how much I went in depth explaining line by line the whole code.

Writing a book is a great milestone in a blogger life, but once the book is published, another challenge awaits me: selling it. Talking with the guys at Packt Publishing, they have set the goal of 2,000 copies sold as a “great achievement”. To show them I am more than great, I want to sell an extra 10%, for a grand total of 2,200 copies.

If you love the blog, if you found it a great resource for improving your programming skills, you can learn a lot more if you buy a copy of the book.

Writing a book is not just creating tutorials for another media, it’s a great experience I will blog about during next days. It made me a better writer.

Now I want to focus on game development and start coding some Flash games to release as soon as possible, but after this summer I’d probably be writing another book.

And now, something about the book itself and its scope:

You can’t call yourself a Flash game developer unless you know how to build certain essential games, and can quickly use the skills and techniques that make them up.

Flash Game Development by Example is an ultra-fast paced game development course. Learn step-by-step how to build 10 classic games. Each game introduces new game development skills, techniques, and concepts. By the end of the book you will have built ten complete games – and have the skills you need to design and build your own game ideas.

The book starts with simple well known puzzle games: Concentration and Minesweeper. After learning the basics of game design you’ll introduce AI with a four-in-a-row game. Then as you build your own versions of old arcade games such as Snake, Tetris, and Astro Panic. The book ends with a collection of modern casual classics[...]

Tuesday, March 22, 2011

FlashGameLicense Blog: We’re Proud to Introduce New Payment Features

FlashGameLicense Blog: We’re Proud to Introduce New Payment Features:

We’re always looking for ways to facilitate transactions and add value for both sponsors and developers. We have a couple of great new ways to do that! First up is ProxyPay.

ProxyPay

In short, ProxyPay is a service to help sponsors and developers get money to each other across different payment systems. For instance, a sponsor can pay us via PayPal, and we can then pay the developer via MoneyBookers or wire transfer.

If you’ve ever experienced the nuances of paying internationally, or if you are an international developer that’s tired of trying to arrange a payment method that will work in your country (and tired of saying “no I can’t take PayPal in my country!”), then you probably see the benefits of ProxyPay right away.

There are modest fees associated with this service, to cover our costs. The most common arrangements (such as the above-mentioned payment via PayPal to MoneyBookers) costs $50 plus the service fees from PayPal and MoneyBookers.

The ProxyPay system has been in beta for some time, so you may already have received payments this way. However, it’s now open to anybody, so developers, feel free to ask sponsors to use ProxyPay to pay you. This page has all the details.

EasyLicense

Sponsors are increasingly needing more and more information from developers in order to license games.  Legally, in most countries, sponsors must collect tax information and have multiple contracts signed between them and the developer before they can sponsor, or even non-exclusively license, a game.  Some larger companies even require upwards of $3million in insurance coverage from the developer.  For indie developers, and even small development companies, these are large hurdles –  sometimes even roadblocks.

This is where EasyLicense comes in to make things… well.. easy!

From the developer’s perspective, EasyLicense allows you to sign one contract, and set up all of your payment information through one company, FGL.  FGL then can sub-license your game out to anyone you choose without you ever having to sign another contract, or hunt down your EIN or W8-Ben, or any number of other aggravating tasks.

From the buyer’s perspective, EasyLicense allows you to work through FGL to license potentially thousands of games without worrying about tax withholding laws and treaties in various countries.  It also allows you to pay out to a single, US, company for all games.  Companies we are currently working with have found this saves them significant amounts of money since their legal and accounting departments rarely need to get involved. This also benefits both sides in our experience as this allows payouts to flow much faster than cases where hundreds of developers are being paid individually.  All contracts also come with $1million in insurance coverage for errors and ommissions, and cyber liability by default, and more can be added if necessary.

Although this service is still in beta, we’re already seeing exciting sponsorship growth through this licensing model. If your company would benefit from this service, please drop us a line and we’ll get you the details.

[Literature] Game Balance ch3 - Transitive Mechanics and Cost Curves

[Literature] Game Balance ch3 - Transitive Mechanics and Cost Curves:

My notes from course 3 of the Game Balance class of Summer 2010, by Ian Schreiber.

An intransitive game is like Rock-Paper-Scissors, where everything is better than something else and there is no single “best” move. In contrast, in transitive games, some elements are just flat out better than others, and we balance that by giving them different costs.

The cost is expressed in terms of game resource(s) (eg money, wood, existing units, items, technology, skills, ...) but can also consist of temporal restrictions (eg single-use constraint on a particular item, or a bonus being limited in time). A player wil pay a cost if she can see benefits to her situation (eg better stats, bonus skill). The goal for the game designer is to reach benefits = cost. In other words, if the weapon is overpowered, then either decrease its power (or any benefit) or increase its price (or any cost). Overpowered <=> undercosted.

A cost curve is a game balance technique designed to put everything in terms of the resource cost. In some games, you can choose to make an increasing, linear or decreasing curve, all of them might be balanced, but they have different effects on the gameplay. In Magic: the Gathering you get one Mana per turn. If you were the designer and you made a cost curve that was increasing, so that each additional point of mana gives you more benefit than the last, you’ll have a game where late-game cards are really powerful and early-game cards are pretty weak, so you’ll have a game that is heavily weighted towards late-game play. If the cost curve is decreasing, it puts more of a focus on the early game. The curve depends on the game duration you expect.

How to build or reverse-engineer a cost curve? [...]

Create a log application using XML and AIR: Part 1

Create a log application using XML and AIR: Part 1:

In this tutorial we will learn how to use XML files with AIR and start creating an application that lets the user write and view logs, that are saved in an XML file.

Firstly, create a button called myWriteButton and an input text field called myText on stage. This is where the user will write his log entries to.

Here is how the code is going to work: we load data from an XML file as a string value, then parse it to an XML object and store it in a temporary local XML object. We do the changes we want to the local XML file, then, when we're ready to save, we simply overwrite the existing file with the new one.

Let's get started. Create a new File object with a reference to the XML file:

var myFile:File = File.documentsDirectory.resolvePath('Air Examples/mylog2.xml');

Create the local XML object:

var localXML:XML;

And set the text field to blank:

myText.text = '';

Now we need to update the XML object with the information from the real XML file, call the getXML() method:

getXML();

Now, the method itself. If the file we linked to exists - read from it and set localXML to that data. If it doesn't exist - create new one with starting and ending tags.

function getXML():void
{
if (myFile.exists)
{
var myStream:FileStream = new FileStream();
myStream.open(myFile, FileMode.READ);
localXML = new XML(myStream.readUTFBytes(myStream.bytesAvailable));
myStream.close();
}
else
{
localXML = <mylog></mylog>;
}
}

Add a listener for the button:

myWriteButton.addEventListener(MouseEvent.CLICK, writeEntry);

The function for the button appends a child to the local XML and updates the XML on the hard drive:

function writeEntry(evt:MouseEvent):void
{
localXML.appendChild(<logentry date={new Date()}>{myText.text}</logentry>);
myText.text = "";
saveXML();
}

To save the XML, we use saveXML() method, which overwrites the existing file or creates a new one if there isn't one already:

function saveXML():void
{
var myStream:FileStream = new FileStream();
myStream.open(myFile, FileMode.WRITE);
myStream.writeUTFBytes(localXML.toXMLString());
myStream.close();
}

Here's the full code[...]

Making a Flash game like Plants Vs Zombies – Step 5

Making a Flash game like Plants Vs Zombies – Step 5:

After a little pause, here we go with the 5th step of the tutorial.

In this step we’ll fix a bug which allowed plants to fire even if there isn’t any enemy coming from the right side, when there’s at least one enemy on the left side, and we’ll see zombies attacking the plants.

First, let me explain some changes: during previous steps, zombiesArray array was used only to count the number of zombies walking in each row. This information isn’t enough for us to know whether the zombies are on the left or on the right side of each plant, so from now on zombiesArray is an array of arrays filled with the names of the zombies walking in each row.

You’ll understand this feature better when we’ll discuss the source code.

To make zombies attack plants, we must stop them once they are on the same tile the plant is placed on.

Let’s see the source code: [...]

Sunday, March 20, 2011

ActionScript 3.0 Saturated Bridge Design Pattern 3: Reuse and Change

ActionScript 3.0 Saturated Bridge Design Pattern 3: Reuse and Change: Double Update

When we think of update and change, typically we think of adding new implementations to existing structures. However, what about tweaking a pattern? If you want to reuse a general pattern (like the Bridge we’ve been discussing), what are the “rules” about changing the pattern? Generally, the purpose of using design patterns is so [...]

Saturday, March 19, 2011

Embedding Assets in AS3

Embedding Assets in AS3:

Getting assets (such as images and sound files) into your AS3 project can be simple, but I ran into a few problems (and nice solutions!) that might help others out too. I thought I’d jot it down into a blog post!

How I used to do it

I use FlashDevelop, and I try to avoid using the Flash IDE for development. I found it incredibly handy, though, that I could copy any asset – even vector art – with a simple drag-and-drop into Flash, and export the whole bundle as an .SWC file.

FlashDevelop is awesome handling SWC files; a simple pair of clicks gives you full access not only to the assets, but any sub-classes and properties the assets may have (as imbued by Flash itself). It’s quite awesome, and it’s how I’ve done everything to-date.

The Problem

There are a few downsides to Flash’s SWC asset library:

  1. Porting to other platforms or languages (that don’t support Flash files) is a pain in the butt; without SWC support you have to re-invent your asset importing routines for each platform.
  2. Even when sticking with Flash, importing assets into Flash that you’ve already separated out into individual files can be annoying and tedious (as opposed to developing all your assets within Flash or Illustrator)
  3. You need to own a copy of the Flash IDE (the Professional version, too, if you want to make commercial projects)

The first item on that list is the one that bugged me the most. No other development environment has a standardized equivalent to the SWC Library; converting your game to any other platform or language suddenly gains an extra hurdle, and requires exporting of assets and all sorts of hoop-jumping.  I know this first hand; there was some problems creating the mobile editions of Steambirds.

When I look at various Flash blitting/game engines, such as Flixel and FlashPunk, and they tend to support sprite sheets, image file imports, and other such “industry standard” ways of doing things. Converting from these engines to – let’s say, iPhone – will be a whole lot easier.

There’s just one little thing standing in the way of me following in their path…

I hate SpriteSheets

SpriteSheets were invented by old console programmers that couldn’t manage their assets with the hardware they had. Instead of making large images, they’d break everything down into sprites – dump them all into a single crammed-in file, and re-construct environments piece-by-piece. This is what gives Super Mario Bros. that square look, and why so many games seemed to be built on a grid.

SpriteSheets nearly require you to make all of your assets the same size, and even if you don’t: Any time you save managing dozens of tiny files will be made up in creating a lookup table (or a map) to your spritesheet [...]

Friday, March 18, 2011

[Literature] Game Balance ch2 - Numerical Relationships

[Literature] Game Balance ch2 - Numerical Relationships:

My notes from course 2 of the Game Balance class of Summer 2010, by Ian Schreiber.

Numbers only have meaning in relation to each other. A few kinds of numerical relationships:

  • identical (1:2:3:4)
  • linear (2:4:6:8)
  • exponential (2:4:8:16)
  • triangular (1:3:6:10)

It is much easier to balance a system when you can put everything in terms of a single central resource. For example in CRPG such as Final Fantasy, everything can be put in terms of HP (gold is used to buy stuff to reduce dmg, hence increasing HP). In 2D platformers, the loss condition is lives (sometimes, it is score), and everything is tied to it.

Mario Bros system Mario Bros relationships

Various loops in CRPG

XP - encounters: more encounters gets you more XP. Your level increases, and so do your stats, which in turn lets you face more encounters. The feedback loop here is not exactly positive, because as the level increases, the number of encounters needed to level up increases (non-linearly) [...]

Create a Flash prototype of The Moops – Combos of Joy

Create a Flash prototype of The Moops – Combos of Joy:

Did you play The Moops – Combos of Joy?

It’s a cute physics game we can build a prototype in a few minutes (don’t worry, Plants Vs Zombies fans, as next step is about to come).

Moops – Combos of Joy screenshot

Let’s see game’s features:

* It’s a physics game so we are using Box2D to create it.

* The player fires a ball with the mouse. The direction can be decided according to mouse position, but power can’t. Player fires balls with the same, predefined speed.

* A series of shapes “fall” down from the top of the stage. Actually they don’t fall because there is no gravity in the game. Let’s say they move from top to bottom at a constant speed.

* When the ball hits a square, the square reacts according to physics, changing its direction and speed, but the ball does not exactly follow physics rules as its speed never changes.

Obviously there are more features in the original game but at the moment we’ll see these ones. Since it’s a long time we don’t deal with Box2D, I am using a line by line approach to explain the code.

This is the script:

1
2
3
4
5
6
7
8
9
10
11
12
13
14
15
16
17
18
19
20
21
22
23
24
25
26
27
28
29
30
31
32
33
34
35
36
37
38
39
40
41
42
43
44
45
46
47
48
49
50
51
52
53
54
55
56
57
58
59
60
61
62
63
64
65
66
67
68
69
70
71
72
73
74
75
76
77
78
79
80
81
82
83
84
85
86
package {
 import flash.display.Sprite;
 import flash.events.Event;
 import flash.events.MouseEvent;
 import flash.utils.Timer;
 import flash.events.TimerEvent;
 import Box2D.Dynamics.*;
 import Box2D.Collision.Shapes.*;
 import Box2D.Common.Math.*;
 public class moops extends Sprite {
  private var world:b2World=new b2World(new b2Vec2(0,0),true);
  private var worldScale:int=30;
  private var timeCount:Timer=new Timer(500);
  public function moops():void {
   timeCount.start();
   debugDraw();
   addEventListener(Event.ENTER_FRAME, update);
   stage.addEventListener(MouseEvent.CLICK,onClick);
   timeCount.addEventListener(TimerEvent.TIMER, onTime);
  }
  private function onClick(e:MouseEvent):void {
   var angle:Number=Math.atan2(mouseX,mouseY-480)-Math.PI/2;
   addball(20*Math.cos(angle),-20*Math.sin(angle));
  }
  private function onTime(event:TimerEvent):void {
   addBox(300+Math.random()*200,-100,40);
  }
  private function addball(xVel:Number,yVel:Number):void {
   var ball:b2BodyDef= new b2BodyDef();
   ball.userData="ball";
   ball.type=b2Body.b2_dynamicBody;
   ball.position.Set(20/worldScale, 460/worldScale);
   var circle:b2CircleShape=new b2CircleShape(15/worldScale);
   var ballFixture:b2FixtureDef = new b2FixtureDef();
   ballFixture.shape=circle;
   ballFixture.friction=0;
   ballFixture.density=1;
   ballFixture.restitution=1;
   var ballBody:b2Body=world.CreateBody(ball);
   ballBody.CreateFixture(ballFixture);
   ballBody.SetLinearVelocity(new b2Vec2(xVel,yVel));
  }
  private function debugDraw():void {
   var debugDraw:b2DebugDraw = new b2DebugDraw();
   var debugSprite:Sprite = new Sprite();
   addChild(debugSprite);
   debugDraw.SetSprite(debugSprite);
   debugDraw.SetDrawScale(worldScale);
   debugDraw.SetFlags(b2DebugDraw.e_shapeBit|b2DebugDraw.e_jointBit);
   debugDraw.SetFillAlpha(0.5);
   world.SetDebugDraw(debugDraw);
  }
  private function addBox(xOrigin:Number,yOrigin:Number,size:Number):void {
   var box:b2BodyDef= new b2BodyDef();
   box.position.Set(xOrigin/worldScale,yOrigin/worldScale);
   box.type=b2Body.b2_dynamicBody;
   var square:b2PolygonShape = new b2PolygonShape();
   square.SetAsBox(size/2/worldScale, size/2/worldScale);
   var boxFixture:b2FixtureDef = new b2FixtureDef();
   boxFixture.shape=square;
   boxFixture.friction=0;
   boxFixture.density=4;
   boxFixture.restitution=1;
   var boxBody:b2Body=world.CreateBody(box);
   boxBody.CreateFixture(boxFixture);
   boxBody.SetLinearVelocity(new b2Vec2(0,5));
  }
  private function update(e:Event):void {
   world.Step(1/30,10,10);
   world.ClearForces();
   world.DrawDebugData();
   for (var currentBody:b2Body = world.GetBodyList(); currentBody; currentBody=currentBody.GetNext()) {
    if (currentBody.GetPosition().y*worldScale>600 || currentBody.GetPosition().y*worldScale<(100*-1)) {
     world.DestroyBody(currentBody);
    }
    if (currentBody.GetUserData()=="ball") {
     var velocity:b2Vec2=currentBody.GetLinearVelocity();
     if (velocity.Length()!=20) {
      var speedOffset:Number=20/velocity.Length();
      currentBody.SetLinearVelocity(new b2Vec2(velocity.x*speedOffset,velocity.y*speedOffset));
     }
    }
   }
  }
 }
}

Let’s see how does it work [...]

Thursday, March 17, 2011

Storing and Loading External Level Data and Information in XML

Storing and Loading External Level Data and Information in XML:

Have you ever accidentally hardcoded information into your program, to later realize it would be easier to not have to compile for small changes?

Storing information in XML allows you an easy way to change parts of your program, without needing to re-compile.

You can store entire levels, character definitions, and directions to artwork from xml.

This enables you to create a fully functioning game or application, and make it easy for yourself or other people to change the content of your program.

This tutorial just shows you how to create an xml file, put information in it, load it using actionscript, and run the program based off the content of the xml.

We will be creating a small “side scrolling” game. It is by no means complete, but should show how you can store game information in XML.

Creating your xml file

The first thing you need to do is create an xml file. If you don’t have a current FlashDevelop Project you are working in, you’ll need to create one.

Next, right click on your ‘src’ folder, and go to ‘Add->New XML File’ and name it ‘data.xml’ and click ‘OK’(you can also create a new text file in explorer, and rename it to .xml).

FlashDevelop sets up a basic xml file:

1
2
3
<data>
 
</data>

Your ‘root node’ has already been created, named ‘data’. You’ll notice that the syntax in xml is very simmilar to html, except that you can declare whatever tags and attributes you want. XML is just a way of organizing your data.

Now we’ll create a couple “basic levels”, and define where some of our art work is located.

1
2
3
4
5
6
7
8
9
10
11
12
13
14
15
16
17
18
19
20
21
22
23
24
25
26
27
28
29
30
31
32
33
34
35
36
37
38
39
40
41
42
43
44
45
46
47
48
49
50
51
52
53
54
55
56
57
58
59
60
61
62
63
64
65
66
67
68
69
70
71
72
<?xml version="1.0" encoding="utf-8" ?>
<data>
 <levels>
  <level name="Red Island">
   <shapes>   
    <shape type="rectangle" x="0" y="0">
     <name>space background</name>
     <width>800</width>
     <height>600</height>
     <color>0x000000</color>
     <is_ground>false</is_ground>
    </shape>
    <shape type="circle" x="0" y="0">
     <name>Star Outline</name>
     <radius>610</radius>
     <color>0xffb400</color>
    </shape>
 
    <shape type="circle" x="0" y="0">
     <name>Star</name>
     <radius>600</radius>
     <color>0xFF0000</color>
    </shape>
    <shape type="circle" x="700" y="20">
     <name>tiny star1</name>
     <radius>2</radius>
     <color>0xFFFFFF</color>
    </shape>
    <shape type="circle" x="720" y="200">
     <name>tiny star1</name>
     <radius>2</radius>
     <color>0xFFFFFF</color>
    </shape>
 
    <shape type="circle" x="300" y="300">
     <name>Moon1</name>
     <radius>100</radius>
     <color>0x3388CC</color>
    </shape>
    <shape type="circle" x="600" y="400">
     <name>Moon2</name>
     <radius>100</radius>
     <color>0x3388CC</color>
    </shape>
 
    <shape type="rectangle" x="0" y="550">
     <name>ground</name>
     <width>800</width>
     <height>50</height>
     <color>0x006666</color>
     <is_ground>true</is_ground>
    </shape>
    <shape type="rectangle" x="250" y="450">
     <name>floating block</name>
     <width>50</width>
     <height>50</height>
     <color>0x006666</color>
     <is_ground>true</is_ground>
    </shape>
   </shapes>
 
   <starting_point x="100" y="300"/>
  </level>
 </levels>
 <entities>
  <entity name="bobby" type="hero">
   <filename>lilguy.png</filename>
   <health>100</health>
   <speed>10</speed>
  </entity>
 </entities>
</data>

Here, I just tried to decide on things from my “game” that I would want to store in xml.
I made an xml tag for “shapes” to go under, and then defined circles and rectangles, based on where I’d want to place them.

These make up an outerspace solar system — a giant red star, a few blue moons close by, and a few stars in the background. I also added two blocks to be used as interactive blocks to stand on.

I also added a “starting position” for out hero to start in our level.

I also created a tag for entities– so we can put enemies, allies, ect in here, but for now I just put the hero player, with a path/ filename to an image I created, and a tag for the health and speed of the character.
To load images externally, they must be in your ‘bin’ folder(or sub-folder) for loading using the ‘Loader’ class, or in your ‘bin’ folder if using an embed tag.

You’ll notice that for some tags I either created a sub tag, or an attribute. It’s really up to your discretion — I could have put filename and speed as attributes on the entity tag, like I did with the name, or I could have made the name attribute a sub-tag/ node.
The only difference is just how you refer to them in your actionscript, as you’ll see in the next part.

Creating Actionscript for loading

Now we need to setup our actionscript to load in the xml, load in any images defined in the xml, and create and setup the level[...]