Welcome to this introduction to working at pixel level with ActionScript 3′s BitmapData object. We’ll take some 2D images, break them into their component pixels, then re-assemble them as 3D images which we can move and rotate.
Final Result Preview
Let’s take a look at the final result we will be working towards:
Step 1: Set up
Just before jumping in let’s take a moment to look at how the sample project is laid out. Opening the source zip for this tutorial you will have sources for each significant step, you can go right ahead and make a copy of the begin folder as this will serve as our starting point.
Inside this folder you’ll find two other folders; src and bin. The src folder is where we will be saving all of our code and FLA files and the bin folder is where the Flash will save the SWF files. Inside the src folder there is the Main.FLA and the Main.AS document class.
If for any reason you find an error in your code, have an attempt to fix it (always good to learn from mistakes) but if you can’t then don’t worry! You can jump right back in and use one of the steps folders in the source zip that is closest to the step you were on.
Step 2: Download Away3D
If you’ve already had a peek of the Main.as file you’ll already notice a few references to Away3D, a 3D framework for Flash. We’re going to need to download this and add it to our project to continue.
You can grab their latest version from the Away3D site.
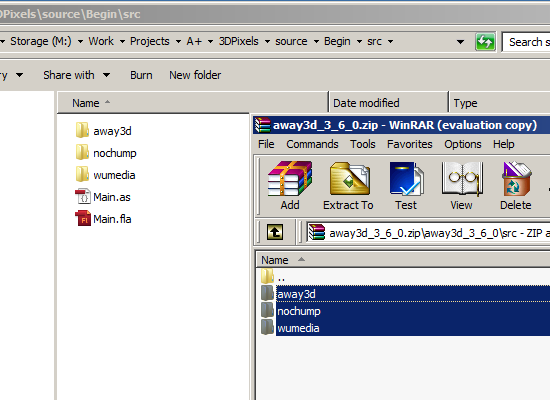
Once this download has completed, open the zip file and inside the away3d_3_6_0\src folder you will find three folders, away3d, nochump and wumedia. Copy these, as shown below to your src folder.
Step 3: The Flash File
If you haven’t already, open Main.fla and Main.as. Looking in the Flash Library you can see an image called 1.png and a MovieClip with an instance name of img1, which will serve as a basic container for the png.
We’re going to perform a quick compile just to make sure we’ve added Away3D correctly. If all goes well we should see a blank Flash movie with a dark grey background and no error messages from Flash.
Step 4: The Main.as File
Examining the Main.as file we can see a few variables that are used in Away3D, there’s already a host of tutorials on Away3D but we’ll quickly recap on these:
// basic Away3D properties
protected var scene:Scene3D;
protected var camera:TargetCamera3D;
protected var view:View3D;
Scene3Dis a space we can use to add 3D objects like cubes and spheres.TargetCamera3Dis one of the many types of cameras available in Away3D, it’s what we use to look at the Scene3D.View3Dis a viewport, often described as the “window” in which we see our scene.
Without going in to specifics you can also see a basic scene is setup ready for use with the initAway3d() method. Notice it adds an ENTER_FRAME EventListener, this simply tells Away3D to render() (or draw) any objects added to the Scene3D each frame.
/**
 * Away3D basic scene setup
 */
private function initAway3d():void
{
    scene = new Scene3D();
    camera = new TargetCamera3D({z: -200});
    view = new View3D({scene:scene, camera:camera});
    addChild(view);

    addEventListener(Event.ENTER_FRAME, renderLoop);
}

/**
 * the render loop
 */
private function renderLoop(event:Event):void
{
    view.render();
}
That’s pretty much it for the introduction to the Main.as class, we’ll be building everything else as we go.
Step 5: Bitmaps and BitmapData
We’re going to jump straight in and introduce these two classes, as we’ll be working with these throughout the tutorial. If you’re new to Bitmap and BitmapData you can think of them as a painters canvas and a collection of paint daubs. They’re entirely different objects but are both connected, the BitmapData contains all pixel information or brush strokes and would be nothing without being painted on to a canvas or in this case, the Bitmap!
Let’s test this out by adding an instance of the img1 MovieClip to the stage and making a copy of it using Bitmap/BitmapData.
Amend the Main.as to the following:
/**
 * constructor
 */
public function Main()
{
    initAway3d();
    drawExample();
}

/**
 * a quick example of BitmapData and Bitmap usage
 */
private function drawExample():void
{
    // create an instance of the img1 object on the stage to copy
    var img:MovieClip = new img1();
    addChild(img);

    // create a BitmapData object with the following parameters: width, height, transparent, color
    var bmpData:BitmapData = new BitmapData(img.width, img.height, true, 0x000000);

    // draws a copy of the img MovieClip in to the BitmapData
    bmpData.draw(img);

    // adds a Bitmap to the stage with the BitmapData (copy of the img1) information to display
    var bmp:Bitmap = new Bitmap(bmpData);
    bmp.y = img.height;
    addChild(bmp);
}
Looking at the drawExample() code, the first two lines simply add the img1 object to the stage, this is the image we will make of copy of.
Following that we create a BitmapData object with the following parameters:
width, the width to make theBitmapDataheight, the height to make theBitmapDatatransparent, whether theBitmapDatashould contain transparent pixelscolor, the background color
As we know the width and height from img1 we have set them directly, as we’re going to need transparency we set the next parameter to true and lastly we specify 0x000000 or black as the background color as it’ll appear transparent until we fill it[...]
No comments:
Post a Comment