Showing posts with label code. Show all posts

Monday, May 7, 2012

Generating Ghosts That Follow in Your Footsteps

Path following is a simple concept to grasp: the object moves from point A to point B to point C, and so on. But what if we want our object to follow the path of the player, like ghosts in racing games? In this tutorial, I’ll show you how to achieve this with waypoints in AS3.


Final Result Preview

Click the SWF, then use the arrow keys to move around. Press space to switch to the ghost, which will follow the path you’ve created.

The Logic Behind Path Following

Let’s suppose the player moves 4 units left and 2 units down from our point of origin. For our ghost to end up in the same location it will have to also move 4 units left and 2 units down from the same point of origin. Now let’s say our player is moving at a speed of 2; for the path following to remain accurate our ghost will also have a speed rate of 2.
What if our player decides to take a pause before continuing on? The obvious solution is for the ghost to keep track of the player’s exact position every tick – but this will involve storing a lot of data. Instead, what we’ll do is simply store data every time the player presses different keys – so if the player moves right for ten seconds, we’ll store the same amount of data as if the player moved right for half a second.
For this technique to work our ghost must abide by the following rules:
  • The ghost and player have the same point of origin.
  • The ghost must follow the exact same path as the player.
  • The ghost should move at the same speed as the player.
  • The ghost has to store the current time each time the player’s motion changes.

Step 1: Setting Up

Start by creating a new Flash file (ActionScript 3.0). Set the width to 480, the height to 320 and frames per second to 30. Leave the background color as white and save the file as CreatingGhosts.fla; lastly set its class to CreatingGhosts.
Before we move into the classes we need to create a pair of MovieClips. Start by drawing two separate 20px squares without a stroke. Convert the first fill to a MovieClip, setting its registration to the center, naming it player and exporting it for ActionScript with the class name Player. Now repeat the same process, except replace the name with ghost and the class with Ghost. Remove these MovieClips from the stage.
Create your document class with the following code:
Read more: Generating Ghosts That Follow in Your Footsteps

Wednesday, April 25, 2012

My ActionScript Game Server with 15,000 Concurrent Connections

Goal

Create a game using ActionScript for both the server side game server and the client side game with the ability for high concurrent (10,000+) socket connections. Make sure memory and performance of the application are up to the task.

What am I talking about?

This blog post will explain how I was able to create a socket server running on a Amazon EC2 ubuntu server with more than 15k+ concurrent connections. This socket server has all the game logic for a game called SpellTraction, which both the server and client are written in ActionScript.
Server: Game built in ActionScript 3 and run as a shell process using a modified redtamarin build. The modified redtamarin has a libev based socket server.
Client: Client game built with ActionScript 3.
To check out a running version of the client go to either:
http://renaun.com/serveras/test/ - this version is driven by other Amazon EC2 instances that are running test scripts to create the 15k+ connections.
or
http://renaun.com/serveras/spelltraction/ - the game with any other player looking at it right now.

Here is a screenshot of the game [...]
Read more: My ActionScript Game Server with 15,000 Concurrent Connections

Monday, April 23, 2012

ActionScript 3.0 Bitmaps, Clones and ColorTransforms

Color Bit TransformLess is More Ever since I started working with mobile devices with Flash and ActionScript 3.0, I’ve been looking for faster ways to move my objects through those little windows on iPhones, Androids and Blackberries. Lag time is huge and the action looks geriatric. I’ve seen some interesting things done with the bitmapped classes, and in previous posts we’ve discussed what may be helpful. However, since I haven’t used them extensively (or fully), I thought it’d be a good idea to walkthrough my thinking on the topic. For a while now I’ve been working on a a Samurai action game, and while I’ve been making progress, I keep looking for speed tweaks. In general my thoughts regarding bitmapped graphics and Bitmap classes can be summed up in Figure 1. If I create a single Bitmap object using the BitmapData objects (or convert graphic files into BitmapData elements) and then clone the object, I should be able to save processing time.
Figure 1: Cloned and Colored
Of course, I have to assume a good deal. First, I assume that processing a single instance of an object and cloning it is more efficient than creating multiple instances of the same object. I got the idea from how Flash originally used symbols over the Internet. You create one symbol and then re-used it. My idea is pretty much the same. Create once; clone many. Second, in order for an object to look like more than a single object, I want to change something about the cloned object. With my simple samurai fighter, I can change its color because it is a Bitmap object. So, first we’ll look at how to create a bitmapped object from scratch using both the Bitmap and BitmapData objects. Making Bitmapped Objects from Code I like drawing bitmapped objects or using digital photography. However, in order to best understand what’s going on, let’s start from scratch with BitmapData objects. Figure 2 shows the fundamentals of creating a bitmapped data object:
BitmapData Figure 2: Implementing BitmapData Object
The ActionScript 3.0 BitmapData object contains a 32-bit integer made up of four 8-bit values (0-255). The first parameter expects a width, the second height—this is the Bitmap shape; a rectangular data matrix. The third parameter is the objects transparency, which has a default value of true (it is transparent). By setting the transparency argument to false, you make the object opaque. The 32-bit integer is the final parameter with the first two hexadecimal values being the alpha value with the final six values expressing an RGB color. The following class provides a basic example: [...]
Read more: ActionScript 3.0 Bitmaps, Clones and ColorTransforms

Monday, March 26, 2012

AIR 3.2 – Making an Endless Runner with Stage3D (Part 1)

With the introduction of AIR 3.2, Adobe has brought Stage3d to mobile devices. This means that flash developers can now leverage direct GPU Acceleration on Mobile Platforms (Android and iOS specifically). While this obviously enables 3d games, it’s also totally a huge boon for 2d games! There are already several 2d frameworks you can choose from which make the gpu quite easy to work with:
My personal favorite right now is ND2D.  So I thought it would be cool to take a look at how you might build an Endless Runner style game with this framework!

Files & Demo

Before we get started here’s some downloads to help you follow along:

Overview

The core classes which will make up this demo are*:
  • Game.as – Root display object, instantiates the other classes, and manages property injection
  • Background.as – Handle parrallax scrolling bg
  • Foreground.as – Handles ground tiles
  • PhysicsManager – Simple Physics engine, processes gravity and collisions
  • PlayerManager – Control Player animations and Keyboard controls
* Note: I’ve never actually built this type of game before. So, my approach may have some issues. However, this is about my 3rd iteration, so it should be ok ;)

Hello World2D

The first step to setting up ND2D is to create your World2D, and assign it an active Scene. In this example we’ll have just one Scene, our main Game: [...]
Read more: AIR 3.2 – Making an Endless Runner with Stage3D (Part 1)

Friday, March 23, 2012

Creation of a rotating room with Flash and Box2D

I was thinking about a game concept which features physics and a rotating room, so I asked to myself how to make a rotating room with Box2D, and what is the best way to do it. These are the three ways I tried. 1 – “Manually” rotating a static room In my first attempt I built a static room with a compound object (see the theory of compound objects in this post), then I rotated the object at every frame. This is the source code: [...]
Read more: Creation of a rotating room with Flash and Box2D

Tuesday, March 13, 2012

fastSort, faster is better!

Today, Jackson Dunstan posted about how to use a profiler to get better performance in flash.
For this post he decided to show how to use TheMiner… awesome!
In this post he’s profiling two sorting method: native vector. sort, and Skyboy’s fastSort code.
At first I was impressed by the result of Skyboy. Then I realized two things.
First, The flash native sort REALY don’t like Number.infinity, negative infinity.
So when sorting and vector. with these values inside, it’s getting a LOT slower.
Where a standard vector could take 100ms to sort, one with infinity values in it can take up to 2000ms!!
The other thing is fastSort is using void (*) pointer everywhere.
So if we go back a few day to my previous (epic) article , we know that this is a really bad thing when casting from void to Number.
It’s allocating a LOT of memory. (5Mo/Sort on 50K elements)
So I decided to add a few hundreds lines to this class with already a lot of it (fastSort)
I added a specific sorting method for int, uint and Number to manage only typed values.
The result is quite amazing!
Native Vector Sort : 100 ms + 400Ko allocation
UnOptimized fastSort : 400 ms + 5Mo allocation
New Optimized fastSort : 20ms + zero allocation
Finaly, just before giving you the code, I want to invite you on a new little forum that focus on Performances, optimization, debugging and multiple other flash hardcore subjects.
Many of the most hardcore dev and blogger I know are already in or are going to join soon, so please be part of this and enjoy posting refreshing and brain teasing content!
The Hardcore flash forum
And now.. the way too many lines of code part: [...]

Read more: fastSort, faster is better!

Friday, March 2, 2012

Build a Classic Snake Game in AS3

In this tutorial I would like to show you how easy it is to create a classic “Snake” game in Flash. I will try to explain everything easily, step by step, so that you can develop the game further to your needs! The Game will be developed in AS3 and I will use the FlashDevelop IDE.


Introduction

The game won’t be complex. Whenever we hit a wall, it will restart the game. After eating an apple the snake will grow, and a ‘new’ Apple will appear. (Actually, it will be the same apple, but I’ll explain this later.)

One of the most important aspects of the game is the code’s reaction to KEY_DOWN events. The snake will only then change its direction after a tick has passed, not immediately after a keypress. This means that, if the snake is going right, and you press down and left very fast, the snake will go down, not down AND left. Without this ‘feature’ the snake would allow us to go left while we are going right, which would mean it hit itself.


Let’s Look at the Game Already!

Let’s take a look at the final result we will be working towards:


Step 1: Creating the Project

In FlashDevelop, create a new Project, and inside the ‘src’ folder create a ‘com’ folder. In the ‘com’ folder create a new class, and call it ‘Element.as’.

Set the dimensions of the project to 600x600px.

The FlashDevelop project structure

Step 2: Wait… What’s an Element?

The snake is make up of blue squares, which I call elements. We will create an Element Class, which draws the element. The red apple is going to be an element too, so we will extend the code with a few more lines.

Therefore we won’t create a new class for the apple. (But if you really want to, you can.)


Step 3: Writing the Element Class

The Element class creates a square. It doesn’t draw it on the stage, it just creates it. The registration point of the element – the position referred to by its x- and y-coordinates – is in the top-left.

After opening the Element.as you will see something like this:

package com
{
 /**
  * ...
  * @author Fuszenecker Zsombor
  */
 public class Element
 {

  public function Element()
  {

  }

 }
}

First we need this to extend the Shape class, so we can use the graphics object to draw the square. After this, create two variables: one for the direction (if it’s part of the snake), and one for the score value (if it’s an apple), and then change the parameters of the constructor function: [...]

Read more: Build a Classic Snake Game in AS3

Friday, December 9, 2011

Create REAL explosions with Box2D

Look at the title… Create REAL explosions with Box2D… keyword: REAL.

This means we will make a Box2D explode into pieces using the basics of Slicing, splitting and cutting objects with Box2D. At the moment it’s just a prototype but it does not need that much optimization.

That’s what we’ll get:

Click the mouse to make the box explode.

Too fast? Get this slow motion example:

As you can see, this is a real explosion.

This is the source code, can you discover how was it possible?

Read more: Create REAL explosions with Box2D

Friday, September 9, 2011

Guide to Mochi Media services – Leaderboards

Once you are able to set up a game with Mochi Media and enable it for live update and connect with Mochi Services and use Link Tracking, it’s time to learn something which will tie players in front of their monitors until they show the world how much they rock: leaderboards.

Mochi Media offers to developers a great set of features, allowing them to create they own leaderboards with all kind of social options.

First things first, so let’s start from the game dashboard, with the Scores section yet to be activated. Click on ACTIVATE and you are ready to enter the world of leaderboards [...]

Read more: Guide to Mochi Media services – Leaderboards

Thursday, September 1, 2011

movieMonitor: an AS3 performance monitor with 10.1 features

Do you want to know how your latest Flash project is performing?

Here is movieMonitor, a little widget useful to display FPS, memory usage, stage size and number of children.

It’s based upon Hi-ReS-Stats by Mr.doob, but I added some new features to fit my needs, using some of the new System properties introduced by Flash Player 10.1

The usage is simple: just add

stage.addChild(new movieMonitor());

And you’re done. You can change stage with any DisplayObject if you want.

Look at this example:

Let’s see what do these figures mean:

FPS: current amount of frames per second (after the “/” you can see the amount of frames per second set in movie properties)

Minute average: the average amount of frames per second in the latest minute

ms per frame: the amount of milliseconds needed to draw the current frame

Direct: the amount of memory (in Megabytes) currently in use that has been directly allocated by Flash Player

Max direct: the maximum amount of memory allocated by the Flash Player so far

Total: the entire amount of memory (in Megabytes) used by the application, including the memory used by the container application, such as the web browser

Garbage: the amount of memory (Megabytes) that is allocated but not in use. This unused portion of allocated memory fluctuates as garbage collection takes place

Width: the width of the stage, in pixels. The width is calculated based on the bounds of the content of the stage (after the “/” you can see the stage width set in movie properties)

Height: the height of the stage, in pixels. The height is calculated based on the bounds of the content of the stage (after the “/” you can see the stage height set in movie properties)

Children: the number of DisplayObjects in the movie.

This is the script [...]

Read more: movieMonitor: an AS3 performance monitor with 10.1 features

Saturday, August 27, 2011

Create a terrain like the one in Tiny Wings with Flash and Box2D – adding textures

If you are following the series about the creation of a Tiny Wings-like terrain, you should know one of the most popular requests once I placed a car running on the hills was how to get rid of the debug draw graphics and use your own textures.

First, you need a seamless texture, or a texture without seam at least horizontally. I suggest you to pick a texture of the same length of the hills (640 pixels in this case) or a texture which width divides the lenght of the hills.

I used a rock texture taken from 40 watt.

Then, as soon as you place the polygons representing the hill slices, you also have to draw on a sprite the same shape you are giving your hill.

This will act as a mask for your seamless texture. And obviously remember to remove both the mask and the texture when they leave the screen to the left side.

This is what you will get:

Use UP and DOWN arrow keys to control the cart, and LEFT/RIGHT to balance it while in the air.

This is the fully commented source code: [...]

Read more: Create a terrain like the one in Tiny Wings with Flash and Box2D – adding textures

Monday, August 22, 2011

Perlin Lines - A Beautiful Art Effect in AS3 Flash

We present two versions of Flash art which is based on a simple principle: allowing lines to be traced out on a Bitmap with changing directions determined by an invisible Perlin noise BitmapData. The examples include grayscale and a colorized version. The results are highly aesthetic. The images can be saved due to our custom and easy to reuse BitmapSaver class. Full source code available for download.

Read more: Perlin Lines - A Beautiful Art Effect in AS3 Flash

Saturday, August 6, 2011

Build a Simple Flash Frisbee Game With AS3

In this tutorial, we’ll build a really simple “keepy-uppy” game. Click the frisbee to send it skyward, then spin it with your mouse to stop it falling to the ground! Collect power-ups to change the size of the disc.

Final Result Preview

Let’s take a look at the final result we will be working towards:


Step 1: Brief Overview

Using pre-made graphic elements we’ll create good looking interface that will be powered by several ActionScript 3 classes.

The user will be able to move a character across the stage, collect upgrade items and beat gravity, you can modify the values in the class to customize the game.


Step 2: Flash Document Settings

Open Flash and create a 320 pixels wide, 480 pixels tall document. Set the Frame rate to 24fps.

Flash Document Settings


Step 3: Interface

Interface Flash Frisbee Game

A colorful nice looking interface will be displayed, this involves multiple shapes, buttons and more.
Most of the graphics we used have been created in previous tutorials so it won’t be necessary to include their creation.


Step 4: Instance Names

keepy uppy frisbee Flash game

The image above shows the Instance Names used in the MovieClips. The ones that start with a Capital Letter are Library Class Names and should not be on stage, there are also two clouds clips above this graphics, they are called clouds and clouds2.


Step 5: Tween Nano

Tween Nano

We’ll use a different tween engine from the default included in flash, this will increase performace as well as it is easier to use.

You can download TweenNano from its official website. Learn how to add it to your project here.

Read more: Build a Simple Flash Frisbee Game With AS3

Monday, July 25, 2011

Fast AS3 MultiMap

Sometimes you need to map a key to many values, but AS3 has no built-in data structure for this purpose. Dictionary and Object are suitable one-to-one maps, but there’s been no one-to-many support until now. Read on for my own one-to-many class—MultiMap—as well as performance testing and analysis. Before writing your own general-purpose class, it’s [...]

Read more: Fast AS3 MultiMap

Monday, July 4, 2011

Slicing, splitting and cutting objects with Box2D – part 3: cutting your own Sprites

In the second part of this series I showed you how to cut Box2D objects.

Unfortunately I was working in the debug draw environment, so the whole process can’t be applied in a real-world example, unless you want to publish a game with the debug draw graphics.

So it’s time to see how to cut your own sprites. This is what you’ll get at the end of this step:

Cut the debug draw polygons to see randomly colored debris fall down. These debris are Sprites generated in real time.

So let’s take a look at the source code, and see what changed since the previous step[...]

Slicing, splitting and cutting objects with Box2D – part 3: cutting your own Sprites

Thursday, May 26, 2011

Generating Digital Audio Using SiON

In this tutorial I’ll be showing you how to get started with SiON, an AS3 software synthesizer library which generates sound using only code.


Final Result Preview

In the end this is what we’re going to obtain:

Click on the darker rectangle area to start/stop the balls movement.


Getting Necessary Files

First you need to get the SiON library. You can download it either as a SWC file or as uncompressed ActionScript files. To do this go to SiON Downloads and select the desired download method.

After you’ve downloaded the source code add it to your global class path.

Notice that on this page you can also download the ASDoc documentation and older versions of the library.

In this tutorial we’ll make use of the well known minimalcomps library, developed by Keith Peters; if you don’t have it go ahead and grab it: minimalcomps.

Also add the minimalcomps library to your global class path and let’s get started.

Note: As always I’ll be using FlashDevelop throughout this tutorial. You can use whatever code editor you like although I recommend sticking with FlashDevelop.


Step 1: What is SiON?

The SiON library is a software synthesizer library built in ActionScript 3.0 and works in Flash Player 10 or higher.

With SiON you can generate dynamic sounds on the run without the need of loading any audio files. Also makes it very easy to synchronize sounds with display objects (eg. object hitting a wall, explosion etc).

From the multitude of features it has I’ll show you the essentials of working with it: using MML (Music Macro Language) data to generate sound, using voice presets and effectors on playing sounds, setting the tempo (BPM), panning and changing volume and lastly I’ll show you how to sync sounds with display objects.


Step 2: Setting up the Project

Let’s start by creating a new project. Open your code editor and create a new ActionScript 3 project [...]

Read more: Generating Digital Audio Using SiON

Wednesday, May 25, 2011

Detecting Key Combos, the Easy Way

Have you ever been amazed at the variety of attacks in fighting games like Mortal Kombat, Super Smash Bros, Soul Calibur and others? Now you can learn how to create an engine to detect key combinations and build your own fighting game as well!


Final Result Preview

Let’s take a look at the final result we will be working towards:

The combos in this demo are: ASDF, AAA, and SSS. Type them!


Step 1: Introduction

Ever wanted to build a fighting game (or any other genre) with lots of combos? In this tutorial we will create a simple class to detect key combos and tell us when a combo has been done by the user. We will also create a very simple graphical interface to let us test our class.


Step 2: Starting a New Project

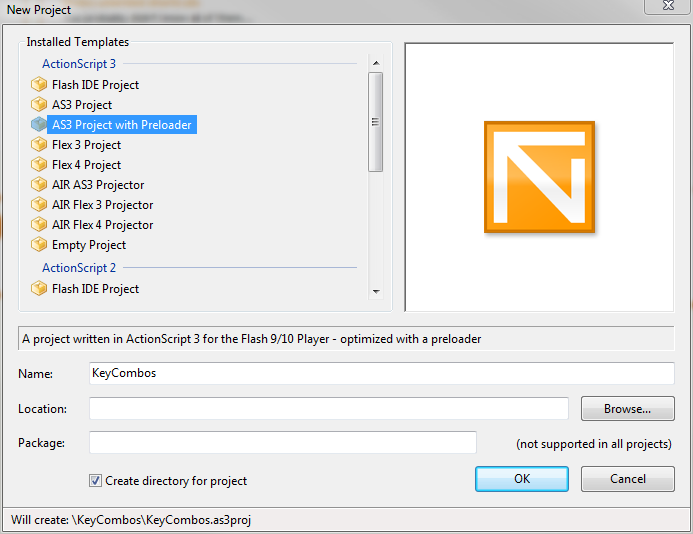
For this tutorial, we will use FlashDevelop‘s pure AS3 project with preloader. We will create a project with a preloader only to make it easy for you if you want to keep working on the final result towards a game. Let’s start by opening FlashDevelop and selecting our project:

Starting a new project on FlashDevelop

With that, we can begin working on our classes.

In order to use the graphics we’ll create in Flash Pro within our AS3 project, we need to export our images from the .fla file to a .swc format. More information about this format can be found in Option 2 of this guide to FlashDevelop. Create a new AS3 FLA in Flash Professional, then change the settings on our .fla file to export its content to a .swc format: go to File > Publish Settings (or press Ctrl+Shift+F12) and check the “Export SWC” box under the “Flash” tab.

Export to SWC option

If you don’t have Flash Professional, don’t worry. I’ve included the final SWC file in the download package for this tutorial. Download it, then skip to Step 6.


Step 3: The Basic Shape of the Button

We will first create all the graphical part and worry only with the code later. Since we will be dealing with key combos, let’s create a button with a letter in it to represent a key. Our button will be very simple: three circles with different colors and some filters in it. That’s how I built mine: a big gray circle with a white circle on top of it, and a red circle on top of the white one. After that, I applied a glow and two drop shadow filters on the red circle in order to get the final result, which is included in the source files.

The button we will use

For more details on how the button was built, grab the source files for this tutorial!


Step 4: Up and Down Images

We now have to give our button “up” and “down” images. Before doing that, we need to turn it into a symbol. Let’s convert it to a symbol, give it a name of KeyButtonImage and export it as “SWCAssets.KeyButtonImage”. We are adding the SWCAssets package in the class name for organization purposes when we start coding. This will be more clear later [...]

Read more: Detecting Key Combos, the Easy Way

Thursday, May 19, 2011

Flash procedural perfect cave generation

Today I’ll show you a procedural way to generate perfect caves, to be used in roguelike games.

The roguelike is a sub-genre of role-playing video games, characterized by randomization for replayability, permanent death, and turn-based movement. Most roguelikes feature ASCII graphics, with newer ones increasingly offering tile-based graphics. Games are typically dungeon crawls, with many monsters, items, and environmental features. Computer roguelikes usually employ the majority of the keyboard to facilitate interaction with items and the environment. The name of the genre comes from the 1980 game Rogue (source).

Please note I said “perfect cave” but I do not mean “better than the rest”, but a cave in which every tile can be reached from any other tile without jumping through walls.

This is the code [...]

Read more: Flash procedural perfect cave generation

Thursday, March 24, 2011

Alchemy Series Part 5: Revenge of the Thiz

Alchemy Series Part 5: Revenge of the Thiz:

This episode is a bit of a catch all for some other random things that we wanted to cover in this series. The hope is, by the time you are done reading this post (along with the last 4) you will be able to start build swcs of other libraries, or even creating your own directly in C. If this ends up being the case, please let us know, we would love to see what you guys make! Anywho, on with the show…

For any of this to make sense, you will probably want to follow along with the code in the example which you can download here:
Example Source

Multiple File Compilation and Linking
While doing my own research on Alchemy, I came across many a forum post asking about compiling and linking C libraries that were comprised of multiple files, as most are. So this week’s example has been split up into multiple files to try and demonstrate the process. In the alchemy folder bundled with the example code, this is a folder called “lib”. In there is a couple of C files and a few Bash scripts. For the purpose of this example, we are going to consider this our Library. In order get our library compiled and ready to link with our Alchemy wrapper we have to complete a few intermediate steps.

The first step is to compile each of the .c files individually and create .o (object) files from them. These object files are what is linked together in the end to create the swc. Since most C libraries out there have lots of files, its probabaly most convenient to create a bash script to handle the compile. In our case its the “compilelib.sh” file.

#!/bin/bash
optLevel=3
 
gcc -I../include -I./ -Wall -O$optLevel -c loopstart.c
gcc -I../include -I./ -Wall -O$optLevel -c cancelstate.c

The first line should look familiar to you from previous posts, but just in case you missed it, it simply tells cygwin to interpret this script with the “bash” shell located at “/bin/bash”. Next we create a variable to make it easy to alter some compile settings without having to edit each line individually. Then we have the now familiar “gcc” calls. The “-I” switches tell gcc to add these folders to its search path when looking for files and definitions, such as (.h) header files. In this case we are telling it to look in the “include” folder one level up, and to also look in its own folder. The “include” folder has our “alcexample.h” file which contains the declarations for our library functions and data structures. The -Wall tells gcc to report all types of warnings while compiling. -O is the compiler optimization setting. At one point I thought the optimization was messing with Alchemy, I was wrong. But I figured it would be good to suggest leaving the variable in there as an example. You could probably do the whole include bit with a var too. Lastly “-c” tells gcc to not run the linker, and just save out the object file. Once those files have been compiled into object files, we need to archive the library together into one file. Thus the “arclib.sh” script:

#!/bin/bash
ar csr exampleLib.a loopstart.o cancelstate.o

To build the archive we use the “ar” program. The command line settings break down like this:
c – create the archive
s – this creates an object file index in the archive which “allows routines in the library to call each other without regard to their placement in the archive” (from ranlib docs)
r – inserts the object file into the archive and replaces duplicates instead of appending

Lastly we feed it the name we want the archive to be called and a list of object files we want included.

At this point we have the library built and archived ready for use in our Alchemy wrapper. So if you pop up one folder level you will see our main Alchemy file, alcexample.c, as well as another Bash script that will finish our build called “compileandlink.sh”:

#!/bin/bash
gcc -I./include -L./lib -lexampleLib -Wall alcexample.c -swc -O3 -o alcexample.swc

This looks very similar to our “compilelib.sh” script, with a couple of notable exceptions. This time we are using the “-L” switch to add a library path to the gcc search path. We then follow that with a “-l” switch and the name of our library. The “-c” has also been replaced by a “-o” and a “-swc”. Which means that gcc will now link the project and create your brand new .swc file :)

So, basically the moral of the story is to build a multi-file library, it takes three steps:
1) Basic library compile to object files
2) Archiving of the .o files to a single archive file (with indicies)
3) Final compile and link

Great, now that we can compile the example, lets jump back into looking at code.

Bound States
So a few posts ago, I had mentioned that the first parameter for the AS3_Function() call was usually NULL, and I at the time didn’t know why. Well, its been figured out :) You can replace this NULL with a pointer to some data of whatever kind you like. This can be a handy shortcut so you don’t have to continuously pass in the pointer address from flash to your function calls when you want to access data within the C code. If you take a look at the alcexample.c file and head down to main(), you will see it looks much like the rest of the examples. However instead of passing NULL into our AS3_Functions we are now passing a pointer to a struct[...]

Tuesday, March 22, 2011

Making a Flash game like Plants Vs Zombies – Step 5

Making a Flash game like Plants Vs Zombies – Step 5:

After a little pause, here we go with the 5th step of the tutorial.

In this step we’ll fix a bug which allowed plants to fire even if there isn’t any enemy coming from the right side, when there’s at least one enemy on the left side, and we’ll see zombies attacking the plants.

First, let me explain some changes: during previous steps, zombiesArray array was used only to count the number of zombies walking in each row. This information isn’t enough for us to know whether the zombies are on the left or on the right side of each plant, so from now on zombiesArray is an array of arrays filled with the names of the zombies walking in each row.

You’ll understand this feature better when we’ll discuss the source code.

To make zombies attack plants, we must stop them once they are on the same tile the plant is placed on.

Let’s see the source code: [...]