We present two versions of Flash art which is based on a simple principle: allowing lines to be traced out on a Bitmap with changing directions determined by an invisible Perlin noise BitmapData. The examples include grayscale and a colorized version. The results are highly aesthetic. The images can be saved due to our custom and easy to reuse BitmapSaver class. Full source code available for download.
Read more: Perlin Lines - A Beautiful Art Effect in AS3 FlashMonday, August 22, 2011

Getting Warmer: Smart Aiming With Heat-Seeking Missiles
In the previous tutorial we had a homing missile chasing after a single target. This tutorial will show you how to convert your homing missiles into heat-seeking missiles for multiple targets.
If you haven’t read the first Homing Missile tutorial, you may download this .zip file, which contains the source code we’ll be starting with on this tutorial.
Final Result Preview
Let’s take a look at the final result we will be working towards:
Step 1: Modify the Cannon Graphic
The only Movie Clip in the Library we’ll need to change is the Cannon, since we’ll make it aim at the closest target before shooting. Remember that 0° of rotation means pointing at the right, so make the graphic accordingly.
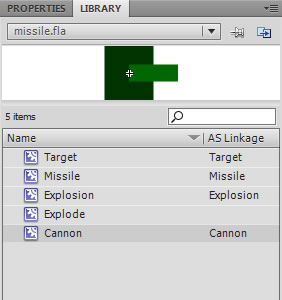
Step 2: Declare Distance Variables for the Cannon
I’m going to reuse the targetX and targetY variables to calculate the distance of the cannon from the target, so I’ll declare them at the beginning of the class instead of inside the playGame function, as well as a new variable to store the calculated distance:
private var missile:Missile = new Missile();
private var speed:int = 15;
private var cannon:Cannon = new Cannon();
private var missileOut:Boolean = false;
private var ease:int = 10;
private var target:Target = new Target();
private var floor:int = 385;
private var gravity:Number = 0.5;
private var targetVY:Number = 0;//Current vertical velocity of the target
private var distance:int;
private var targetX:int;
private var targetY:int;
Now the targetX and targetY variables will be already declared for the playGame function:
private function playGame(event:Event):void
{
    if (missileOut)
    {
        if (missile.hitTestObject(target))
        {
            var explosion:Explosion = new Explosion();
            addChild(explosion);
            explosion.x = missile.x;
            explosion.y = missile.y;
            removeChild(missile);
            missileOut = false;
        }
        else
        {
            targetX = target.x - missile.x;
            targetY = target.y - missile.y;
            var rotation:int = Math.atan2(targetY, targetX) * 180 / Math.PI;
            if (Math.abs(rotation - missile.rotation) > 180)
            {
                if (rotation > 0 && missile.rotation < 0)
                    missile.rotation -= (360 - rotation + missile.rotation) / ease;
                else if (missile.rotation > 0 && rotation < 0)
                    missile.rotation += (360 - rotation + missile.rotation) / ease;
            }
            else if (rotation < missile.rotation)
                missile.rotation -= Math.abs(missile.rotation - rotation) / ease;
            else
                missile.rotation += Math.abs(rotation - missile.rotation) / ease;

            var vx:Number = speed * (90 - Math.abs(missile.rotation)) / 90;
            var vy:Number;
            if (missile.rotation < 0)
                vy = -speed + Math.abs(vx);
            else
                vy = speed - Math.abs(vx);

            missile.x += vx;
            missile.y += vy;
        }
    }
	targetVY += gravity;
    target.y += targetVY;
    if (target.y > floor)
    {
        target.y = floor;
        targetVY = -18;
    }
}
Step 3: Make the Cannon Point Towards the Target
[...]
Getting Warmer: Smart Aiming With Heat-Seeking MissilesFriday, August 19, 2011
Quick Tip: How to Debug an AS3 Error #1009
One of the more common questions I see on forums and get from colleagues is how to debug Error 1009, also known as the “Null Object Reference Error.” Or, as I call it, the “Annoying Mosquito Error From Hell.” It crops up a lot, and unfortunately the error itself does not contain much information about the source of the error. In this quick tip, we’ll take a look at some steps you can take to track down this mosquito and squash it good.
Introduction
This piece is the first followup to the more general “Fixing Bugs in AS3” tutorial. If you wish to better understand some of the techniques in this tip, you may wish to read that in full first.
Step 1: Understand the Error
It’s too bad that Adobe doesn’t (or can’t) provide more information about the root of this error. First of all, it’s rather obtusely worded (much like all of their errors, but this more so than most):
TypeError: Error #1009: Cannot access a property or method of a null object reference
Let’s try to put this in everyday terms. Error 1009 means that you’ve tried to do something with a variable that you assume has a value, but really does not. Flash doesn’t like that. You wouldn’t like it either; imagine you had a glass that you assumed was full of the tasty beverage of your choice, but really was empty. You grab the glass, expecting a refreshing swig, but you feel the disappointing weight of an empty glass instead. That’s your own personal Error 1009.
In ActionScript, if you do this:
var s:String;
trace(s.toUpperCase());
Flash will bum hard (a technical term for “produce an error”) when you run the code. The variable s may have been declared, but its value is null (we never set the value, just declared the variable), so calling the toUpperCase method on it is troublesome.
To be clear, because s is declared as a String, the compiler takes no issue with the code: there is a variable called s, it’s a String, and toUpperCase is a valid method to call on Strings. The error we get is a run-time error, which means we only get it when we run the SWF. Only when the logic is performed do we now get to see how this turns out.
Step 2: Permit Debugging
[...]
Quick Tip: How to Debug an AS3 Error #1009Thursday, August 18, 2011
Flash Game Dev Tip #11 – The Flixel Display List Explained

Tip #11 – The Flixel Display List Explained
This question comes up on the flixel forums so often that I feel it warrants a post of all its own. Flixel 2.5 changed the way in which the game is rendered. And it’s important to know the order of the display objects if you ever want to do anything such as insert a 3rd party API like Flint, or display the Flixel mouse cursor on-top of a Mochi leaderboard.
Flixel Display Objects != Display Objects
If you are familiar with Flash then you’ll know about Display Objects and how using addChild() allows you to parent them for easy grouping. Flixel uses native Display Objects but only for a few key elements. The following illustration explains the parenting involved:
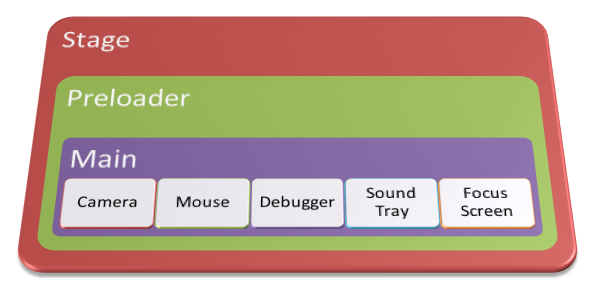
Stage is the root of your SWF and parent of all Display Objects. It will contain your Preloader which itself usually extends a Sprite or MovieClip. This in turn contains Main which in most cases extends FlxGame, which is a Sprite [...]
Flash Game Dev Tip #11 – The Flixel Display List ExplainedWednesday, August 17, 2011
Build a 2D Portal Puzzle Game With Unity: Adding the Portals
At the end of the first part of this series, we had just created a new shader, which will allow us to hide part of the main character’s sprite when it is part-way concealed by a portal. In this part, we’ll put that to use as we create a portal prototype.
Final Result Preview
Let’s take a look at the final result we will be working towards, across the whole of this multi-part tutorial:
Please view the full post to see the Unity content.
Hit the number keys 1-8 to try different levels. The aim is to get the little yellow Roly character to the designated end point, using portal mechanics. The demo shows off a few of the different mechanics we’ll introduce.
It’s going to take us a while to get to that point, though! In this second part of the tutorial, we’ll start work on adding the actual portal objects. Click here to see what we’ll have built by the end of this part.
Step 1: Create a Portal
It’s time to create an early portal prototype. Here’s a texture we’ll use to build it.

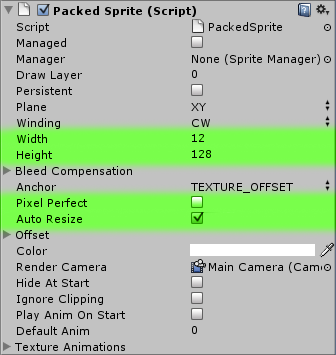
It’s very small, but we will stretch so the portal will look OK. Create a sprite the way you did before, but this time instead of selecting Pixel Perfect, select only Auto Resize. Then change the height of the sprite to 128 and width to 12. Also, you may assign Tiles Material to it.
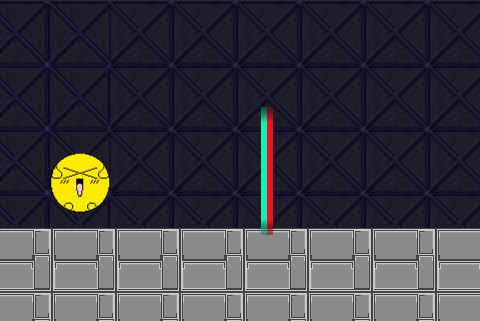
Now add Box Collider to our portal. Do it the same way we did before, but this time let’s check Is Trigger, because we don’t want our collider to be solid, we want the ball to be able to go through it. Also remember to set it’s z size to 30, so all objects on the ground can detect the collision with it.
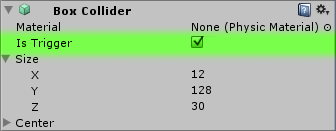
The next thing to do is to create a script and name it Portal. This will be the script we attach to the portal, it will store portal related data, such as a linear equation of an axis, its height and what kind of portal does it lead to. Of course you should place this script in the Game Scripts folder.
Read more: Build a 2D Portal Puzzle Game With Unity: Adding the Portals: "Wednesday, August 10, 2011
Build a 2D Portal Puzzle Game With Unity: Getting Started
In this tutorial (part free, part Premium), you’ll learn how to create a 2D puzzle game in Unity which uses a Portal-style game mechanic to teleport objects across the level. In this first part, we’ll lay out the main concepts of the game, put some graphics together, and get the basic (portal-less) physics working.
Final Result Preview
Let’s take a look at the final result we will be working towards, across the whole of this multi-part tutorial:
Please view the full post to see the Unity content.
Hit the number keys 1-8 to try different levels. The aim is to get the little yellow Roly character to the designated end point, using portal mechanics. The demo shows off a few of the different mechanics we’ll introduce.
It’s going to take us a while to get to that point, though! In this first part of the tutorial, we’ll make a good start.
Important Note: This project does make use of a few commercial Unity plugins: Sprite Manager 2, EZ GUI, and Vectrosity. Also, while the first two parts of the tutorial are free to read, the third and fourth will be available exclusively to our Premium members.
Step 1: Project Overview
When creating your game you never want to jump right away into the code, first, you need an idea.
Some people like to simply start doodling whatever they have on mind, some take a couple of random words and make a concept of the game based on thoughts that gravitate around those. Sometimes you don’t really want to make something new but rather do something that’s already done, but then again, you want to do it your way.
Once you’ve got a pretty clear image of what you want to do, you need to be able to present your idea in a way that other people can see what the heck is this all about. Usually it takes a form of a concept art, a mock up picture, or a quick prototype. Even if you think the idea is great at the beginning, you should look objectively at those concepts and with an eye of a critic review your idea.
If it doesn’t seem very appealing after the review, it surely won’t be later on, it’s better to simply try again with something else. If you still think it is the best game ever, you should show it to your friends, they surely won’t mind a few minutes lost, and their opinions are invaluable because they are given from other perspective than your own.
The game we’re going to make in this tutorial is a 2D puzzle game that uses portals as its core mechanic. I’m sure you checked out the demo above so I don’t really have to explain much. I should probably show here some of my concepts for the game, but unfortunately many of them either weren’t saved or simply weren’t in digital form to begin with, I can present only a couple of them that I found lying here and there [...]
Read more: Build a 2D Portal Puzzle Game With Unity: Getting StartedSaturday, August 6, 2011
Build a Simple Flash Frisbee Game With AS3
In this tutorial, we’ll build a really simple “keepy-uppy” game. Click the frisbee to send it skyward, then spin it with your mouse to stop it falling to the ground! Collect power-ups to change the size of the disc.
Final Result Preview
Let’s take a look at the final result we will be working towards:
Step 1: Brief Overview
Using pre-made graphic elements we’ll create good looking interface that will be powered by several ActionScript 3 classes.
The user will be able to move a character across the stage, collect upgrade items and beat gravity, you can modify the values in the class to customize the game.
Step 2: Flash Document Settings
Open Flash and create a 320 pixels wide, 480 pixels tall document. Set the Frame rate to 24fps.

Step 3: Interface

A colorful nice looking interface will be displayed, this involves multiple shapes, buttons and more.
Most of the graphics we used have been created in previous tutorials so it won’t be necessary to include their creation.
Step 4: Instance Names

The image above shows the Instance Names used in the MovieClips. The ones that start with a Capital Letter are Library Class Names and should not be on stage, there are also two clouds clips above this graphics, they are called clouds and clouds2.
Step 5: Tween Nano

We’ll use a different tween engine from the default included in flash, this will increase performace as well as it is easier to use.
You can download TweenNano from its official website. Learn how to add it to your project here.
Read more: Build a Simple Flash Frisbee Game With AS3
Subscribe to:
Posts (Atom)