Wednesday, September 5, 2012

Constrained mode support

FlashPlayer 11.4 was released recently and now many more users will be able to use  hardware  3D-rendering in Flash. Earlier versions of FlashPlayer 11 support hardware rendering for devices   manufactured after 2008. The constrained mode extends this support to all devices released since 2005. For example, almost one third  of TankiOnline players will be able to use GPU rendering thanks to the constrained mode support. (Around two third of the players already have GPU support and less than ten percent still use the old version of the Flash player that doesn’t support hardware rendering at all) Incidentally, your application should be ready to work in constrained mode as well as FlashPlayer on the user side. This is easy to achieve with Alternativa3D 8.32.

How does it work?

In order to make your application work in constrained mode you just should set the second parameter of stage3D.requestContext3D() when requesting the context, in the following way:
stage3D.requestContext3D(Context3DRenderMode.AUTO, Context3DProfile.BASELINE_CONSTRAINED);
Context3DProfile class appears with API of the 11.4 version of FlashPlayer so you need to update your playerglobal.swc (or use hardcoded string constant – "baselineConstrained"); If you wish to enable constrained mode only if normal hardware rendering is unavailable, you can request the context as usual then check which mode is set and, if after you receive it, the software rendering mode is set, you should request the context again, this time in constrained mode.

What do you get with Alternativa3D in Constrained mode?

[...]
Read more: Constrained mode support

Saturday, September 1, 2012

How To Make Better Games

I don’t get out anywhere near enough these days, so my boss sent me off to the Edinburgh International Technology Festival. I must admit, there was a great mix of presentations over the two days, but it was the gaming related talks that I found of most interest, and I’d like to share some of what I learned. Over the last year or so at WeeWorld, we’ve become increasingly focussed on mobile games development, and I was curious to see if our approach to development was at all similar to what others do. So I was pleasantly surprised to hear from CEO of Denki, Colin Anderson, who gave a great overview of the process that they used when writing their hit iOS game, Quarrel. Reassuringly, it looks like my current project is following a similar path to Denki’s. There was also a huge number of great points from the many other speakers, which I’ll attempt to summarise along with Colin’s suggestions.

90% of games revenue is generated by less than 10% of releases

It’s a sobering thought, but the reality is that very few games actually make any money. There’s nothing more frustrating than spending 6-9 months writing a game that doesn’t sell. Even simple games are expensive to make, so it’s important that you do everything in your power to ensure you create a game that stands a fighting chance of actually recouping it’s costs and then some.

Find fun first

It may seem obvious, but when you hit upon an idea you have to make sure that its core element is fun. Be it in the real world or digital, making games starts with play. It’s a concept we’re all familiar with, as playing and having fun is something we all did as children. And we all invented our own games by making up rules as we played. Of course, some attempts were more successful than others, but games that didn’t engage or entertain us were quickly discarded and forgotten about. Creating video games is really no different. Latch onto a simple concept that’s fun and then apply some rules. And remember, your ultimate goal is to design something for other people. So don’t be selfish; invent with others in mind. And if your idea isn’t fun from the beginning, then it probably never will be.

Fail fast but fail small

The quality of your game doesn’t guarantee success but it’s safe to assume that the better your game, the more chance it has of succeeding. Therefore, if it looks like you’re working on a stinker then it’s better to know this as soon as possible and move onto a different idea. Again think back to when you were a kid. You ever spend months refining a game idea that wasn’t working? Of course not, kids are pretty unforgiving and just quickly move onto something else. Games developers really should do the same. Companies such as Denki takes this very approach. They evaluate their project at various key points and identify as early as possible whether or not their idea is worth continuing with. Here’s roughly how Denki went about developing Quarrel for iPhone:
  1. Started with a simple concept image and statement.
  2. Produced concept art
  3. Developed an internal prototype
  4. Developed an external prototype
  5. Game production
This approach provides ample opportunity to bail out if the idea isn’t working. Early steps in the process are fairly inexpensive compared to the later steps and also take considerably less time to complete. I’m a great believer in rapid prototyping so it was great to see Denki working on two prototypes of Quarrel before committing to the final game. How a player will interact with your game in the real world will be entirely different to what they will do in your head. This point alone makes prototyping critical as you can relatively quickly determine whether it’s worth continuing with your idea. It also gives invaluable feedback that can be used to improve the final game or a second prototype if you choose to continue.

Creatives love to talk more than they like to listen

An audience member had stated that he’d worked with many excellent creative directors over the years, and that not one of them had managed to create a decent game. Speaker, Mark Sorrell, responding to this by saying rather controversially that “Creatives love to talk more than they like to listen”. There’s a lot of truth in what Mark said, but I think it extends to all of us. It’s really important that you aren’t precious with your ideas. If something isn’t working then don’t be afraid to drop it, or at the very least attempt to change it. Of course, when you’re so close to a project, it’s not always easy to tell if something isn’t working, that’s why you really need to listen to others. You’ll get nowhere if you, or your team, decides to work in isolation. At WeeWorld we’ve been making changes to our prototypes based on invaluable user feedback. For our earlier prototype that feedback was purely from those within the company. However, we’ve gradually opened that up to external play testers, which has lead to significant changes being made. User testing is vital, but you still need to make sure you take that feedback on board. It’s all too easy to collect valuable information from user testing and then simply ignore it because it will lead to more work. You also need to learn how to sift through the noise. This is particularly important when you have performed a large number of user tests. You’ll need to focus and identify the common complaints rather than trying to address everything. Ultimately don’t be afraid to admit when an idea of your own isn’t working. The worst thing you can do is push through an idea that negatively impacts a project. I know it sounds like common sense, but it’s something that most of us are guilty of [...]
Read more: How To Make Better Games

Tuesday, August 28, 2012

Using the Composite Design Pattern for an RPG Attributes System

Intelligence, Willpower, Charisma, Wisdom: besides being important qualities you should have as a game developer, these are also common attributes used in RPGs. Calculating the values of such attributes — applying timed bonuses and taking into account the effect of equipped items — can be tricky. In this tutorial, I’ll show you how to use a slightly modified Composite Pattern to handle this, on the fly.

Note: Although this tutorial is written using Flash and AS3, you should be able to use the same techniques and concepts in almost any game development environment.

Introduction

Attributes systems are very commonly used in RPGs to quantify characters’ strengths, weaknesses, and abilities. If you’re not familiar with them, skim the Wikipedia page for a decent overview.
To make them more dynamic and interesting, developers often improve these systems by adding skills, items and other things that affect the attributes. If you want to do this, you’ll need a good system that can calculate the final attributes (taking into consideration every other effect) and handle the addition or removal of different types of bonuses.
In this tutorial, we will explore a solution for this problem by using a slightly modified version of the Composite design pattern. Our solution will be able to handle bonuses, and will work on any set of attributes you define.

What Is the Composite Pattern?

This section is an overview of the Composite design pattern. If you are already familiar with it, you might want to skip to Modeling Our Problem.
The Composite Pattern is a design pattern (a well-known, reusable, general design template) for subdividing something big into smaller objects, in order to create a bigger group by handling only the small objects. It makes it easy to break big chunks of information into smaller, more easily treatable, chunks. Essentially, it’s a template for using a group of a particular object as though it was a single object itself.
We’re going to use a widely used example to illustrate this: think of a simple drawing application. You want it to let you draw triangles, squares and circles, and treat them differently. But you also want it to be able to handle groups of drawings. How can we easily do that?
The Composite Pattern is the perfect candidate for this job. By treating a “group of drawings” as a drawing itself, one could easily add any drawing inside this group, and the group as a whole would still be seen as a single drawing.
In terms of programming, we would have one base class, Drawing, which has the default behaviors of a drawing (you can move it around, change layers, rotate it, and so on), and four subclasses, Triangle, Square, Circle and Group.
In this case, the first three classes will have a simple behavior, requiring only the user input of the basic attributes of each shape. The Group class, however, will have methods for adding and removing shapes, as well as doing an operation on all of them (for example, changing the color of all shapes in a group at once). All four subclasses would still be treated as a Drawing, so you don’t have to worry about adding specific code for when you want to operate on a group.
To take this into a better representation, we can view each drawing as a node in a tree. Every node is a leaf, except for Group nodes, which can have children — which are in turn drawings inside that group.

A Visual Representation of the Pattern

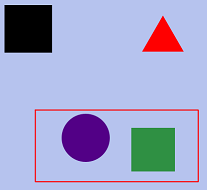
Sticking with the drawing app example, this is a visual representation of the “drawing application” we thought about. Note that there are three drawings in the image: a triangle, a square and a group consisting of a circle and a square:
Using the Composite Design Pattern for an RPG Attributes System
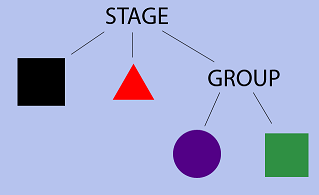
And this is the tree representation of the current scene (the root is the drawing application’s stage):
Using the Composite Design Pattern for an RPG Attributes System
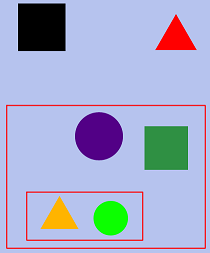
What if we wanted to add another drawing, which is a group of a triangle and a circle, inside the group we currently have? We would just add it as we would add any drawing inside a group. This is what the visual representation would look like:
Using the Composite Design Pattern for an RPG Attributes System
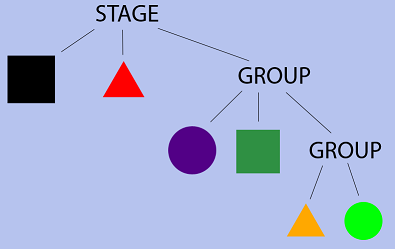
And this is what the tree would become:
Using the Composite Design Pattern for an RPG Attributes System
Now, imagine that we’re going to build a solution to the attributes problem we have. Obviously, we’re not going to have a direct visual representation (we can only see the end result, which is the calculated attribute given the raw values and the bonuses), so we’ll start thinking in the Composite Pattern with the tree representation.

Modeling Our Problem

In order to make it possible to model our attributes in a tree, we need to break each attribute into the smallest parts we can.
We know we have bonuses, which can either add a raw value to the attribute, or increase it by a percentage. There are bonuses which add to the attribute, and others that are calculated after all those first bonuses are applied (bonuses from skills, for example).
So, we can have:
  • Raw bonuses (added to the raw value of the attribute)
  • Final bonuses (added to the attribute after everything else has been calculated)
You may have noticed that we are not separating bonuses that add a value to the attribute from bonuses that increase the attribute by a percentage. That’s because we are modeling each bonus to be able to change either at the same time. This means we could have a bonus that adds 5 to the value and increases the attribute by 10%. This will all be handled in the code.
These two kind of bonuses are only the leaves of our tree. They are pretty much like the Triangle, Square and Circle classes in our example from before.
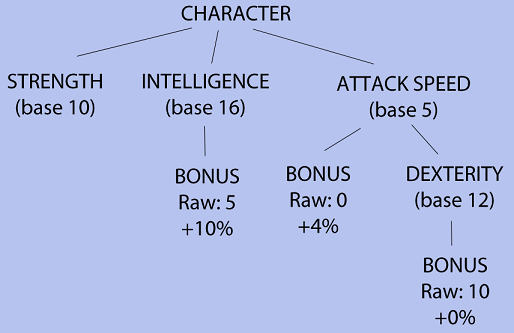
We still haven’t created an entity that will serve as a group. These entities will be the attributes themselves! The Group class in our example will be simply the attribute itself. So we will have an Attribute class that will behave like any attribute.
This is how an attribute tree could look:
Using the Composite Design Pattern for an RPG Attributes System
Now that everything is decided, shall we start our code?

Creating the Base Classes

We will be using ActionScript 3.0 as the language for the code in this tutorial, but don’t worry! The code will be fully commented on afterwards, and everything that is unique to the language (and the Flash platform) will be explained and alternatives will be provided — so if you are familiar with any OOP language, you will be able to follow this tutorial without problems.
The first class we need to create is the base class for any attribute and bonuses. The file will be called BaseAttribute.as, and creating it is very simple. Here is the code, with comments afterwards: [...]
Read more: Using the Composite Design Pattern for an RPG Attributes System

Introducing ASC 2.0

ASC 2.0A few minutes ago we just posted a preview on Adobe Labs of the new ActionScript Compiler (ASC 2.0) as part of the AIR 3.4/FP 11.4 SDK. You can find the complete release notes here. To fully utilize this new AIR 3.4 preview SDK, make sure you use Flash Builder 4.7 Preview also available here, which includes all this, plus things like Concurrency (ActionScript Workers) support for debugging and more.
Here are below the main improvements added to the ActionScript compiler:
  • Flash Builder 4.7 and the ASC 2.0 command-line compiler now share the same code model. This avoids duplicate representations of a program and means the IDE has an accurate representation of the language - matching the compiler.
  • A new multi-threaded architecture allows multiple files to be compiled at once, improving compilation time.
  • Better constant-folding and constant-propagation results in better performing code at runtime.
  • Reduces function overhead by removing unnecessary activation records.
  • Contains some demonstration byte-code optimizations for in-lining and dead code elimination.
  • Non-linear control flow added to AS3 through a new 'goto' keyword.
  • SWF 13 with LZMA compression is now supported.
  • A new symbol management system means Flash Builder 4.7 ActionScript workspaces that mix Flash and AIR projects should incrementally compile much faster.
  • ASC 2.0 based versions of fontswf, optimizer, swfdump and swcdepends command-line tools are available.
  • Legacy versions of asdoc and fdb command-line tools are also still included.
  • Font transcoding has been removed from [Embed] syntax. Fonts should be pre-transcoded and embedded as a SWF, which can be performed using a tool like fontswf or Flash Professional CS6.
  • Relative paths in source code ([Embed] assets, includes, etc...) resolve relatively from the including file. To specify a path relative from a source root, prefix your path with a forward slash '/'.
  • US English compiler error messages have been translated into French, Japanese, and Simplified Chinese. The locale is determined by the JVM and can be overridden using the -tools-locale configuration option.
We also added support for inlining. When the inlining feature is enabled, the compiler will attempt to inline getters, setters and any functions which are decorated with [Inline] metadata. Make sure you also add the -inline compiler argument.
A function can be inlined when the following constraints are met:
  • The function is final, static or the containing scope is file or package
  • The function does not contain any activations
  • The function does not contain any try or with statements
  • The function does not contain any function closures
  • The function body contains less than 50 expressions
Below are some basic examples of functions which the compiler will and won't be able to inline.
Read more: Introducing ASC 2.0

Friday, August 10, 2012

Intro to AS3 Workers (Part 3): NAPE Physics + Starling!

In part 1 of this series we looked at the basic message protocol for AS3 Workers, and a simple hello world.
In part 2, we looked at an example of performing imageProcessing in a seperate thread.
In this final installment, I’ll show how you can run your Physics entirely on a seperate thread, and we’ll also throw in a little Starling to the mix as some icing on the cake :)
Here’s an example of what we’re making:


Note: If you can’t see the SWF, make sure you have downloaded Flash Player 11.4. Chrome user’s, don’t forget to disable the old version.

As a comparison, here’s an optimized Haxe Demo rendered in CPU mode with Physics done in the main thread:
http://deltaluca.me.uk/docnew/swf/StressPyramid.html
On most computers the single threaded test will struggle to reach >45fps. With the CPU completely maxed out. Even if you do manage to hit 60fps because you have a super fast CPU, you;re still totally maxed out, you would have no more room at all to do anything else in your game. Contrast that to the Worker implementation, where the main thread is doing virtually nothing on the CPU. It spends <1ms on de-serializing the data, and a couple more pushing a bunch of vertex's to Starling. It has so much free time it's taking a smoke break!

Overview

First a quick overview of how this will work:
  • The Nape simulation will live entirely inside a Worker thread
  • The Main Thread will make calls on the Worker Thread when it wants to add a new Physics Body
  • Each frame, the Worker Thread will copy the position data of all bodies into a shared ByteArray
  • The Main Thread will read the position data from the ByteArray, and use it to update the on-screen Sprites
We’ll start by looking at the document class, and the messages that it sends to the Worker. Then we’ll look at the Worker which contains the actual physics code.

Document Class

The first step is to setup our worker and some message channels so we can talk.
At this point you should be familiar with this boiler-plate code for a Worker-based application: [...]
Read more: Intro to AS3 Workers (Part 3): NAPE Physics + Starling!

Tuesday, August 7, 2012

Intro to AS3 Workers (Part 2): Image Processing

In Part 1 of my Intro to AS3 Workers series I looked at the fundamentals of AS3 workers, including the various communication methods, and showed an example of a simple Hello World worker. In this next post, I’ll take it a step further and show how you can start doing something useful, like image processing! In this case, I’ll be applying a Sharpen Filter to a large bitmap, while the main UI thread continues to render at 30fps. First a demo. In order to view these swf’s:
DEMO: Single-Threaded Here you can take a look at what we’re going to make. This version does not use workers, and you can see that the slider locks up completely as the image is processed:
Make sure you have downloaded and enabled Flash Player 11.4.
DEMO: Multi-Threaded Here is the same demo, but using a Worker. You can see the UI renders at a smooth 30fps:
Make sure you have downloaded and enabled Flash Player 11.4.

The Code

Before actually jumping into the code, it’s important to plan ahead. Especially when dealing with concurrency, we really need to create an efficient system for marshaling data between the workers, otherwise your main thread will begin to bog down due to the heavy cost of serializing and de-serializing data. After a bit of a thought, I decided to architect the app like so:
  • The bitmapData would be shared with the worker using  a shareable byteArray
  • We will use the bitmapData.setPixels(), and bitmapData.copyPixelsToByteArray() API’s to convert the bitmap > byteArray, and vice versa.
  • The main thread will issue “SHARPEN” commands to the worker, and the worker will send “SHARPEN_COMPLETE” when it’s done
  • The worker will use a 500ms timer to check whether it needs to run a new Sharpen operation. This prevents excessive Sharpen operations.
The Document Class First up is the constructor, here we’ll use the same loaderInfo.bytes trick as we did in the last tutorial. This constructor is run twice, the second instance is the worker, and it creates a SharpenWorkerinstance which will handle all communication back to the main thread [...]
Read more: Intro to AS3 Workers (Part 2): Image Processing

Saturday, August 4, 2012

Intro to AS3 Workers: Hello World

With the beta release of AIR 3.4 and Flash 11.4, Adobe has introduced one of the most requested API’s for years: Multi-threading!
With AS3 workers it’s now very easy to create true multi-threaded applications with just a few lines of code. The API is fairly straightforward, and they’ve done some very handy things like a new ByteArray.shareable property to share memory between worker’s, and a new BitmapData.copyPixelsToByteArray API for quickly converting bitmapData to ByteArray.
In this post I’ll go through the various components of the Worker API, and we’ll look at a simple little HelloWorker application.
If you would like to follow along, you can download the FlashBuilder Project Files:

So what is a worker?

Put simply a worker is just another SWF that’s running alongside your main SWF. For a an in depth background check out Thibault Imbert’s excellent writeup.
To create a worker you call WorkerDomain.current.createWorker()  function and pass it the bytes of a SWF.
There’s currently 3 ways to generate these SWF bytes:
  1. Use the loaderInfo.bytes of the main SWF, and check the Worker.current.isPrimordial property inside your document class’s constructor. This is the quickest way to create a worker, and has the advantage of instant testing-debug cycle.
     
  2. Publish a SWF file, and [Embed] it in your main project. This will have tooling support in FlashBuilder 4.7, but until then it’s quite cumbersome. Everytime you change the code in your worker, you must re-export the SWF, this gets annoying pretty quick!
     
  3.  Use Worker From Class a new Library which allows you to create workers directly from Classes. This looks like the most optimal solution right now, but does  introduce a couple of external dependencies in your project.
     
In this initial tutorial I’m going to focus on the first method, using our own loaderInfo.bytes. This is the quick and dirty way to do it. In a follow up tutorial I’ll take a look at Worker From Class.
For a great tutorial on method #2 check out Lee Brimelow’s video’s part 1 and part 2.

Lets talk.

In any multi-threaded scenario communication is key. Transferring memory from one thread to another is expensive, and sharing memory takes careful planning and consideration. Much of the challenge in implementing a worker system comes from finding the right architecture for sharing data to and from your workers.
To help us out Adobe has given us a few simple (but flexible) ways to send messages.

worker.setSharedProperty() / worker.getSharedProperty()

This the simplest but most limited way to pass values around. You can call worker.setSharedProperty(“key”, val) to set things, and WorkerDomain.current.getSharedProperty(“key”) to get them on the other side. You can store both simple and complex objects here, but for most cases the data is serialized, it’s not actually shared. If a value changes on one end, it will not be updated on the other until you call share/get again.
The exception is if you pass a ByteArray with byteArray.shareable=true, or a MessageChannel. Coincidentally, these are the other two methods of communication :)

MessageChannels

MessageChannels are like one way conduits from one worker to another, and they’re event based. So, you will call channel.send() on one end, and channel.receive() on the other. To know when a new message has arrived, you just listen on the channel for Event.CHANNEL_MESSAGE. Messages are queued up and received in the order they were sent.
MessageChannels are shared using worker.setSharedProperty(), and can be shared throughout as many workers in your Application as you would like, but they only ever have one destination. As such, it seems to be a good convention to name them by their receiver, ie channelToWorker or channelToMain
An important limitation to both MessageChannel and sharedProperties, is that the data is serialized when it is sent. That means it needs to be deconstructed, transferred, and reconstructed on the other side. This can be costly. Due to this limitation, these API’s are best used for transfering small amounts of data intermittently. Ideally just simple strings or numbers.
So what if you do need to share a huge chunk of data? The answer is a shareable ByteArray…

byteArray.shareable

The fastest way to transfer data is to not transfer it at all!
Thankfully Adobe has given us the ability to share a ByteArray directly. Since we can store virtually anything inside a ByteArray, this is extremely powerful. To share a byteArray, you set  byteArray.shareable=true and then use messageChannel.send(byteArray) or worker.setSharedPropert(“byteArray”, byteArray) to share it.
Once your byteArray is shared, you can write into it, and read from it on the other end instantly. Beautiful :)
That is basically all there is to it. As you can see, there are 3 distinct ways to share data, and you could combine them in many many different ways. Now that we’ve gone over the structure, lets look at a simple Hello World.

Sample Application

First, in order to get your projects compiling, you’ll need to do a couple things:
  • Download the latest AIR 3.4 SDK, or playerglobal.swc file, make sure your project is using them.
  • Add compile flag “swf-version=17″ to your project
  • Install FlashPlayer 11.4 standalone debugger
With that, you should now see the various Worker related API’s such as Worker, WorkerDoman, MessageChannel etc. If you’re having trouble with this, check out the first couple minutes of Lee Brimelow’s video where he walks through setup.
You can also just download a copy o my FlashBuilder Project which should just work.

Step 1 – The Document Class

First we’ll need to create our document class: [...]
Read more: Intro to AS3 Workers: Hello World