In
my previous article, we looked at
Tiled Map Editor as a tool for making levels for your games. In this tutorial, I’ll take you through the next step: parsing and rendering those maps in your engine.
Note: Although this tutorial is written using Flash and AS3, you should be able to use the same techniques and concepts in almost any game development environment.
Requirements
Saving in XML Format
Using the TMX specification we can store the data in a variety of ways. For this tutorial we will be saving our map in the XML format. If you plan on using
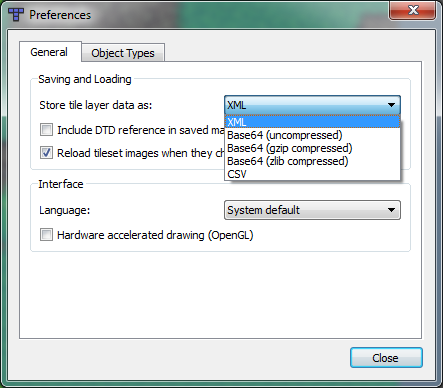
the TMX file included in the requirements section you can skip to the next section. If you made your own map you will need to tell Tiled to save it as XML. To do this, open your map with Tiled, and select Edit > Preferences… For the “Store tile layer data as:” dropdown box, select XML, as shown in the image below:
Now when you save the map it will be stored in XML format. Feel free to open the TMX file with a text editor to take a peek inside. Here’s a snippet of what you can expect to find:
<map version="1.0" orientation="orthogonal" width="20" height="20" tilewidth="32" tileheight="32">
 <tileset firstgid="1" name="grass-tiles-2-small" tilewidth="32" tileheight="32">
  <image source="grass-tiles-2-small.png" width="384" height="192"/>
 </tileset>
 <tileset firstgid="73" name="tree2-final" tilewidth="32" tileheight="32">
  <image source="tree2-final.png" width="256" height="256"/>
 </tileset>
 <layer name="Background" width="20" height="20">
  <data>
   <tile gid="13"/>
   <tile gid="2"/>
   <tile gid="1"/>
   ...
  </data>
 </layer>
 <layer name="Top" width="20" height="20">
  <data>
   <tile gid="0"/>
   ...
  </data>
 </layer>
 <objectgroup name="Collision" width="20" height="20">
  <object x="287" y="354" width="127" height="60"/>
 </objectgroup>
</map>
As you can see, it simply stores all the map information in this handy XML format. The properties should mostly be straightforward, with the exception of
gid – I will go into a more in-depth explanation of this later on in the tutorial. Before we move on, I would like to direct your attention to the
objectgroup “
Collision” element. As you may recall from the
map creation tutorial, we specified the collision area around the tree; this is how it is stored. You can specify power-ups or player spawn point in the same manner, so you can imagine how many possibilities there are for Tiled as a map editor!
Core Outline
Now here’s a brief rundown on how we will be getting our map into the game:
- Read in the TMX file.
- Parse the TMX file as an XML file.
- Load all the tileset images.
- Arrange the tileset images into our map layout, layer by layer.
- Read map object.
Reading in the TMX File
As far as your program is concerned, this is just an XML file, so the first thing we want to do is read it in. Most languages have an XML library for this; in the case of AS3 I will use the
XML class to store the XML information and a
URLLoader to read in the TMX file.
xmlLoader=new URLLoader();
xmlLoader.addEventListener(Event.COMPLETE, xmlLoadComplete);
xmlLoader.load(new URLRequest("../assets/example.tmx"));
This is a simple file reader for
"../assets/example.tmx". It assumes that the TMX file is located in your project directory under the “assets” folder. We just need a function to handle when the file read is complete:
private function xmlLoadComplete(e:Event):void {
   xml = new XML(e.target.data);
   mapWidth = xml.attribute("width");
   mapHeight = xml.attribute("height");
   tileWidth = xml.attribute("tilewidth");
   tileHeight = xml.attribute("tileheight");
   var xmlCounter:uint = 0;

   for each (var tileset:XML in xml.tileset) {
      var imageWidth:uint = xml.tileset.image.attribute("width")[xmlCounter];
      var imageHeight:uint = xml.tileset.image.attribute("height")[xmlCounter];
      var firstGid:uint = xml.tileset.attribute("firstgid")[xmlCounter];
      var tilesetName:String = xml.tileset.attribute("name")[xmlCounter];
      var tilesetTileWidth:uint = xml.tileset.attribute("tilewidth")[xmlCounter];
      var tilesetTileHeight:uint = xml.tileset.attribute("tileheight")[xmlCounter];
      var tilesetImagePath:String = xml.tileset.image.attribute("source")[xmlCounter];
      tileSets.push(new TileSet(firstGid, tilesetName, tilesetTileWidth, tilesetTileHeight, tilesetImagePath, imageWidth, imageHeight));
      xmlCounter++;
   }
   totalTileSets = xmlCounter;
}
This is where the initial parsing is taking place. (There are a few variables we will keep track of outside this function since we will use them later.) Once we have the map data stored, we move onto parsing each tileset. I’ve created a class to store each tileset’s information. We’ll push each of those class instances in an array since we will be using them later:
public class TileSet
{
   public var firstgid:uint;
   public var lastgid:uint;
   public var name:String;
   public var tileWidth:uint;
   public var source:String;
   public var tileHeight:uint;
   public var imageWidth:uint;
   public var imageHeight:uint;
   public var bitmapData:BitmapData;
   public var tileAmountWidth:uint;

   public function TileSet(firstgid, name, tileWidth, tileHeight, source, imageWidth, imageHeight)
   {
      this.firstgid = firstgid;
      this.name = name;
      this.tileWidth = tileWidth;
      this.tileHeight = tileHeight;
      this.source = source;
      this.imageWidth = imageWidth;
      this.imageHeight = imageHeight;
      tileAmountWidth = Math.floor(imageWidth / tileWidth);
      lastgid = tileAmountWidth * Math.floor(imageHeight / tileHeight) + firstgid - 1;
   }
}
Again, you can see that
gid appears again, in the
firstgid and
lastgid variables. Let’s now look at what this is for.
Understanding “gid“
For each tile, we need to somehow associate it with a tileset and a particular location on that tileset. This is the purpose of the
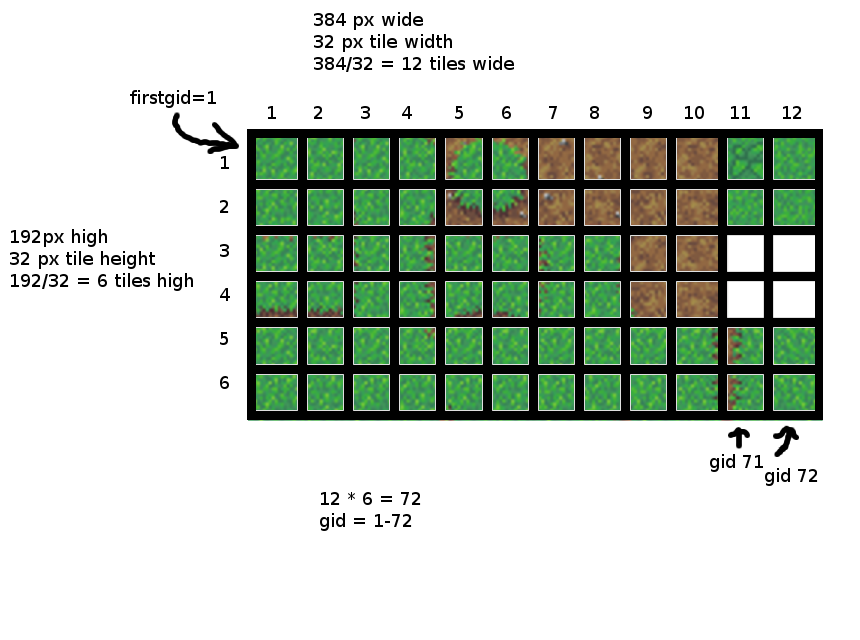
gid. Look at the
grass-tiles-2-small.png tileset. It contains 72 distinct tiles:
We give each of these tiles a unique
gid from 1-72, so that we can refer to any one with a single number. However, the TMX format only specifies the first
gid of the tileset, since all of the other
gids can be derived from knowing the size of the tileset and the size of each individual tile. Here’s a handy image to help visualize and explain the process.
So if we placed the bottom right tile of this tileset on a map somewhere, we would store the
gid 72 at that location on the map. Now, in the example TMX file above, you will notice that
tree2-final.png has a
firstgid of 73. That’s because we continue counting up on the
gids, and we don’t reset it to 1 for each tileset. In summary, a
gid is a unique ID given to each tile of each tileset within a TMX file, based on the position of the tile within the tileset, and the number of tilesets referred to in the TMX file.
Loading the Tilesets
Now we want to load all the tileset source images into memory so we can put our map together with them. If you aren’t writing this in AS3, the only thing you need to know is that we’re loading the images for each tileset here:
// load images for tileset
for (var i = 0; i < totalTileSets; i++) {
   var loader = new TileCodeEventLoader();
   loader.contentLoaderInfo.addEventListener(Event.COMPLETE, tilesLoadComplete);
   loader.contentLoaderInfo.addEventListener(ProgressEvent.PROGRESS, progressHandler);
   loader.tileSet = tileSets[i];
   loader.load(new URLRequest("../assets/" + tileSets[i].source));
   eventLoaders.push(loader);
}
[...]
Read more: Parsing and Rendering Tiled TMX Format Maps in Your Own Game Engine
 Image adapted from Craig Reynolds’ article